Fujitsu FI 4220C Quick Installation Guide
Fujitsu FI 4220C - Document Scanner Manual
 |
View all Fujitsu FI 4220C manuals
Add to My Manuals
Save this manual to your list of manuals |
Fujitsu FI 4220C manual content summary:
- Fujitsu FI 4220C | Quick Installation Guide - Page 1
or Windows NT R 4.0, perform the procedure in to complete the installation. Manual CD-ROM FUJITSU TWAIN32 Scanner Driver CD-ROM FUJITSU ISIS Scanner Driver CD-ROM Adobe R Acrobat R 5.0 CD-ROM AC cable AC adapter fi-4220C Quick Installation Guide FUJITSU ISIS Scanner Driver Quick Installation - Fujitsu FI 4220C | Quick Installation Guide - Page 2
installing Image Capturing Software Utilities "ScandAll 21" for Microsoft R Windows R. 7 Scanning documents Confirm whether the scanner works normally, as follows. 1. Place a document on the ADF paper chute. For details on how to load documents, see " 3 BASIC SCANNER OPERATIONS" in the "fi-4220C
-
 1
1 -
 2
2
 |
 |

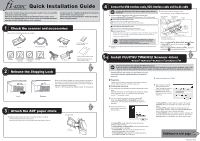
Release the Shipping Lock
2
Make sure to slide the shipping lock in place (located on the bottom of
the scanner) to secure the internal carrier unit during transportation.
After transporting and placing the scanner, tilt the scanner (approx. 30
degrees) and release the shipping lock.
See the "fi-4220C Image Scanner Operator's Guide" for further details.
Check the scanner and accessories
1
Confirm that all of the following items are included.
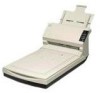
Scanner
ADF paper chute
USB interface cable
fi-4220C Image Scanner
Operator's Guide
Continued on next page
Carefully read the "fi-4220C Image Scanner Operator's
Guide" before using this product.
Particularly read and understand the "Safety Precautions"
before using this product.
Quick Installation Guide
Attach the ADF paper chute
3
1.
Holding the ADF paper chute, insert it so that the two tabs on the chute
slot into the holes on the rear of the scanner.
Attach the ADF paper chute so that the side with the side guides is face up.
Connect the USB interface cable, SCSI interface cable and the AC cable
4
1.
Connect either the USB interface cable or the SCSI interface cable.
When using
Windows
R
95
,
Windows NT
R
4.0
,connect the SCSI interface cable.
Connecting the USB interface cable
1
Connect the PC end of the USB interface cable to the PC.
2
Connect the scanner end of the USB interface cable to the scanner.
Connecting the SCSI interface cable
1
Connect the PC end of the SCSI
interface
cable to the PC.
2
Connect the scanner end of the SCSI
interface
cable to the scanner.
3
Check the SCSI ID switch.
The SCSI ID switch is set to No. 5. If another device has the same ID then change the SCSI
ID. Refer to the "fi-4220C Image Scanner Operator's Guide" for information about the
procedure to change the SCSI ID.
2.
Connect the AC adapter with the AC Cable, and then connect it to the DC inlet on the
Scanner.
Caution
Confirm that the power of PC and the image scanner device is
turned off.
•
When using
Windows
R
98
,
Windows
R
Me
,
Windows
R
2000
or
Windows
R
XP
, perform the procedure in step
to
complete installation.
•
When using
Windows
R
95
or
Windows NT
R
4.0
, perform the
procedure in
to complete the installation.
• It is necessary to separately purchase a SCSI interface cable and a
SCSI card which are available commercially. See "fi-4220C Image
Scanner Operator's Guide" for details.
•
Connect the scanner so that it is the terminator SCSI device.
3.
Insert the AC cable into the power outlet.
Next, install the FUJITSU TWAIN32 Scanner driver.
Caution
P3PC-E057-03EN
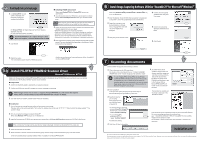
Install FUJITSU TWAIN32 Scanner driver
5
-a
Windows
R
98,Windows
R
Me,Windows
R
2000,Windows
R
XP
Install the mini-driver first, and then the TWAIN data source.
If the old version of FUJITSU TWAIN32 Scanner driver has been installed on your personal computer, refer to the
"Scanner Utility for Microsoft
R
Windows
R
User's Guide" on the Scanner driver CD-ROM, and
update the mini-driver.
Caution
The Windows
R
XP screen samples are shown below. The screen
and operations will differ slightly depending on the OS that is
being used.
Preparation
Confirm that the Scanner is connected to your personal computer
with the USB interface cable or SCSI interface cable.
Installing the mini-driver
1.
Turn on the power by pushing the power switch on the scanner's control
panel.
The green LED on the control panel lights. The Function No. display
shows to the order "8","P","0","1". When Function No. display
reaches "1" the scanner is ready.
2.
Turn on your personal computer and log on to Windows
R
.
When using
Windows
R
2000
or
Windows
R
XP
log on as an
administrator . The "Found New Hardware Wizard" dialog box is
displayed.
3.
Check "Install from a list or
specific location (Advanced)",
then click [Next].
For
Windows
R
Me,
check "Specify the location of the driver
(Advance)", then click [Next].
For
Windows
R
2000
and
Windows
R
98
, clicking on [Next] the select
search method screen is displayed.
• For
Windows
R
98
, select "Search for the best driver for your
devise. (Recommended)" then click [Next].
• For
Windows
R
2000
, select "Search for a suitable driver for my
device (Recommended)" then click [Next].
4.
Insert the Scanner driver CD-ROM
5.
Select "Search for the best
driver in these locations".
Check "Include this location in
the search:" then specify
D:\Driver2
(When your CD-
ROM is the D drive). After that
click [Next].
For
Windows
R
98
, just check "Specify a location:" then specify
D:\Driver2
(When your CD-ROM is the D drive). After that click
[Next].
For
Windows
R
Me
, select "Search for the best driver for your
device." Check "Specify a location" then specify
D:\Driver2
(When
your CD-ROM is the D drive). After that click [Next].
For
Windows
R
2000
, just check "Specify a location" and then in the
next screen specify "Copy manufacturer's files from:" then specify
D:\Driver2
(When your CD-ROM is the D drive), then click [OK].
ADF paper chute
tab
Side guide
Lock
Release
DC inlet
USB interface cable(*1)
SCSI interface cable(*1)
AC cable(*2)
Refer to the "fi-4220C Image Scanner Operator's Guide" when you would like
to know more about the scanner.
Refer to the "Scanner Utility for Microsoft
R
Windows
R
User's Guide" on the
Scanner driver CD-ROM when you would like to know more detailed information
about the FUJITSU TWAIN32 Scanner driver installation.
SCSI interface
connector
USB interface
connector
*1) Connect to your PC.
*2) Connect to the power outlet.
FUJITSU TWAIN32
Scanner Driver
CD-ROM
Manual
CD-ROM
Adobe
R
Acrobat
R
5.0
CD-ROM
AC adapter
AC cable
fi-4
2
20C Quick Installation Guide
FUJITSU ISIS Scanner
Driver
Quick Installation Guide
FUJITSU ISIS
Scanner Driver
CD-ROM