Fujitsu T4215 Battery Charger User's Guide - Page 4
Battery Capacity, Charging Time - ac adapter
 |
View all Fujitsu T4215 manuals
Add to My Manuals
Save this manual to your list of manuals |
Page 4 highlights
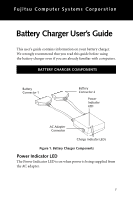
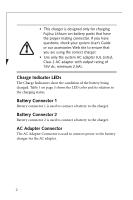
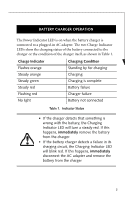
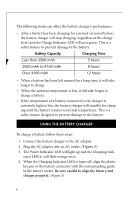
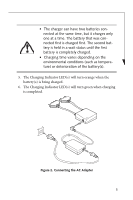
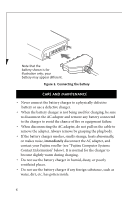
The following items can affect the battery charger's performance: • After a battery has been charging for a period (as noted below), the battery charger will stop charging (regardless of the charge level) and the Charge Indicator LED will turn green. This is a safety feature to prevent damage to the battery. Battery Capacity Charging Time Less than 2500 mAh 5 hours 2500 mAh to 4100 mAh 8 hours Over 4100 mAh 12 hours • When a battery has been left unused for a long time, it will take longer to charge. • When the ambient temperature is low, it will take longer to charge a battery. • If the temperature of a battery connected to the charger is extremely high or low, the battery charger will standby for charging until the battery returns to normal temperature. This is a safety feature designed to prevent damage to the battery. USING THE BATTERY CHARGER To charge a battery, follow these steps: 1. Connect the battery charger to the AC adapter. 2. Plug the AC adapter into an AC outlet. (Figure 2) 3. The Power Indicator LED will light up and the Charging Indicator LED(s) will flash orange once. 4. When the Charging Indicator LED(s) turns off, align the plastic key pin of the battery connector with the corresponding guide in the battery socket. Be very careful to align the battery and charger properly. (Figure 3) 4
-
 1
1 -
 2
2 -
 3
3 -
 4
4 -
 5
5 -
 6
6 -
 7
7 -
 8
8 -
 9
9 -
 10
10 -
11
-
12
 |
 |