Garmin Alpha 10 Owners Manual - Page 10
Acquiring Satellite Signals, Calibrating the Compass, Dog Collar Device Setup
 |
View all Garmin Alpha 10 manuals
Add to My Manuals
Save this manual to your list of manuals |
Page 10 highlights
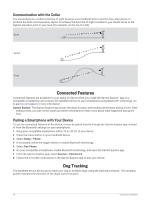
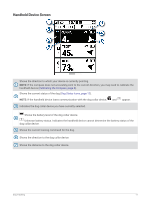
Acquiring Satellite Signals NOTICE This device is intended for outdoor use only. Satellite reception requires a clear line of sight to the sky. GPS accuracy may be affected if you use the device indoors. Both the dog collar device and the handheld device must acquire satellite signals before you put the dog collar device on your dog. Acquiring satellite signals can take a few minutes. 1 Go outdoors to an open area. 2 Turn on both devices (Turning On the Device, page 5). 3 On the handheld device, select a paired collar with the Thumb Stick controller. When the dog collar device has acquired satellite signals, the status LED flashes a double-blink or triple-blink in green. When the handheld device has acquired satellite signals and communicated with a paired dog collar device, it displays status information for the dog collar device (Handheld Device Screen, page 11). Calibrating the Compass NOTICE Calibrate the electronic compass outdoors. To improve heading accuracy, do not stand near objects that influence magnetic fields, such as vehicles, buildings, and overhead power lines. You should calibrate the compass after moving long distances or experiencing temperature changes. 1 Press the menu button. 2 Select Calibrate Compass. 3 Follow the on-screen instructions. Dog Collar Device Setup Methods to Add a Dog Collar Device to a Handheld Device You must add the dog collar device to the handheld device. You can add up to 20 devices to one handheld device by using MURS/VHF, entering the track and control codes, or by sharing wirelessly using ANT+® technology. Up to 20 devices can be active at one time. Using MURS/VHF: Allows you to add a dog collar device after you have placed the dog collar device into pairing mode by pressing the power key. This method is helpful when you are adding a new accessory collar to the system prior to leaving for the hunt (Adding a Dog or Contact Using Wireless Pairing, page 7). Entering the track and control codes: Allows you to add a dog collar device that you do not own and that is not in the area. The dog's owner must determine if you can only track the dog or can track and control the dog. This method requires the dog's owner to find and communicate the codes to the person adding the dog collar device. This method is helpful when you would like to add a dog collar device during a hunt, but you are not near the dog. For example, you are adding another member of your hunting party's dog collar device to your handheld device, but you do not own the dog collar device (Adding a Dog Using the Track and Control Codes, page 8). NOTE: This feature varies based on dog collar device type and feature availability in your area. You may see track codes only or track and control codes. 6 Dog Collar Device Setup
-
 1
1 -
2
-
3
-
4
-
 5
5 -
 6
6 -
 7
7 -
 8
8 -
 9
9 -
 10
10 -
 11
11 -
 12
12 -
 13
13 -
 14
14 -
 15
15 -
16
-
17
-
18
-
19
-
20
-
21
-
22
-
23
-
24
-
25
-
26
 |
 |
