Garmin Alpha 300/300i Owners Manual
Garmin Alpha 300/300i Manual
 |
View all Garmin Alpha 300/300i manuals
Add to My Manuals
Save this manual to your list of manuals |
Garmin Alpha 300/300i manual content summary:
- Garmin Alpha 300/300i | Owners Manual - Page 1
Alpha® 300i with Training Owner's Manual - Garmin Alpha 300/300i | Owners Manual - Page 2
in the content of this manual without obligation to notify any person or organization of such changes or improvements. Go to www.garmin.com for current updates and supplemental information concerning the use of this product. Garmin®, the Garmin logo, Alpha®, ANT®, ANT+®, City Navigator®, inReach - Garmin Alpha 300/300i | Owners Manual - Page 3
6 Iridium® Satellite Network 6 Activating the Device 6 Dog Collar Device Setup 7 Methods to Add a Dog Collar Device to a Handheld Device 7 Adding a Dog to the Alpha Navigator Using Wireless Pairing 7 Sharing a Dog Wirelessly 8 Adding a Dog Using the Track and Control Codes 8 VHF Radio - Garmin Alpha 300/300i | Owners Manual - Page 4
Garmin Messenger App 24 Syncing inReach Data 24 Contact Tracking 24 Turning On and Off the Transmitter..... 25 Methods to Add a Contact to a Handheld Your Contact ID 26 Updating a Contact ID 26 Hunting with the Alpha System....... 27 Marking Your Truck Location 27 Marking a Covey 27 Active - Garmin Alpha 300/300i | Owners Manual - Page 5
Information 39 Viewing E-label Regulatory and Compliance Information 39 Support and Updates 40 Product Updates 40 Device Care 40 Cleaning the Device 40 Cleaning the Touchscreen 40 Specifications 41 Alpha Handheld Device Specifications 41 Dog Collar Device Specifications..... 41 Battery - Garmin Alpha 300/300i | Owners Manual - Page 6
- Garmin Alpha 300/300i | Owners Manual - Page 7
Important Safety and Product Information guide in the product box for product warnings and other important information. Setting Up the Alpha System Before you can use the Alpha system, you must set up the devices. 1 Charge the handheld device (Charging the Handheld Device, page 4). 2 Charge the dog - Garmin Alpha 300/300i | Owners Manual - Page 8
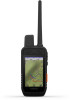
Satellite antenna VHF radio antenna Mounting spine microSD® memory card slot (under battery) Battery cover D-ring USB port (under weather cap) Alpha Device Keys Power key Customizable training keys Training up Training down Training enter SOS key (under protective cap) 2 Getting Started - Garmin Alpha 300/300i | Owners Manual - Page 9
Dog Collar Device NOTE: Your dog collar device may look different than the device pictured. VHF antenna GPS antenna Power button Contact points Status LED Flashing beacon LEDs Installing the Battery Pack 1 Turn the D-ring counter-clockwise, and pull up to remove the cover. 2 Locate the metal - Garmin Alpha 300/300i | Owners Manual - Page 10
area before charging or connecting to a computer. NOTE: The device does not charge when it is outside the approved temperature range (Alpha Handheld Device Specifications, page 41). You should fully charge the battery before you use the device for the first time. Charging a fully depleted - Garmin Alpha 300/300i | Owners Manual - Page 11
when the collar is charging. 4 After the status LED turns solid green, remove the charging clip from the collar. Turning On the Device • On the handheld device, press the power button. • On the dog collar device, hold the power button until the status LED flashes and the collar beeps. Turning Off - Garmin Alpha 300/300i | Owners Manual - Page 12
handheld Alpha 300i device, including messaging, SOS, tracking, and inReach Weather, you must activate it. 1 From your computer or smartphone, go to explore.garmin.com to create an account and activate a service plan. 2 Turn on the device. 3 Select Activate. 4 Follow the on-screen instructions - Garmin Alpha 300/300i | Owners Manual - Page 13
the hunt (Adding a Dog to the Alpha Navigator Using Wireless Pairing, page 7). Entering your hunting party's dog collar device to your handheld device, but you do not own the dog . 3 Select Pair Collar, and follow the on-screen instructions. 4 After successfully adding the dog collar device, enter - Garmin Alpha 300/300i | Owners Manual - Page 14
can share data wirelessly over ANT+, you must bring your Alpha handheld device within 3 m (10 ft.) of the other handheld device. 1 Select Dog List. 2 Select the dog third party antenna or an antenna not approved by Garmin®. Go to www.garmin.com/tracking-legal for details about the performance and - Garmin Alpha 300/300i | Owners Manual - Page 15
you can create a group, you must pair one or more dog devices to your handheld. 1 Select Dog List. 2 Select . 3 If necessary, select Create Group, type, the collar must be turned on and within range of the handheld device. 1 Select Dog List. 2 Select a dog. 3 Select > Change Dog Type. 4 Select - Garmin Alpha 300/300i | Owners Manual - Page 16
dog. 3 Select > Change ID. 4 Select an available ID. If another handheld device is tracking this dog, for best results, remove the dog from the device, dog collar device (Methods to Add a Dog Collar Device to a Handheld Device, page 7), and acquire satellite signals (Acquiring Satellite Signals, - Garmin Alpha 300/300i | Owners Manual - Page 17
3 Tighten the strap so that it is snug around the dog's neck, and fasten the buckle. NOTE: The collar should fit tightly and should not be able to rotate or slide on the dog's neck. The dog must be able to swallow food and water normally. You should observe your dog's behavior to verify that the - Garmin Alpha 300/300i | Owners Manual - Page 18
Sleep Mode. 4 Select an option: • Select Sleep to enter sleep mode. • Select Wake to exit sleep mode. Using the Channel View Both your Alpha handheld navigator and dog collar device broadcast data over individual channels. Channels are identified using unique IDs. You can update your ID to maintain - Garmin Alpha 300/300i | Owners Manual - Page 19
Tracking Your Dog on the Map Before you can track a dog on the map, you must add it to the handheld device (Adding a Dog to the Alpha Navigator Using Wireless Pairing, page 7). You can view the dog's location on the map. 1 From the home screen, select . 2 If necessary, select and to zoom - Garmin Alpha 300/300i | Owners Manual - Page 20
map. Reducing the duration of the track can reduce the clutter on the map. Changing the map does not affect the tracks stored in the handheld device. 1 Select > Map > Tracked Devices > Dog Tracks on Map. 2 Select a time frame. Location Alerts Location alerts notify you when your dogs enter or exit - Garmin Alpha 300/300i | Owners Manual - Page 21
to remove the alert. Enabling Dog Data Broadcast By default, the handheld device does not broadcast dog data to compatible devices. You can enable needs. This manual provides some basic guidelines for training, but each dog has unique training needs. When used properly, the Alpha training system - Garmin Alpha 300/300i | Owners Manual - Page 22
collar training. You do not need to, and should not, apply this intensity selection test again. After you begin training, the dog's performance guides your intensity selection. As the dog advances in training, you may need to change the level depending upon the training situation. 16 Dog Training - Garmin Alpha 300/300i | Owners Manual - Page 23
Customizing the Training Keys You can assign an application, device action, or utility to a training key. If a compatible dog collar is paired, you can also add a dog training command to a training key. You can add multiple pages of training key settings. For example, this is useful when training - Garmin Alpha 300/300i | Owners Manual - Page 24
early can lead to problems in the future. inReach Features WARNING Before you can use the inReach features of your Alpha 300i device, including messaging, recipients. Check-in messages must be set up on the Garmin Explore™ website at explore.garmin.com. 1 Select inReach > Messages > Send Check-In. - Garmin Alpha 300/300i | Owners Manual - Page 25
Quick Text. NOTE: You can add and edit quick text messages on the Garmin Explore website. • To write a custom message, select Type Message. 3 of the listen to receive messages. You can force a check for messages by manually checking for messages, sending a message, or sending a track point. During a - Garmin Alpha 300/300i | Owners Manual - Page 26
, if your recipient has an older model cell phone that does not support viewing maps or is outside of a mobile data coverage area and cannot Alpha 300i device to record track points and transmit them over the Iridium satellite network at the specified send interval. Track points appear on the Garmin - Garmin Alpha 300/300i | Owners Manual - Page 27
use your Alpha 300i device to contact the Garmin ResponseSM center to request help. Pressing the SOS button sends a message to the Garmin Response team, of your rescue, an updated location is sent to the emergency response service every minute. To conserve battery power after the first 10 minutes, - Garmin Alpha 300/300i | Owners Manual - Page 28
. Canceling an SOS Request If you no longer need assistance, you can cancel an SOS request after it is sent to the emergency response service. 1 Lift the protective cap, and hold the SOS button. 2 Select Cancel SOS. 3 When prompted to confirm your cancellation request, select Cancel SOS. Your device - Garmin Alpha 300/300i | Owners Manual - Page 29
is ready to use. Connected Features Connected features are available for your Alpha device when you connect the device to a wireless network or a open the Garmin Explore app. 4 From the Garmin Explore app, select Devices > Pair Device. 5 Follow the on-screen instructions in the Garmin Explore app to - Garmin Alpha 300/300i | Owners Manual - Page 30
Messenger or Garmin Explore app. 2 Wait while your data syncs. TIP: You can check the connection status on the Device tab in the app. Contact Tracking You can track other hunters so you know where they are at all times. You can also send messages to your contacts. One Alpha handheld device can - Garmin Alpha 300/300i | Owners Manual - Page 31
Pairing Before you can add a contact wirelessly, you should be near the contact's handheld device. 1 Select Dog List > . 2 Select an option: • On your handheld device select Add > Pair Handheld, and follow the on-screen instructions. • To add a contact by receiving the information from the contact - Garmin Alpha 300/300i | Owners Manual - Page 32
is not yet assigned to another device in the area. Each time a contact changes their contact ID, you must update the contact ID in your handheld device (Updating a Contact ID, page 26). Updating a Contact ID If a contact has changed their contact ID, you can quickly update the contact ID in your - Garmin Alpha 300/300i | Owners Manual - Page 33
when you are hunting with the Alpha system. • Mark your truck's location , the number of birds taken, and select OK. 3 Review and edit location information (optional). 4 Select Save. Active the active hunt time and distance traveled for your handheld device and each paired dog collar device. It also - Garmin Alpha 300/300i | Owners Manual - Page 34
as name, elevation, and depth. You can add a .gpx file that contains waypoints by transferring the file to the GPX folder (Connecting the Handheld Device to a Computer, page 44). Marking Your Current Location 1 Select Mark Waypoint. 2 Select an option: • Select New. • Select a default location name - Garmin Alpha 300/300i | Owners Manual - Page 35
Select Waypoint Manager. 2 Select a waypoint. 3 Select > Average Location. 4 Move to the waypoint location. 5 Select Start. 6 Follow the on-screen instructions. 7 When the confidence status bar reaches 100%, select Save. For best results, collect 4 to 8 samples for the waypoint, waiting at least 90 - Garmin Alpha 300/300i | Owners Manual - Page 36
Editing a Route 1 Select Navigation > Route Planner. 2 Select a route. 3 Select Edit Route. 4 Select a point. 5 Select an option: • To view the point on the map, select Review. • To change the order of the points on the route, select Move Up or Move Down. • To insert an additional point on the route - Garmin Alpha 300/300i | Owners Manual - Page 37
automatically starts recording your path as a track when it is turned on and has acquired satellite signals. You can pause and start recording manually. 1 Select Track Manager > My Track. 2 Select an option: • To control the current track recording, select the current track tab. • To view data - Garmin Alpha 300/300i | Owners Manual - Page 38
> Use. 3 Move the pin to another location on the map. Compass The handheld device has a 3-axis, tilt-compensated compass. You can use a bearing pointer or > > Calibrate Compass > Start. 2 Follow the on-screen instructions. Navigating with the Bearing Pointer When navigating to a destination, - Garmin Alpha 300/300i | Owners Manual - Page 39
Calibrating the Barometric Altimeter You can calibrate the barometric altimeter manually if you know the correct elevation or the correct barometric Track > > > Altimeter Setup > Calibrate Altimeter. 3 Follow the on-screen instructions. Navigating to a Point on the Plot 1 Select Track Manager > My - Garmin Alpha 300/300i | Owners Manual - Page 40
Applications Additional device features can be found in the applications. You can customize the main menu to display additional applications (Customizing the Main Menu, page 36). Setting a Proximity Alarm Proximity alarms alert you when you or your dogs are within a specified range of a particular - Garmin Alpha 300/300i | Owners Manual - Page 41
Imagery. • To download premium maps and activate your Outdoor Maps+ subscription for this device, select Check Subscription. NOTE: Go to garmin.com/outdoormaps for information about purchasing a subscription. 3 Select > Layer Information to view details about the map layers (optional). 4 Select Add - Garmin Alpha 300/300i | Owners Manual - Page 42
Deleting a Map You can remove maps to increase the available device storage. 1 Select Map Manager > Outdoor Maps+. 2 Select a map. 3 Select > Delete. Customizing Your Device Customizing the Main Menu 1 From the main menu, select > Main Menu > Main Menu. 2 Select an option: • To move a menu item, - Garmin Alpha 300/300i | Owners Manual - Page 43
by turning off the screen when the backlight times out (Turning On the Handheld Battery Save Mode, page 42). Appearance: Sets the displayed accent colors for Display > Accessibility. Touch Sensitivity: Sets the touchscreen sensitivity. Review Text Size: Adjusts the size of the text. Scroll Controls - Garmin Alpha 300/300i | Owners Manual - Page 44
Advanced Map Settings Select > Map > Advanced. Orientation: Adjusts how the map is shown on the page. North Up shows North at the top of the page. Track Up shows your current direction of travel toward the top of the page. Automotive Mode shows an automotive perspective with the direction of travel - Garmin Alpha 300/300i | Owners Manual - Page 45
: Allows you to enable or disable the inReach remote function and device verification. NOTE: You can pair a compatible Garmin device and use it to remotely send messages from your Alpha device. Changing the Units of Measure You can customize units of measure for distance and speed, elevation, and - Garmin Alpha 300/300i | Owners Manual - Page 46
maps for your handheld device and compatible dog collar device using Garmin Express™. • Go to support.garmin.com for FAQs, videos, and more information. Product Updates On your computer, install Garmin Express (www.garmin.com/express). This provides easy access to these services for Garmin devices - Garmin Alpha 300/300i | Owners Manual - Page 47
Specifications Alpha Handheld Device Specifications Battery type Rechargeable, replaceable lithium- Contact your local waste disposal department to properly recycle the batteries. 2 Only for use with Garmin part number 361-00053-04. 3 The device withstands incidental exposure to water of up to - Garmin Alpha 300/300i | Owners Manual - Page 48
a location with a temperature outside the long-term storage temperature range can significantly reduce its recharging capacity. When you do not plan to use the handheld device for several months, the battery should be removed. Stored data is not lost when the battery is removed. When you do not plan - Garmin Alpha 300/300i | Owners Manual - Page 49
newer. Installing a Memory Card WARNING Do not use a sharp object to remove user-replaceable batteries. You can install a microSD memory card in the handheld device for additional storage or pre-loaded maps. 1 Turn the D-ring counter-clockwise, and pull up to remove the cover. 2 Remove the battery - Garmin Alpha 300/300i | Owners Manual - Page 50
Connecting the Handheld Device to a Computer NOTICE To prevent corrosion, thoroughly dry the USB port, the weather cap, and the surrounding area before charging or connecting to a computer. 1 - Garmin Alpha 300/300i | Owners Manual - Page 51
of interest, such as restaurants or marine services. For more information, go to buy.garmin.com or contact your Garmin dealer. tempe Your device is compatible with to display temperature data. See the instructions for your tempe sensor for more information (garmin.com/manuals/tempe). Appendix 45 - Garmin Alpha 300/300i | Owners Manual - Page 52
sensors are activated and functioning correctly. • When paired, your Garmin device receives data from only your sensor, and you can go not remove them. 2 Thread the new collar strap through the dog device, antenna guide, and GPS antenna. 3 If necessary, tighten the screws that secure the GPS antenna - Garmin Alpha 300/300i | Owners Manual - Page 53
Data Field Options 24 hr. Max. Temperature: The maximum temperature recorded in the last 24 hours. 24 hr. Min. Temperature: The minimum temperature recorded in the last 24 hours. Accuracy of GPS: The margin of error for your exact location. For example, your GPS location is accurate to within +/- 12 - Garmin Alpha 300/300i | Owners Manual - Page 54
Grade: The calculation of rise (elevation) over run (distance). For example, if for every 10 ft. (3 m) you climb you travel 200 ft. (60 m), the grade is 5%. Heading: The direction you are moving. Lap Ascent: The vertical distance of ascent for the current lap. Lap Descent: The vertical distance of - Garmin Alpha 300/300i | Owners Manual - Page 55
Velocity Made Good: The speed at which you are closing on a destination along a route. You must be navigating for this data to appear. Vertical Dist. to Dest.: The elevation distance between your current position and the final destination. You must be navigating for this data to appear. Vertical - Garmin Alpha 300/300i | Owners Manual - Page 56
support.garmin.com May 2023 GUID-AA041605-DE53-4A18-B076-5DCB8D4F9007 v2
-
 1
1 -
 2
2 -
 3
3 -
 4
4 -
 5
5 -
 6
6 -
 7
7 -
8
-
9
-
10
-
11
-
12
-
13
-
14
-
15
-
16
-
17
-
18
-
19
-
20
-
21
-
22
-
23
-
24
-
25
-
26
-
27
-
28
-
29
-
30
-
31
-
32
-
33
-
34
-
35
-
36
-
37
-
38
-
39
-
40
-
41
-
42
-
43
-
44
-
45
-
46
-
47
-
48
-
49
-
50
-
51
-
52
-
53
-
54
-
55
-
56
 |
 |

Alpha
®
300i with Training
Owner’s Manual