Garmin BC 50 with Night Vision Installation Instructions PDF - Page 6
Mounting the Camera Directly on a Vehicle with Adhesive
 |
View all Garmin BC 50 with Night Vision manuals
Add to My Manuals
Save this manual to your list of manuals |
Page 6 highlights
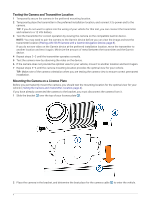
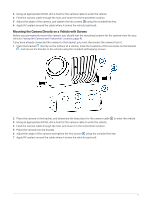
Mounting the Camera Directly on a Vehicle with Adhesive If the included screws cannot be used for installation, you can install the camera using the included adhesive strips. NOTICE The adhesive is intended for long-term installation and can be difficult to remove. You should carefully consider the mounting location before you install the mount. 1 Using an appropriate drill bit, drill a hole for the camera cable to enter the vehicle. 2 Clean the camera bracket and the area of the vehicle where you want to place the camera bracket. 3 Remove the backing from one side of the adhesive strip, and press it into place on the camera bracket. 4 Remove the backing from the other side of the adhesive strip, press the bracket into place on the vehicle, and hold the bracket for 30 seconds to ensure proper adhesion. NOTE: You should allow the bracket to remain in place at room temperature for 24 hours. 5 Feed the camera cable through the hole, and route it to the transmitter location. 6 Place the camera into the bracket. 7 Adjust the angle of the camera, and tighten the hex screws using the included hex key. 8 Apply waterproof sealant around the cable where it enters the vehicle (optional). 6
-
 1
1 -
 2
2 -
 3
3 -
 4
4 -
 5
5 -
 6
6 -
 7
7 -
 8
8
 |
 |
