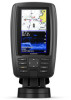
Garmin ECHOMAP Plus 42cv Installation Instructions
Garmin ECHOMAP Plus 42cv Manual
 |
View all Garmin ECHOMAP Plus 42cv manuals
Add to My Manuals
Save this manual to your list of manuals |
Garmin ECHOMAP Plus 42cv manual content summary:
- Garmin ECHOMAP Plus 42cv | Installation Instructions - Page 1
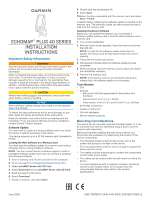
ECHOMAP™ PLUS 40 SERIES INSTALLATION INSTRUCTIONS Important Safety Information WARNING See the Important Safety and Product Information guide update to a memory card using a computer that is running Windows® software. NOTE: You can contact Garmin customer support to order a preloaded software update - Garmin ECHOMAP Plus 42cv | Installation Instructions - Page 2
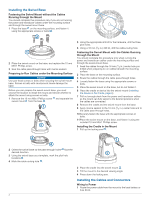
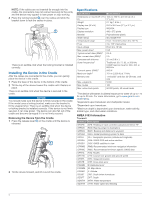
it. 6 Place the cradle or device into the swivel mount (Installing the Device in the Cradle, page 4). 7 Pull out enough slack from the power and transducer cables so the mount can fully swivel to the desired positions when the cables are connected. 8 Remove the cradle and the swivel mount from the - Garmin ECHOMAP Plus 42cv | Installation Instructions - Page 3
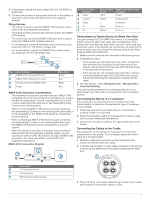
Garmin Device to Share User Data You can connect the ECHOMAP Plus device to a compatible Garmin Transducer Go to www.garmin.com/transducers or contact your local Garmin dealer to determine the appropriate type of transducer for your needs. 1 Follow the instructions provided with your transducer - Garmin ECHOMAP Plus 42cv | Installation Instructions - Page 4
of up to 1 m for up to 30 min. For more information, go to www.garmin.com /waterrating. 2Dependent upon transducer and chartplotter model. 3Dependent upon transducer. 4Maximum depth is dependent upon transducer, water salinity, bottom type, and other water conditions. NMEA 0183 Information Transmit - Garmin ECHOMAP Plus 42cv | Installation Instructions - Page 5
Description Depth Depth below transducer Water temperature Water speed Garmin Ltd. or its subsidiaries Garmin® and the Garmin logo are trademarks of Garmin Ltd. or its subsidiaries, registered in the USA and other countries. ECHOMAP™, Garmin ClearVü™, and Garmin Quickdraw™ are trademarks of Garmin - Garmin ECHOMAP Plus 42cv | Installation Instructions - Page 6
© 2017 Garmin Ltd. or its subsidiaries support.garmin.com
-
 1
1 -
 2
2 -
 3
3 -
 4
4 -
 5
5 -
 6
6
 |
 |
ECHOMAP
™
PLUS 40
SERIES
INSTALLATION
INSTRUCTIONS
Important Safety Information
WARNING
See the
Important Safety and Product Information
guide in the
product box for product warnings and other important
information.
When connecting the power cable, do not remove the in-line
fuse holder. To prevent the possibility of injury or product
damage caused by fire or overheating, the appropriate fuse
must be in place as indicated in the product specifications. In
addition, connecting the power cable without the appropriate
fuse in place voids the product warranty.
CAUTION
Always wear safety goggles, ear protection, and a dust mask
when drilling, cutting, or sanding.
NOTICE
When drilling or cutting, always check what is on the opposite
side of the surface.
To obtain the best performance and to avoid damage to your
boat, install the device according to these instructions.
Read all installation instructions before proceeding with the
installation. If you experience difficulty during the installation,
contact Garmin
®
Product Support.
Software Update
You may need to update the device software when you install
the device or add an accessory to the device.
This device supports up to a 32 GB memory card, formatted to
FAT32.
Loading the New Software on a Memory Card
You must copy the software update to a memory card using a
computer that is running Windows
®
software.
NOTE:
You can contact Garmin customer support to order a
preloaded software update card if you do not have a computer
with Windows software.
1
Insert a memory card into the card slot on the computer.
2
Go to
www.garmin.com/support/software/marine.html
.
3
Select
echoMAP Series with SD Card
.
4
Select
Download
next to
echoMAP Series with SD Card
.
5
Read and agree to the terms.
6
Select
Download
.
7
Choose a location, and select
Save
.
8
Double-click the downloaded file.
9
Select
Next
.
10
Select the drive associated with the memory card, and select
Next
>
Finish
.
A Garmin folder containing the software update is created on the
memory card. The software update can take several minutes to
load onto the memory card.
Updating the Device Software
Before you can update the software, you must obtain a
software-update memory card or load the latest software onto a
memory card.
1
Turn on the chartplotter.
2
After the home screen appears, insert the memory card into
the card slot.
NOTE:
In order for the software update instructions to
appear, the device must be fully booted before the card is
inserted.
3
Follow the on-screen instructions.
4
Wait several minutes while the software update process
completes.
5
When prompted, leave the memory card in place and restart
the chartplotter manually.
6
Remove the memory card.
NOTE:
If the memory card is removed before the device
restarts fully, the software update is not complete.
Tools Needed
•
Drill
•
Drill bits
◦
Bail mount: drill bits appropriate for the surface and
hardware
◦
Swivel mount: 3 mm (
1
/
8
in.) drill bit
◦
Flush mount: 3 mm (
1
/
8
in.) and 9.5 mm (
3
/
8
in.) drill bits
•
#2 Phillips screwdriver
•
Jigsaw or rotary tool
•
File and sandpaper
•
Marine sealant (optional)
Mounting Considerations
The device can be mounted using the included bracket, or it can
be mounted flush with the dashboard using a flush-mount kit
(may be sold separately).
Before permanently installing any part of your device, you
should plan the installation by determining the location of the
various components.
•
The mounting location must provide a clear view of the
screen and access to the keys on the device.
•
The mounting location must be sturdy enough to support the
device and the mount.
•
The cables must be long enough to connect the components
to each other and to power.
•
The cables can be routed under the bail mount or behind the
device.
•
To avoid interference with a magnetic compass, the device
should not be installed closer to a compass than the
compass-safe distance value listed in the product
specifications.
GUID-760FBC47-2446-4474-B03E-DC2085C730B6 v2
June 2020