Garmin GHP 12 Autopilot System Class B Drive Unit Installation Instructions
Garmin GHP 12 Autopilot System Manual
 |
View all Garmin GHP 12 Autopilot System manuals
Add to My Manuals
Save this manual to your list of manuals |
Garmin GHP 12 Autopilot System manual content summary:
- Garmin GHP 12 Autopilot System | Class B Drive Unit Installation Instructions - Page 1
installation instructions before proceeding with the installation. If you experience difficulty during the installation, contact Garmin Product Support. should be installed by a qualified marine installer. This equipment is only for use with Garmin autopilots. The system was filled and tested at the - Garmin GHP 12 Autopilot System | Class B Drive Unit Installation Instructions - Page 2
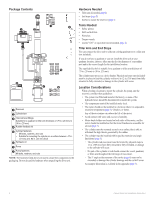
• Suitable for mounting the cylinder on a surface between .47 in. (12 mm) and .95 in. (24 mm) thick ➏ Hydraulic oil ➐ consider these guidelines: • The system was filled and tested at the installed so that the motor brushes are accessible for service (page 3). • The cylinder must be mounted Instructions - Garmin GHP 12 Autopilot System | Class B Drive Unit Installation Instructions - Page 3
attempt to move the cylinder rod until instructed. You must first select a mounting location 1. Make sure that the brush holders ➊ are accessible for service after mounting the pump. ➊ ➋ ➋ ➊ ➌ ➍ for mounting the cylinder on a surface between .47 in. (12 mm) and .95 in. (24 mm) thick. 1. With - Garmin GHP 12 Autopilot System | Class B Drive Unit Installation Instructions - Page 4
using the supplied M8 bolts, washers, and nuts. ➊ 5. Tighten the bolts to 12.5 ft-lbf (17 Nm). Installing the Tiller Bolt The supplied tiller bolt is your warranty. Consult the installation instructions provided with your Garmin autopilot to install the autopilot components and to connect the - Garmin GHP 12 Autopilot System | Class B Drive Unit Installation Instructions - Page 5
into the reservoir. You may need to manually assist the cylinder at first to purge any remaining air in the system. 14. Observe the oil level in the reservoir. 15. If necessary, fill the reservoir to the maximum line on the label. Troubleshooting Symptom Possible Causes The motor does not run - Garmin GHP 12 Autopilot System | Class B Drive Unit Installation Instructions - Page 6
System Weight (Gross) Temperature rating Appendix Value 100 W 12 A Reversing IP55 BS EN 28846:1993 BS EN 60945: 2002 12 Vdc 12 W IP65 0.44 gal. (538 cc) 0.27 in² (176.6 mm²) 12 G1/4(BSP) parallel BS2779'73 5/8-18 SAE female swivel Brass Marine Steering Hose • 1000 PSI working pressure • 5/16″ I/D - Garmin GHP 12 Autopilot System | Class B Drive Unit Installation Instructions - Page 7
mm) diameter ➌ 0.28 in. (7 mm) diameter ➎ ➍ 2 in. (50.8 mm) ➎ 3.33 in. (84.6 mm) ➏ 3.15 in. (80 mm) ➐ 8.58 in. (218 mm) ➐ Class B Drive Unit Installation Instructions 7 - Garmin GHP 12 Autopilot System | Class B Drive Unit Installation Instructions - Page 8
of the rudder bolt adapter. ➓ Relative distance from the center of the rod to the base of the cylinder mount when at rest. Measurement 360° 12 in. (305 mm) 23.75 in. (603.2 mm) 29.72 in. (754.9 mm) 35.7 in. (906.8) 5° to either side of center 0.59 in. (15 mm - Garmin GHP 12 Autopilot System | Class B Drive Unit Installation Instructions - Page 9
of the cylinder base to the rudder post when the rudder is amidships. Measurement 29.66 in. (753.3 mm) 35° 8.28 in. (210.4 mm) 10.12 in. (257 mm) 29.67 in. (753.7 mm) Class B Drive Unit Installation Instructions 9 - Garmin GHP 12 Autopilot System | Class B Drive Unit Installation Instructions - Page 10
, disseminated, downloaded or stored in any storage medium, for any purpose without the express prior written consent of Garmin. Garmin hereby grants permission to download a single copy of this manual onto a hard drive or other electronic storage medium to be viewed and to print one copy of this
-
 1
1 -
 2
2 -
 3
3 -
 4
4 -
 5
5 -
 6
6 -
 7
7 -
8
-
9
-
10
 |
 |

Class B Drive Unit Installation Instructions
To obtain the best performance and to avoid damage to your boat, install
the Garmin
®
Class B Drive Unit according to the following instructions.
Professional installation of the drive unit is highly recommended, because
specific knowledge of rudder operation is required to properly install the
drive unit.
Read all installation instructions before proceeding with the installation.
If you experience difficulty during the installation, contact Garmin Product
Support.
About the Class B Drive Unit
The Class B drive unit is a self-contained hydraulic drive unit that uses a
solenoid clutch to extend and retract the rod that steers the tiller. Combined
with the included rudder feedback sensor, the Garmin Class B Drive unit
will provide the steering necessary for a Garmin autopilot when installed
correctly.
Because the drive unit is self-contained, you do not need to connect or
disconnect any of the hydraulic hoses. The system was filled and tested at the
factory.
Registering Your Device
Help us better support you by completing our online registration today.
•
Go to
.
•
Keep the original sales receipt, or a photocopy, in a safe place.
Contacting Garmin Product Support
Contact Garmin Product Support if you have any questions about this
product.
•
In the USA, go to
www.garmin.com/support
, or contact Garmin USA by
phone at (913) 397.8200 or (800) 800.1020.
•
In the UK, contact Garmin (Europe) Ltd. by phone at 0808 2380000.
•
In Europe, go to
www.garmin.com/support
and click
Contact Support
for in-country support.
Important Safety Information
WARNING
You are responsible for the safe and prudent operation of your vessel.
The Autopilot is a tool that will enhance your capability to operate your boat.
It does not relieve you from the responsibility of safely operating your boat.
Avoid navigational hazards and never leave the helm unattended.
See the
Important Safety and Product Information
guide in the autopilot
product box for product warnings and other important information.
CAUTION
Failure to install and maintain this equipment in accordance with these
instructions could result in damage or injury.
When in use, beware of hot motor and solenoid components, as well as the
risk of entrapment from moving parts
Always wear safety goggles, ear protection, and a dust mask when drilling,
cutting, or sanding.
Notice
This equipment should be installed by a qualified marine installer.
This equipment is only for use with Garmin autopilots.
The system was filled and tested at the factory, so you should not disconnect
the hydraulic hoses to install the system.
When drilling or cutting, always check the opposite side of the surface. Be
aware of fuel tanks, electrical cables, and hydraulic hoses.
March 2011
190-01289-06 Rev. B
Printed in the UK