Garmin GHP 12 Autopilot System Class B Drive Unit Installation Instructions - Page 4
Installing the Rudder Feedback Sensor, Connecting the Drive Unit to the Garmin Autopilot
 |
View all Garmin GHP 12 Autopilot System manuals
Add to My Manuals
Save this manual to your list of manuals |
Page 4 highlights
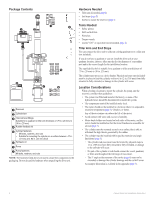
2. Verify the marked locations. The marked locations should be 3 in. (76.2 mm) ➊ apart. NOTE: The diagram is not to scale. 3. Drill .35 in. (8.8 mm) holes through the ➊ mounting surface. 4. Secure the mounting foot to the mounting surface using the supplied M8 bolts, washers, and nuts. ➊ 5. Tighten the bolts to 12.5 ft-lbf (17 Nm). Installing the Tiller Bolt The supplied tiller bolt is suitable for a quadrant or tiller arm thickness of .79 in. (20 mm) to .98 in. (25 mm). 1. Drill a 20.1 mm hole in the quadrant or tiller arm ➊ (not included) for the tiller bolt ➋. ➑ ➐ ➏ ➋ ➌➊ ➍ ➎ 2. It is recommended to apply Loctite 638 or equivalent to the tiller bolt where it passes through the quadrant or tiller arm ➌. 3. Place the tiller bolt into the quadrant or tiller arm, and secure it with the M20 washer ➍ and the M20 nut ➎. 4. Tighten the M20 nut to 50.15 ft-lbf (68 Nm). 5. Place the rod ➏ on the tiller bolt. 6. Fasten the rod to the tiller bolt with the other M20 washer ➐ and the locking pin ➑. Installing the Rudder Feedback Sensor Notice You must carefully measure the operating distance of the drive unit cylinder rod and install the feedback sensor mounting clamp at the proper location, or you will damage the feedback sensor. To use the drive unit with a Garmin autopilot, you must install the rudder feedback sensor after you have installed the drive unit. 1. Place the sensor mounting clamp ➊ on the cylinder ➋. ➑ ➐ ➒ ➏ ➋ ➊ ➌ ➍ ➎ 2. Fasten the sensor mounting clamp to the cylinder using the included 45 mm M6 screw ➌ and M6 nut ➍. Do not tighten the nut at this time. 3. Adjust the position of the sensor mounting clamp so that the distance ➎ between the mounting bracket and the center of the tiller bolt is between 19.69 in. (500 mm) and 32.28 in. (820 mm) during the full range of the cylinder movement. If the distance ever compresses below 19.69 in. (500 mm) or extends beyond 32.28 in. (820 mm) it will damage the sensor. 4. Tighten the M6 nut to 3.7 ft-lbf (5 Nm). 5. Install the sensor mounting stud ➏ in the sensor mounting clamp. 6. Fit the rudder feedback sensor ➐ on the sensor mounting clamp and the tiller bolt. 7. Fasten the rudder feedback sensor to the sensor mounting clamp with the included M5 A4 washer ➑ and locking pin ➒. 8. Fasten the rudder feedback sensor to the tiller bolt with the included M5 A4 washer and locking pin. Connecting the Drive Unit to the Garmin Autopilot Notice Do not cut the cables connected to the drive unit. Cutting the drive-unit cables voids your warranty. Consult the installation instructions provided with your Garmin autopilot to install the autopilot components and to connect the drive unit to the correct component. 4 Class B Drive Unit Installation Instructions
-
 1
1 -
 2
2 -
 3
3 -
 4
4 -
 5
5 -
 6
6 -
 7
7 -
 8
8 -
 9
9 -
 10
10
 |
 |
