Garmin GMI 20 Marine Instrument Owner s Manual - Page 6
Changing the Layout of Instrument s, Adding an Instrument Removing an Instrument
 |
View all Garmin GMI 20 Marine Instrument manuals
Add to My Manuals
Save this manual to your list of manuals |
Page 6 highlights
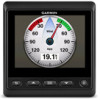
Configuring Graph Data Fields Some instrument pages display graph data. You can configure the data that displays on the graphs. 1 From the instrument page, select > Configure Data Fields. 2 Select an option: • To view the data as a number instead of a graph, select Show Number. • To change the type of data shown on the graph, select Graph Data. • To determine how long the graph data displays, select Graph Duration. • To configure the scale of values that display on the graph, select Graph Scale. • To reset the graph scale to the default values, select Reset Scale. Changing the Layout of Instrument Pages NOTE: Instrument page layout can be changed only on pages that display more than one instrument. You can change the layout of instrument pages to display up to four instruments from any category. 1 Select > Change Page Layout. 2 Select the number of instrument screens to view at the same time. 3 Select Change to change the instrument. 4 Select a category. 5 Select an instrument. 6 If necessary, select a data style. 7 Select Done. Adding an Instrument Page 1 Select > Pages > Add Page. 2 Select an instrument page collection. 3 Select or to scroll through the instrument pages. 4 Select an instrument page to add. 5 If necessary, select Yes to add more instrument pages. Removing an Instrument Page 1 Select > Pages > Remove Page. 2 Select a page to remove. 3 Select Yes. Changing the Order of Instrument Pages You can change the order of instrument pages. 1 Select > Pages > Reorder Pages. 2 Select an instrument page. 3 Select or to move the instrument page up or down in the order. 4 Select Select to place the instrument page in the new location in the order. Device Configuration System Settings Select > Setup > System. Units: Sets the units of measure. Heading: Sets the reference used in calculating heading information. Beeper: Sets if and when audible sounds are used. Auto Power: Enables the device to turn on automatically when the NMEA 2000 network turns on. Language: Sets the on-screen language. Operating Mode: Sets the operating mode to normal or store demo mode. Fuel Capacity: Sets the maximum fuel capacity for your boat. Time: Sets the time format, time zone, and daylight savings time for your location. Speed Sources: Sets the speed sources for fuel economy and wind. System Information: Displays software information. Factory Defaults: Resets the device to factory defaults. Selecting the Heading Type 1 Select > Setup > System > Heading. 2 Select an option: • To automatically set the magnetic declination for your GPS position, select Auto Magnetic. • To set true north as the heading reference, select True. • To set the magnetic variation value, select User Magnetic. Configuring the Beeper 1 Select > Setup > System > Beeper. 2 Select an option: • To turn off the beeper, select Off. • To set the beeper to sound only when alarms are triggered, select Alarms Only. • To set the beeper to sound when the keys are pressed and alarms are triggered, select On (Keys & Alarms). Enabling Pop-Ups NOTE: You can select a pop-up duration between 1 and 10 seconds. Pop-ups inform you when engine trim and trim tabs have changed by a specific threshold. 1 Select > Setup > Pop-Ups. 2 Select a pop-up. 3 Select a pop-up duration. Customizing Gauge Limits You can configure the upper and lower limits and the range of standard operation of a gauge. When a value exceeds the range of standard operation, the gauge becomes red. NOTE: Not all options are available for all gauges. 1 Select > Setup > Set Gauge Limits . 2 Select a gauge. 3 Select an option: • To set the minimum value of the standard operating range, select Rated Min. . • To set the maximum value of the standard operating range, select Rated Max. . • To set the lower limit of the gauge lower than the rated minimum, select Scale Min. . • To set the upper limit of the gauge higher than the rated maximum, select Scale Max. . 4 Select the limit value. 5 Repeat steps 3 and 4 to set additional gauge limits. 6 If applicable, select Yes to share the gauge limit settings across all Garmin® devices on the network. 2 Device Configuration
-
 1
1 -
 2
2 -
 3
3 -
 4
4 -
 5
5 -
 6
6 -
 7
7 -
 8
8 -
 9
9 -
 10
10
 |
 |
