Garmin GNX 20 Marine Instrument Installation Instructions - Page 2
Connection Considerations
 |
View all Garmin GNX 20 Marine Instrument manuals
Add to My Manuals
Save this manual to your list of manuals |
Page 2 highlights
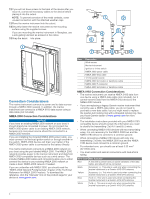
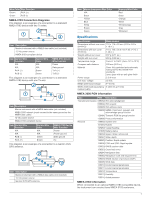
12If you will not have access to the back of the device after you mount it, connect all necessary cables to the device before placing it into the cutout. NOTE: To prevent corrosion of the metal contacts, cover unused connectors with the attached weather caps. 13 Place the marine instrument into the cutout. 14Securely fasten the marine instrument to the mounting surface using the supplied screws. If you are mounting the marine instrument in fiberglass, use a anti-galling lubricant as advised in the notice. 15Snap the bezel into place. À Connection Considerations The marine instrument connects to power and to data sources through a NMEA 2000 network. In addition, the marine instrument can connect to a NMEA 0183 data source using a data cable (not included). NMEA 2000 Connection Considerations NOTICE If you have an existing NMEA 2000 network on your boat, it should already be connected to power. Do not connect the NMEA 2000 power cable to an existing NMEA 2000 network, because only one power source should be connected to a NMEA 2000 network. If you are installing the included NMEA 2000 power cable, you must connect it to the boat ignition switch or through another inline switch. NMEA 2000 devices will drain your battery if the NMEA 2000 power cable is connected to the battery directly. The marine instrument connects to a NMEA 2000 network on your boat using the port labeled NMEA 2000. The NMEA 2000 network provides power to the marine instrument and data from NMEA 2000-compatible devices such as a wind sensor. The included NMEA 2000 cables and connectors allow you to either connect the device to your existing NMEA 2000 network or create a basic NMEA 2000 network if needed. If you are unfamiliar with NMEA 2000, you should read the "NMEA 2000 Network Fundamentals" chapter of the Technical Reference for NMEA 2000 Products. To download the reference, click the "Manuals" link on the product page for your device at www.garmin.com. Item Description Wind sensor Marine instrument Ignition or in-line switch NMEA 2000 power cable NMEA 2000 drop cable 12 Vdc power source NMEA 2000 terminator or backbone cable NMEA 2000 T-connector NMEA 2000 terminator or backbone cable NMEA 0183 Connection Considerations • The marine instrument can receive NMEA 0183 data from one device using a NMEA data cable (not included), but it cannot transmit data from the NMEA 0183 device to the NMEA 2000 network. • If you are replacing a legacy Garmin marine instrument that currently uses a NMEA data cable, you do not need to purchase a new data cable, but you might need to replace the quarter-turn locking ring with a threaded locking ring. See your local Garmin dealer or www.garmin.com for more information. • The installation instructions provided with your NMEA 0183 compatible device should contain the information you need to identify the transmitting (Tx) A (+) and B (-) wires. • When connecting NMEA 0183 devices with two transmitting wires, it is not necessary for the NMEA 2000 bus and the NMEA 0183 device to connect to a common ground. • When connecting a NMEA 0183 device with only one transmitting (Tx) wire, the NMEA 2000 bus and the NMEA 0183 device must connect to a common ground. • For extended runs, you should use at least 0. 33 mm2 (22 AWG) wire. • You must solder and seal all connections with heat-shrink tubing. Wire Color Wire Function Red A red wire is present only on some variations of the data cable, and should not be connected. Black Accessory (-). This wire is used only when connecting the marine instrument to a Garmin HVS GPS antenna. Yellow Accessory (+). This wire is used only when connecting the marine instrument to a Garmin HVS GPS antenna. Blue Tx/A (+). This wire is used only when connecting the marine instrument to a Garmin HVS GPS antenna. White Tx/B (-). This wire is used only when connecting the marine instrument to a Garmin HVS GPS antenna. 2
-
 1
1 -
 2
2 -
 3
3 -
 4
4
 |
 |
