Garmin GPSMAP 440sx Flush Mount Kit Instructions and Template (Multilingual)
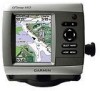
Garmin GPSMAP 440sx - Marine GPS Receiver Manual
 |
UPC - 753759065867
View all Garmin GPSMAP 440sx manuals
Add to My Manuals
Save this manual to your list of manuals |
Garmin GPSMAP 440sx manual content summary:
- Garmin GPSMAP 440sx | Flush Mount Kit Instructions and Template (Multilingual) - Page 1
Flush Mount Kit Use this kit to flush mount a Fishfinder 400C or GPSMAP 400 series unit into a flat panel. • Select an appropriately sized location for the unit. • Use the Flush Mount Template provided to determine a location. • Check that all cables reach the unit mounting the wiring harness to the - Garmin GPSMAP 440sx | Flush Mount Kit Instructions and Template (Multilingual) - Page 2
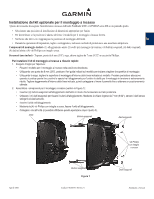
unit and flush mount hardware Tension mount brackets Wing nuts Figure 2 NOTE: If you are installing a Fishfinder 400C, the wiring harness must be connected to the boat's power supply and transducer per the installation instructions included with the unit. NOTE: If you are installing a GPSMAP 400 - Garmin GPSMAP 440sx | Flush Mount Kit Instructions and Template (Multilingual) - Page 3
ce kit pour monter un appareil de la série GPSMAP 400 ou un appareil Fishfinder 400C sur un panneau plat. • Sélectionnez un emplacement a que très peu d'espace entre le boîtier de l'appareil et les bras du support. Découpez légèrement à l'intérieur du trait indiqué, puis poncez ou limez le panneau - Garmin GPSMAP 440sx | Flush Mount Kit Instructions and Template (Multilingual) - Page 4
matériel de montage sur panneau Supports de fixation Ecrous à oreilles Figure 2 REMARQUE : si vous installez un appareil Fishfinder 400C, le faisceau de câbles doit être branché à l'alimentation du bateau ainsi qu'à la sonde, conformément aux instructions d'installation fournies avec l'appareil - Garmin GPSMAP 440sx | Flush Mount Kit Instructions and Template (Multilingual) - Page 5
IT Installazione del kit opzionale per il montaggio a incasso Questo kit consente di eseguire l'installazione a incasso dell'unità Fishfinder 400C o GPSMAP serie 400 su un pannello piatto. • Selezionare una posizione di installazione di dimensioni appropriate per l'unità. • Per determinare se la - Garmin GPSMAP 440sx | Flush Mount Kit Instructions and Template (Multilingual) - Page 6
Dadi ad alette Figura 2 NOTA: se si installa un'unità Fishfinder 400C, collegare i cavi all'alimentazione dell'imbarcazione e al trasduttore installa un'unità GPSMAP serie 400, è necessario collegare i cavi all'alimentazione dell'imbarcazione, all'antenna GPS, all'antenna XM (se disponibile - Garmin GPSMAP 440sx | Flush Mount Kit Instructions and Template (Multilingual) - Page 7
DE Installieren des Einbau-Montagesatzes Verwenden Sie diesen Einbau-Montagesatz, um den Fishfinder 400C oder ein Gerät der Serie GPSMAP 400 in eine Tafel einzubauen. • Wählen Sie für das Gerät einen Aufstellungsort geeigneter Größe aus. • Verwenden Sie die enthaltene Schablone für den Einbau- - Garmin GPSMAP 440sx | Flush Mount Kit Instructions and Template (Multilingual) - Page 8
Flügelmuttern DE Abbildung 2 HINWEIS: Bei der Installation eines Fishfinder 400C muss der Anschluss des Kabelbaums an die Stromversorgung und an der Installation eines Geräts der Serie GPSMAP 400 muss der Anschluss des Kabelbaums an die Stromversorgung, an die GPS-Antenne, an die XM-Antenne (falls - Garmin GPSMAP 440sx | Flush Mount Kit Instructions and Template (Multilingual) - Page 9
montaje alineado de una unidad de la serie GPSMAP 400 en un panel plano. • Seleccione una Compruebe la longitud correcta de todos los cables hasta la ubicación de montaje de la én, corte la superficie de instalación a lo largo de la parte interior de la línea indicada en la plantilla. Tenga cuidado - Garmin GPSMAP 440sx | Flush Mount Kit Instructions and Template (Multilingual) - Page 10
ES Ilustración 2 NOTA: si va a instalar un dispositivo Fishfinder 400C, el arnés de cableado debe estar conectado al suministro de instalar una unidad de la serie GPSMAP 400, debe conectar el arnés de cableado al suministro de alimentación de la embarcación, a la antena GPS, a la antena XM (si - Garmin GPSMAP 440sx | Flush Mount Kit Instructions and Template (Multilingual) - Page 11
este kit para a montagem embutida da unidade das Séries Fishfinder 400C ou GPSMAP 400 num painel plano. • Seleccione um local de montagem os (4) parafusos sextavados na armação, de modo a que fiquem visíveis na parte posterior. • Fixe os parafusos com as (4) porcas sextavadas. Aperte as porcas - Garmin GPSMAP 440sx | Flush Mount Kit Instructions and Template (Multilingual) - Page 12
montagem Porcas de orelhas PT Figura 2 NOTA: na instalação de unidades Fishfinder 400C, a cablagem deve ser ligada à fonte de alimentação da unidade. NOTA: na instalação de unidades GPSMAP 400, deve ligar a cablagem à fonte de alimentação da embarcação, antena GPS, antena XM (quando aplicável) e - Garmin GPSMAP 440sx | Flush Mount Kit Instructions and Template (Multilingual) - Page 13
De inbouwkit installeren Met deze kit kunt u een Fishfinder 400C of een apparaat uit de GPSMAP 400-serie in een vlak paneel monteren. • Kies een locatie met voldoende ruimte om het apparaat te monteren. • Bepaal met behulp van het bijgeleverde installatiesjabloon - Garmin GPSMAP 440sx | Flush Mount Kit Instructions and Template (Multilingual) - Page 14
NL Afbeelding 2 Opmerking: als u een Fishfinder 400C installeert, moet u de installatie-instructies van het apparaat volgen voor het aansluiten van de kabelboom op de stroomvoorziening van de boot en op de transducer. Opmerking: als u een apparaat uit de GPSMAP 400-serie installeert, moet u de - Garmin GPSMAP 440sx | Flush Mount Kit Instructions and Template (Multilingual) - Page 15
Sådan installerer du sættet til planmontering Brug dette sæt til at planmontere en Fishfinder 400C eller GPSMAP-enhed fra 400-serien i et fladt panel. • Vælg en placering med den rette størrelse til enheden. • Brug planmonteringsskabelonen til at fastsætte en placering. • - Garmin GPSMAP 440sx | Flush Mount Kit Instructions and Template (Multilingual) - Page 16
• Placer huset i det hul, du netop har skåret ud i monteringsoverfladen. • Skub tilstramningsbeslagene henover BEMÆRK: Hvis du installerer en Fishfinder 400C, skal ledningsnettet tilsluttes bådens en GPSMAP-enhed fra 400-serien, skal du slutte ledningsnettet til bådens strømforsyning, GPS-antenne, - Garmin GPSMAP 440sx | Flush Mount Kit Instructions and Template (Multilingual) - Page 17
Tasokiinnityssarjan asentaminen Tämän sarjan avulla voit kiinnittää Fishfinder 400C- tai GPSMAP 400 Series -laitteen tasaiseen paneeliin. • Valitse laitteelle sopivankokoinen asennuspaikka. • Määritä paikka sarjan mukana toimitetun tasokiinnitysmallin avulla. • Tarkista, että kaikki kaapelit - Garmin GPSMAP 440sx | Flush Mount Kit Instructions and Template (Multilingual) - Page 18
laite ja tasokiinnityssarja Kiristimet Siipiruuvit FI Kuva 2 HUOMAUTUS: Jos asennat Fishfinder 400C -laitetta, johdinsarja on liitettävä veneen virtalähteeseen ja . HUOMAUTUS: Jos asennat GPSMAP 400 -sarjan laitetta, johdinsarja on liitettävä veneen virtalähteeseen, GPS-antenniin, XM-antenniin ( - Garmin GPSMAP 440sx | Flush Mount Kit Instructions and Template (Multilingual) - Page 19
Installere settet for innebygging Bruk dette settet til å bygge en Fishfinder 400C eller en enhet i GPSMAP 400-serien inn i et flatt panel. • Velg en plassering der det er god nok plass til enheten. • Bruk malen for innebygging, som følger med, for å - Garmin GPSMAP 440sx | Flush Mount Kit Instructions and Template (Multilingual) - Page 20
Figur 2): • Sett huset inn i hullet du nettopp har skåret ut i monteringsoverflaten. • Skyv brakettarmene inn 2 MERK: Hvis du installerer en Fishfinder 400C, må ledningsnettet kobles til båtens en enhet i GPSMAP 400-serien, må ledningsnettet kobles til båtens strømforsyning, GPS-antennen, XM- - Garmin GPSMAP 440sx | Flush Mount Kit Instructions and Template (Multilingual) - Page 21
Installera satsen för nedsänkt montering Använd den här satsen för nedsänkt montering av en Fishfinder 400C eller GPSMAP 400-enhet i en platt panel. • Välj en plats med lämplig storlek för enheten. • Bestäm plats med hjälp av den medföljande mallen för nedsänkt montering. • - Garmin GPSMAP 440sx | Flush Mount Kit Instructions and Template (Multilingual) - Page 22
nkt montering Monteringsfästen Vingmuttrar Figur 2 Obs! Om du installerar en Fishfinder 400C måste kabelstammen anslutas till båtens strömförsörjning och enheten. Obs! Om du installerar en GPSMAP 400-enhet måste du ansluta kabelstammen till båtens strömkälla, GPS-antenn, XM-antenn (om tillämpligt - Garmin GPSMAP 440sx | Flush Mount Kit Instructions and Template (Multilingual) - Page 23
Fishfinder 400C или GPSMAP серии 400 1 2 4 4 4 4 шт.). 3/8" (6 9/32" (7 1 3/8" (6 2 1). 4 4 9/32" (7 4 3). RU 2007 1 190-00757-02 C Болты c - Garmin GPSMAP 440sx | Flush Mount Kit Instructions and Template (Multilingual) - Page 24
3 2 4 4 Рис. 2 Fishfinder 400C GPSMAP серии 400 GPS XM RU - Garmin GPSMAP 440sx | Flush Mount Kit Instructions and Template (Multilingual) - Page 25
Instalacija kompleta za ugradbenu montažu Ovaj komplet koristite za ugradbenu montažu uređaja Fishfinder 400C ili GPSMAP serije 400 u ravnu ploču. • Odaberite mjesto koje odgovara veličini uređaja. • Za određivanje mjesta ugradbene montaže upotrijebite šablonu. • Provjerite dosežu li svi kabeli - Garmin GPSMAP 440sx | Flush Mount Kit Instructions and Template (Multilingual) - Page 26
Montažni nosači Leptir-matice Slika 2 NAPOMENA: Ako montirate Fishfinder 400C, ožičenje se mora spojiti na napajanje plovila i sondu prema čuju uz jedinicu. NAPOMENA: Ako montirate uređaj GPSMAP serije 400, ožičenje morate spojiti na napajanje broda, GPS antenu, XM antenu (ako postoji) i sondu ( - Garmin GPSMAP 440sx | Flush Mount Kit Instructions and Template (Multilingual) - Page 27
Fishfinder 400C ή GPSMAP 400 1 2 4 4 4 4 Phililps. 3/8" (6 mm 9/32" (7 mm Phillips. 1 3/8" (6 mm 2 1): 4 4 9/32" (7 mm 4 3 Μονάδα 2007 1 190-00757-02 Rev. C EL - Garmin GPSMAP 440sx | Flush Mount Kit Instructions and Template (Multilingual) - Page 28
3 2): 4 4 2 Fishfinder 400C GPSMAP 400 GPS XM EL - Garmin GPSMAP 440sx | Flush Mount Kit Instructions and Template (Multilingual) - Page 29
400 Series Flush Mount Template Modèle de montage sur panneau pour la série 400 Modello per il montaggio a incasso per la serie 400 Montageschablone der 400er-Serie Plantilla - Garmin GPSMAP 440sx | Flush Mount Kit Instructions and Template (Multilingual) - Page 30
-
 1
1 -
 2
2 -
 3
3 -
 4
4 -
 5
5 -
 6
6 -
 7
7 -
8
-
9
-
10
-
11
-
12
-
13
-
14
-
15
-
16
-
17
-
18
-
19
-
20
-
21
-
22
-
23
-
24
-
25
-
26
-
27
-
28
-
29
-
30
 |
 |
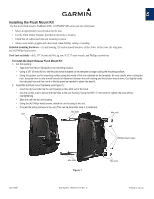
Installing the Flush Mount Kit
Use this kit to flush mount a Fishfinder 400C or GPSMAP 400 series unit into a flat panel.
•
Select an appropriately sized location for the unit.
•
Use the Flush Mount Template provided to determine a location.
•
Check that all cables reach the unit mounting location.
•
Always wear safety goggles and a dust mask when drilling, cutting, or sanding.
Included mounting hardware
—(1) unit housing, (2) tension mount brackets, (4) hex bolts, (4) hex nuts, (4) wing nuts,
and (4) Phillips head screws.
Tools (not included)
—drill, 3/8
"
(6 mm) drill bit, jig saw, 9/32
"
(7 mm) wrench, and Phillips screwdriver.
To install the Quick Release Flush Mount Kit:
1.
Cut the opening:
•
Tape the Flush MountTemplate to the mounting location.
•
Using a 3/8" (6 mm) drill bit, drill the pilot holes indicated on the template to begin cutting the mounting surface.
•
Using the jig saw, cut the mounting surface along the inside of the line indicated on the template. Be very careful when cutting this
hole, because there is only a small amount of clearance between the unit housing and the tension mount arms. Cut slightly inside
the indicated line and then sand or file the panel as needed to obtain the best fit.
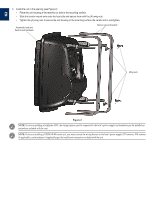
2.
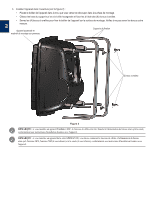
Assemble the flush mount hardware (see Figure 1):
•
Insert the (4) hex bolts into the unit housing so they stick out of the back.
•
Use the (4) hex nuts to secure the hex bolts to the unit housing. Using the 9/32” (7 mm) wrench, tighten the nuts without
overtightening.
•
Slide the unit into the unit housing.
•
Using the (4) Phillips head screws, attach the unit housing to the unit.
•
Connect the wiring harness to the unit (This can be done after step 3, if preferred).
Unit
Hex bolts
Hex nuts
Phillips head screws
Hex nuts
Hex bolts
Figure 1
April 2007
Part Number 190-00757-02 Rev. C
Printed in Taiwan
EN