Garmin Montana 750i Owners Manual - Page 27
Data Management - mount
 |
View all Garmin Montana 750i manuals
Add to My Manuals
Save this manual to your list of manuals |
Page 27 highlights
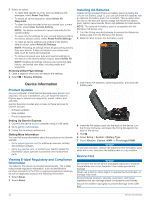
Secure the weather cap tightly to prevent damage to the external antenna port. Avoid extreme shock and harsh treatment, because it can degrade the life of the product. Cleaning the Device 1 Wipe the device using a cloth dampened with a mild detergent solution. 2 Wipe it dry. After cleaning, allow the device to dry completely. Cleaning the Touchscreen 1 Use a soft, clean, lint-free cloth. 2 If necessary, lightly dampen the cloth with water. 3 If using a dampened cloth, turn off the device and disconnect the device from power. 4 Gently wipe the screen with the cloth. Data Management NOTE: The device is not compatible with Windows® 95, 98, Me, Windows NT®, and Mac® OS 10.3 and earlier. File Types The handheld device supports these file types: • Files from Garmin Explore. • GPX route, track, and waypoint files. • GPX geocache files (Downloading Geocaches Using a Computer, page 16). • JPEG photo files. • GPI custom POI files from the Garmin POI Loader. Go to www.garmin.com/products/poiloader. • FIT files for exporting to Garmin Connect. Installing a Memory Card WARNING Do not use a sharp object to remove user-replaceable batteries. You can install a microSD memory card, up to 32 GB, in the handheld device for additional storage or pre-loaded maps. 1 Turn the D-ring counter-clockwise, and pull up to remove the battery pack. 2 Slide the card holder to and lift up. 3 Place the memory card with the gold contacts facing down. 4 Close the card holder. 5 Slide the card holder to to lock it. 6 Replace the battery pack. Connecting the Device to Your Computer NOTICE To prevent corrosion, thoroughly dry the USB port, the weather cap, and the surrounding area before charging or connecting to a computer. 1 Pull up the weather cap from the USB port. 2 Plug the small end of the USB cable into the USB port on the device. 3 Plug the large end of the USB cable into a computer USB port. Your device and memory card (optional) appear as removable drives in My Computer on Windows computers and as mounted volumes on Mac computers. Transferring Files to Your Device 1 Connect the device to your computer. On Windows computers, the device appears as a removable drive or a portable device, and the memory card may appear as a second removable drive. On Mac computers, the device and memory card appear as mounted volumes. NOTE: Some computers with multiple network drives may not display device drives properly. See your operating system documentation to learn how to map the drive. 2 On your computer, open the file browser. 3 Select a file. 4 Select Edit > Copy. 5 Open the portable device, drive, or volume for the device or memory card. 6 Browse to a folder. 7 Select Edit > Paste. The file appears in the list of files in the device memory or on the memory card. Deleting Files NOTICE If you do not know the purpose of a file, do not delete it. Your device memory contains important system files that should not be deleted. 1 Open the Garmin drive or volume. 2 If necessary, open a folder or volume. 3 Select a file. 4 Press the Delete key on your keyboard. NOTE: If you are using an Apple® computer, you must empty the Trash folder to completely remove the files. Using Garmin Connect 1 Connect the device to your computer using the USB cable. 2 Go to connect.garmin.com. 3 Follow the on-screen instructions. Disconnecting the USB Cable If your device is connected to your computer as a removable drive or volume, you must safely disconnect your device from your computer to avoid data loss. If your device is connected to your Windows computer as a portable device, it is not necessary to safely disconnect the device. 1 Complete an action: • For Windows computers, select the Safely Remove Hardware icon in the system tray, and select your device. • For Apple computers, select the device, and select File > Eject. 2 Disconnect the cable from your computer. Device Information 23
-
 1
1 -
2
-
3
-
4
-
5
-
6
-
7
-
8
-
9
-
10
-
11
-
12
-
13
-
14
-
15
-
16
-
17
-
18
-
19
-
20
-
21
-
 22
22 -
 23
23 -
 24
24 -
 25
25 -
 26
26 -
 27
27 -
 28
28 -
 29
29 -
 30
30 -
 31
31 -
 32
32 -
33
-
34
 |
 |
