Garmin Nuvi 200W Quick Start Manual - Page 10
Mounting on Your, Dashboard, Changing the Fuse - suction mount
 |
UPC - 753759072230
View all Garmin Nuvi 200W manuals
Add to My Manuals
Save this manual to your list of manuals |
Page 10 highlights
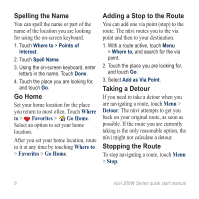
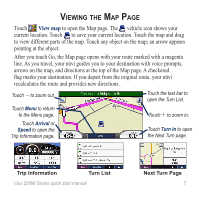
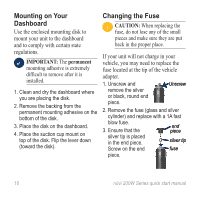
Mounting on Your Dashboard Use the enclosed mounting disk to mount your unit to the dashboard and to comply with certain state regulations. Important: The permanent mounting adhesive is extremely difficult to remove after it is installed. 1. Clean and dry the dashboard where you are placing the disk. 2. Remove the backing from the permanent mounting adhesive on the bottom of the disk. 3. Place the disk on the dashboard. 4. Place the suction cup mount on top of the disk. Flip the lever down (toward the disk). Changing the Fuse Caution: When replacing the fuse, do not lose any of the small pieces and make sure they are put back in the proper place. If your unit will not charge in your vehicle, you may need to replace the fuse located at the tip of the vehicle adapter. 1. Unscrew and remove the silver or black, round end piece. Unscrew 2. Remove the fuse (glass and silver cylinder) and replace with a 1A fast blow fuse. 3. Ensure that the end piece silver tip is placed in the end piece. silver tip Screw on the end fuse piece. 10 nüvi 200W Series quick start manual
-
 1
1 -
2
-
3
-
4
-
 5
5 -
 6
6 -
 7
7 -
 8
8 -
 9
9 -
 10
10 -
 11
11 -
 12
12 -
 13
13 -
 14
14 -
 15
15 -
16
 |
 |