Garmin Rino 120 Owner's Manual
Garmin Rino 120 Manual
 |
UPC - 053759031962
View all Garmin Rino 120 manuals
Add to My Manuals
Save this manual to your list of manuals |
Garmin Rino 120 manual content summary:
- Garmin Rino 120 | Owner's Manual - Page 1
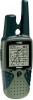
® 120 2-way radio & personal navigator® owner's manual - Garmin Rino 120 | Owner's Manual - Page 2
or improvements. Visit the Garmin Web site (www.garmin.com) for current updates and supplemental information concerning the use and operation of this and other Garmin products. Garmin®, AutoLocate®, Personal Navigator®, MapSource®, TracBack®, BlueChart®, and Rino® are registered trademarks of - Garmin Rino 120 | Owner's Manual - Page 3
Thank you for choosing the Garmin® Rino® 120 (Radio Integrated with Navigation for the Outdoors). To get the most from your new Rino 120, read through the Quick Start Guide first, then this Owner's Manual to understand all of the operating features. The Quick Start Guide describes the process of - Garmin Rino 120 | Owner's Manual - Page 4
Map 29 General Setup 30 Tracks Setup 30 Map Features Setup 30 Text Setup 31 Map Data Setup 31 Measuring Distance 31 Navigation Page 32 Using the Navigation Page 32 Navigation Page Options 34 Trip Computer Page 35 Trip Computer Page Options 35 Main Menu Page 36 Rino® 120 Owner's Manual - Garmin Rino 120 | Owner's Manual - Page 5
58 Adding or Editing from the Route Map Page 61 Rino® 120 Owner's Manual INTRODUCTION > TABLE OF CONTENTS Navigating a Route 62 Stopping Navigation 63 Data Fields for the Route Page 63 Data field options for Route Page 63 Tracks Page 64 Using the TracBack Feature 65 Setting up the Track - Garmin Rino 120 | Owner's Manual - Page 6
Frequency Chart 102 Data Field Definitions 103 Interface Information 105 FCC Compliance Information 106 FCC Licensing Information 107 Limited Warranty 108 Software License Agreement 110 Product Registration 110 Contact Garmin 110 Warnings and Cautions 111 Index 114 Rino® 120 Owner's Manual - Garmin Rino 120 | Owner's Manual - Page 7
State Highways and Exit Information. Using MapSource®, Garmin's map data software (not included), the Rino 120 could display up to 8 MB of a variety of different map information. We currently offer several mapping options that are compatible with the Rino 120 including our MetroGuide®, Topo, Fishing - Garmin Rino 120 | Owner's Manual - Page 8
to cycle through main pages • Used to quit or escape menu items Map (Z) button: • From the Map Page, press to open Zoom control window • From any other page, press to display Map Page and press again to open Zoom control Microphone: • Hold unit 3-4 inches away when talking Rino® 120 Owner's Manual - Garmin Rino 120 | Owner's Manual - Page 9
Rino 120 2-way FRS/GMRS Antenna Belt Clip Connector Mount Headset Connector with Weather cap Mount Alignment Notches Rino® 120 Owner's Manual GETTING STARTED > BACK OF THE RINO 120 GPS Antenna External Power And Data Connector with Weather cap Battery Compartment D-Ring Battery Compartment Cover - Garmin Rino 120 | Owner's Manual - Page 10
the on-screen Main Page button . Customize the Main Page sequence through the Main Menu (refer to the "Main Menu Page" section later in this guide). Radio Page Map Page Navigation Page Main Menu Trip Computer 4 Rino® 120 Owner's Manual - Garmin Rino 120 | Owner's Manual - Page 11
best results, you should initialize the GPS receiver in your Rino 120 unit before you use it the first time. Refer to the "Initializing the Rino 120" section later in this manual for instructions on initializing the unit. The Rino 120 is programmed to provide "pop-up" messages concerning operational - Garmin Rino 120 | Owner's Manual - Page 12
fully discharged. Install new batteries or recharge batteries. Using External Power Receiving Radio signal 6 Transmitting Radio signal Backlight On Radio On Peer-To-Peer On/Location Ready to Send Keylock On Alarm Clock On GPS On, Position Ready GPS On, Position Not Ready Rino® 120 Owner's Manual - Garmin Rino 120 | Owner's Manual - Page 13
• After the receiver has been moved over 500 miles with the power off from the last time you used it. Once you initialize the unit to a location, it typically computes a fix within a couple minutes. Visit the Garmin Web site at www.garmin.com for more information on GPS. Rino® 120 Owner's Manual 7 - Garmin Rino 120 | Owner's Manual - Page 14
of the Rino features, communicate with other Rino users. Also use the Radio Page to control and setup the radio, view current settings, and see informational graphics of the unit's operation. Initializing the Rino 120 To take full advantage of all of the Rino 120 features, the GPS receiver must be - Garmin Rino 120 | Owner's Manual - Page 15
: 1. Using the Thumb Stick, highlight the My ID field. Press the Thumb Stick In to activate the field and display the keyboard. 2. Move the Thumb Stick Up, Down, Left, or Right to highlight the Clear field, then press the Thumb Stick In to clear the default Name ID. Rino® 120 Owner's Manual 4. When - Garmin Rino 120 | Owner's Manual - Page 16
RADIO PAGE To change the user symbol: 1. Using slider bar on the right side indicates your current position in the list. TIP: Hold the used on other selection windows. 3. Once you have highlighted the desired symbol, press the Thumb Stick In. Changing the user symbol 10 Rino® 120 Owner's Manual - Garmin Rino 120 | Owner's Manual - Page 17
Squelch System or CTCSS) allow your Rino 120 to ignore unwanted calls from other persons using the same channel. Be sure everyone you will communicate with using your Rino has selected the same squelch code (number). Rino® 120 Owner's Manual UNIT OPERATION > RADIO PAGE Select from FRS 1-14, GMRS - Garmin Rino 120 | Owner's Manual - Page 18
38 Squelch Codes and their frequencies. As you change the main channels, the Rino 120 remembers the last channel/squelch code combination that you were using. For example, you may set the unit channel to 5 and squelch code be on the same squelch code to communicate back. 12 Rino® 120 Owner's Manual - Garmin Rino 120 | Owner's Manual - Page 19
/squelch codes decreases the scan time and Rino® 120 Owner's Manual UNIT OPERATION > RADIO PAGE helps prevent the chances of missing a transmission. The Scanlist also has Option Menu choices to Scan Current Codes or Scan All Codes. Choosing Scan Current Codes scans only the Channel and Squelch - Garmin Rino 120 | Owner's Manual - Page 20
Stick In. Radio Page Option Menu Scanlist Page The Radio Page Option Menu provides the following: Setup Radio, Setup Tones, Setup Scanlist, Turn Radio Off/On, and Turn GPS Off/On. Refer to the following pages for explanations of each item in the Radio Page Option Menu. 14 Rino® 120 Owner's Manual - Garmin Rino 120 | Owner's Manual - Page 21
in the headset when transmitting successfully using VOX. Scramble-Adds a level of security to your conversations with other Rino 120 or 130 users only. When On, the voice transmission sounds garbled to other non-scrambled Rino units, as well as other 3rd party radios. Rino® 120 Owner's Manual 15 - Garmin Rino 120 | Owner's Manual - Page 22
before changing accessories. NOTE: If the headset has a PTT (Push to Talk) button, it must be pressed for the unit to detect the headset. Microphone Sensitivity-Allows you to set the sensitivity of the internal microphone and the sensitivity of a headset microphone. 16 Rino® 120 Owner's Manual - Garmin Rino 120 | Owner's Manual - Page 23
Tone-Enable or disable the tone the unit makes when it is turned on and off. Rino® 120 Owner's Manual UNIT OPERATION > RADIO PAGE Message Tone-Choose from On or Off to have the unit emit a tone when a message or note is received. Setup Scanlist Refer to "Scanning and Monitoring" previously in this - Garmin Rino 120 | Owner's Manual - Page 24
Picture The Informational Picture on the bottom half of the Radio Page features Garmin's Mr. Mark Waypoint figure showing current GPS and radio status, and radio actions. As you operate the unit, the graphics change does not match the squelch code your unit is set to. 18 Rino® 120 Owner's Manual - Garmin Rino 120 | Owner's Manual - Page 25
Radio On; Ready to transmit Position; Activity on channel; Broken transmission. GPS and FRS/GMRS Radio On; Ready to transmit Position; Position received from Rino user GPS Off; FRS/GMRS Radio On; Position sending not available GPS On; FRS/GMRS Radio Off; GPS operation only Rino® 120 Owner's Manual - Garmin Rino 120 | Owner's Manual - Page 26
UNIT OPERATION > USING THE RINO 120 RADIO FEATURES Using the Rino 120 Radio Features Your Rino 120 unit provides many features to enhance your radio experience, such as transmitting locations and receiving contact information. This section reviews some of the advanced radio features. Refer to the " - Garmin Rino 120 | Owner's Manual - Page 27
on the Thumb Stick to change to the next data field. UNIT OPERATION > USING THE RINO 120 RADIO FEATURES Press Left or Right on the Thumb Stick to view different contact data. To accept a new contact: 1. When a new contact is received, the New Contact Page automatically appears. 2. Highlight OK and - Garmin Rino 120 | Owner's Manual - Page 28
Map Page: 1. From the Contact Review Page, highlight Map and press the Thumb Stick In. 2. Press the Page key when done to return to the Contact Review Page. Contact Bar Contacts also show on the Map Page. Highlight the contact and the map centers on their last position. 22 Rino® 120 Owner's Manual - Garmin Rino 120 | Owner's Manual - Page 29
the Thumb Stick In. 6. Highlight Send Location and press In again. The unit now sends the point to the other Rino users on your channel/squelch code. If using the Scramble feature, receiving radios must also have Scramble enabled. Choose Send Location and press In. Rino® 120 Owner's Manual 23 - Garmin Rino 120 | Owner's Manual - Page 30
the Contact Bar, the Map Page centers the map on that contact and displays its name, direction, and distance. In many instances the map displays an Accuracy Circle surrounding the Position Icon. The Rino 120 uses both 24 Accuracy Circle Map Scale Contact Bar Position Icon Rino® 120 Owner's Manual - Garmin Rino 120 | Owner's Manual - Page 31
to recenter the map on your current position. The scale can be Rino® 120 Owner's Manual UNIT OPERATION > MAP PAGE To change scales on the Map Page: 1. Press the Zoom (Z) key to open the Zoom window. 2. Use the Thumb Stick to change the map scale to show more map area with less detail or less map - Garmin Rino 120 | Owner's Manual - Page 32
size, map orientation, and map detail. Refer to the "Setting up the Map" section for complete instructions. Measure Distance-Displays the distance from one point on the map to another. Restore Defaults-Returns the Map Page to the original factory settings (defaults). 26 Rino® 120 Owner's Manual - Garmin Rino 120 | Owner's Manual - Page 33
used to point at and identify items on the map, and to move the map in order to view areas beyond the current viewing area on the display. The map panning function is activated from the Option Menu on the Map Page. Use set a proximity Rino® 120 Owner's Manual UNIT OPERATION > MAP PAGE circle around - Garmin Rino 120 | Owner's Manual - Page 34
Map Page, Navigation Page, and the Trip Computer. For definitions of these data fields, refer to the "Appendix." Bearing Course Current Destination Current Distance Current ETA Current ETE Elevation Final Destination Final Distance Final ETA Final ETE GPS ) 28 Rino® 120 Owner's Manual - Garmin Rino 120 | Owner's Manual - Page 35
or Down on the Thumb Stick to highlight an item on the list. Press Right to return to the sub-page buttons. 4. Use the Thumb Stick to highlight the desired option and press In to activate. 5. Press the Page key or the on-screen X button to return to the Map Page. Rino® 120 Owner's Manual 29 - Garmin Rino 120 | Owner's Manual - Page 36
Track Points allowed Map Features Setup Points of Interest, Waypoints, Street Label, and Land Cover-Off, Auto, or 20 feet to 500 miles; sets the maximum scale at which that feature should appear on the screen. Some types of data display only at certain zoom scales. 30 Rino® 120 Owner's Manual - Garmin Rino 120 | Owner's Manual - Page 37
Street Label, and Land Cover-None, Small, Medium, or Large; control the screen size of the name. Map Data Setup Show-Check box; check mark determines if map data is used or not. Option Menu . 4. To stop measuring, press the Page key. Map Pointer Field Measuring distance Rino® 120 Owner's Manual 31 - Garmin Rino 120 | Owner's Manual - Page 38
Using the Navigation Page The two main components of the Navigation Page are the Bearing Pointer and Compass Ring. The Bearing Pointer always points directly to the destination, no matter what your current location might be. The Compass Ring displays your heading. 32 Rino® 120 Owner's Manual - Garmin Rino 120 | Owner's Manual - Page 39
is selected. The Compass Ring displays your heading while you are moving, but the data fields to the right of the page will not display any Rino® 120 Owner's Manual UNIT OPERATION > NAVIGATION PAGE destination related data, such as the Estimated Time of Arrival. CDI Scale Navigation Page with Course - Garmin Rino 120 | Owner's Manual - Page 40
to highlight the desired data field and then press it In to display the list of data options. 2. Select the desired option from the list and press the Thumb Stick In. The list of data field choices may be found on page 28 and definitions may be found in the "Appendix." 34 Rino® 120 Owner's Manual - Garmin Rino 120 | Owner's Manual - Page 41
the data field title is selected, press the Thumb Stick In to select a new data field choice. Selecting a data field Rino® 120 Owner's Manual Reset-Clears recorded data from the page to begin recording new data. Big/Small Numbers-Changes the display from seven small data fields to two large data - Garmin Rino 120 | Owner's Manual - Page 42
Locations, Cities, Interstate Exits, Points of Interest, Addresses, and Intersections. (Some require MapSource data.) Routes Page-Allows you to create and store routes for repeated use. Tracks Page-Provides access to the track log, saved tracks, and contact tracks. 36 Rino® 120 Owner's Manual - Garmin Rino 120 | Owner's Manual - Page 43
, heading selection, interface setups, and system software information. Calendar Page-Provides you with a Rino® 120 Owner's Manual UNIT OPERATION > MAIN MENU PAGE Hunt & Fish Page-Provides you with a listing of best times for hunting and fishing for a chosen location. Area Calculation Page-Use - Garmin Rino 120 | Owner's Manual - Page 44
the Main Pages, plus additional pages. The default Main pages are Radio, Map, Navigation, Trip Computer, and Main Menu. The Main Menu cannot press In. Select Move then move the Menu item Up or Down using the Thumb Stick. When the desired position is displayed, press the Rino® 120 Owner's Manual - Garmin Rino 120 | Owner's Manual - Page 45
Menu Mark Waypoint-Marks your current location as a waypoint. Opens the data is loaded into the Rino 120. Send Note-Sends a note to other Rino 120 users. Enable Keylock-Enables keylock so keys are not inadvertently pushed. Press and hold the Page key to unlock the keys. Rino® 120 Owner's Manual - Garmin Rino 120 | Owner's Manual - Page 46
name field. • To assign an identifying symbol to a waypoint, use the Thumb Stick to highlight the symbol block just above the waypoint name. • To view the waypoint details, highlight the details field and press Left or Right on the Thumb Stick to change to the next data field. Rino® 120 Owner's Manual - Garmin Rino 120 | Owner's Manual - Page 47
Stick to save the item as a waypoint. Saving a map feature as a waypoint Rino® 120 Owner's Manual UNIT OPERATION > WAYPOINTS To create a waypoint using the panning arrow: 1. With the Pan Map feature active, move the panning arrow (map pointer) on the map to the location you want to mark, then press - Garmin Rino 120 | Owner's Manual - Page 48
Thumb Stick In to display the keyboard. (For Notes, highlight Edit and press In to start entering data, up to 30 characters.) Select OK and press the Thumb Stick In to finish. 3. Highlight the OK button the press the Thumb Stick to save the changes. Project Waypoint Page 42 Rino® 120 Owner's Manual - Garmin Rino 120 | Owner's Manual - Page 49
Use the Find 'N Go Menu map or selected from the Find 'N Go Menu). 2. Open the Option Menu at the top of the page, select Save As Waypoint. 3. Press the Thumb Stick In to save the item to the Waypoints List. 4. Highlight Save As Waypoint and press the Thumb Stick In. Rino® 120 Owner's Manual - Garmin Rino 120 | Owner's Manual - Page 50
the selected category, while the Nearest list contains only those items that are near to your Current Location or the Map Pointer. These pages are structured with a set of sub-menus and location information pages that guide you through the process of finding locations. 44 Rino® 120 Owner's Manual - Garmin Rino 120 | Owner's Manual - Page 51
, elevation, distance, bearing, and three on-screen buttons for Goto, Map, and OK functions. Nearest Waypoints selected in Find N' Go Menu Rino® 120 Owner's Manual UNIT OPERATION > FIND 'N GO To find a waypoint near your current location: 1. Use the Thumb Stick to select Waypoint from the Find 'N Go - Garmin Rino 120 | Owner's Manual - Page 52
Use the Map to view the waypoint location on the map Rino users), Project Waypoint, Set Proximity (alarm), Add to Route, View Sun & Moon (reports for that waypoint), View Hunt & Fish (reports for that waypoint), or Reposition Here. Entering a waypoint name to find By Name 46 Rino® 120 Owner's Manual - Garmin Rino 120 | Owner's Manual - Page 53
received in the Rino 120 can be found by selecting the Contacts option from the Find 'N Go Menu. UNIT OPERATION > FIND 'N GO If the contact did not have a GPS . Select Map to view the contact's location on the map, or select Delete to delete the contact. Rino® 120 Owner's Manual Contact Information - Garmin Rino 120 | Owner's Manual - Page 54
access additional features. You can select: Send Location (to other Rino users), Project Waypoint, Save as a Waypoint, Set Proximity (alarm), Add to Route, View Sun & Moon (reports for that waypoint), or View Hunt & Fish (reports for that waypoint). Find Nearest Cities List Rino® 120 Owner's Manual - Garmin Rino 120 | Owner's Manual - Page 55
desired exit. Rino® 120 Owner's Manual UNIT OPERATION > FIND 'N GO 4. Press the Thumb Stick In to display the Information Page for that exit. This page contains the exit description with a list of available services near that exit along with the distance and bearing fields. 5. Use the Thumb Stick - Garmin Rino 120 | Owner's Manual - Page 56
, Asian, Barbecue, and Chinese. Food & Drink types Once you have selected an item, you can display the Information Page for that item. You can then use the onscreen buttons to Goto or view the location on the Map; or use the Option Menu for more choices. 50 Rino® 120 Owner's Manual - Garmin Rino 120 | Owner's Manual - Page 57
from the list and then press it In to display the Information Page for that item. 5. Use the on-screen buttons to Goto or view on the Map, or use the page Option Menu. Rino® 120 Owner's Manual UNIT OPERATION > FIND 'N GO Nearest Food & Drink 6. Press the Option Menu button to access additional - Garmin Rino 120 | Owner's Manual - Page 58
quality of each match. You may also use the Option Menu to Clear City, Clear Postal Code, or Clear All. 6. Use the on-screen buttons at the bottom of the page to Goto, view the item on the Map, OK to close, or use the Option Menu for other choices. Entering an Address 52 Rino® 120 Owner's Manual - Garmin Rino 120 | Owner's Manual - Page 59
eld at the top of the list using the keyboard data entry method discussed in the Quick Start Guide. Once you have spelled enough of Use the on-screen buttons at the bottom of the page to Goto, view the item on the Map, OK to close, or use the Option Menu for other choices. Rino® 120 Owner's Manual - Garmin Rino 120 | Owner's Manual - Page 60
the item. Select Map to view the waypoint location Use the page Option Menu to send the location of that point, project a new waypoint from its location, set a proximity circle, add the item to an existing route, or view sun/moon or hunt/fish position data for this time and date. Rino® 120 Owner's Manual - Garmin Rino 120 | Owner's Manual - Page 61
in the Edit Note field. Press the Thumb Stick In to edit the Saved Note. Refer to the Quick Start Guide for information on entering data using the on-screen keyboard. Rino® 120 Owner's Manual UNIT OPERATION > SENDING A NOTE When you are done editing the note, push the Thumb Stick In when OK is - Garmin Rino 120 | Owner's Manual - Page 62
, the Bearing Pointer reverses and the distance increases. To stop navigation, select the on-screen Option Menu button at the top of the Navigation or Map Page. Select Stop Navigation, then press the Thumb Stick In. Viewing a Goto on the Map Page 56 Rino® 120 Owner's Manual - Garmin Rino 120 | Owner's Manual - Page 63
routes can be created using a PC and MapSource mapping programs and then transferred to the unit's memory. Creating and Using a Route Create a route from the Routes Page. You can then use that route to get of an existing route at any time by using the Find 'N Go Menu. Rino® 120 Owner's Manual 57 - Garmin Rino 120 | Owner's Manual - Page 64
item from the Find 'N Go Menu and display its Information Page. If a contact is used in a route, the route changes as the contact's position is updated, or it may be saved as a Waypoint to serve as a stationary point. 2. route back to the original order, repeat this process. Rino® 120 Owner's Manual - Garmin Rino 120 | Owner's Manual - Page 65
Menu button and press the Thumb Stick In to access the Option Menu. Rino® 120 Owner's Manual UNIT OPERATION > ROUTE PAGE 2. Select Restore Defaults and then press the Thumb Stick In to restore factory settings. To review a route point: 1. Select the point from the Route Points List and press the - Garmin Rino 120 | Owner's Manual - Page 66
UNIT OPERATION > ROUTE PAGE Route point review options 3. With the new point highlighted, press the Thumb Stick In to select the waypoint. 3. Use the Thumb Stick to move the point up or down in the list. Press the Thumb Stick In to leave the waypoint in the new list order. Rino® 120 Owner's Manual - Garmin Rino 120 | Owner's Manual - Page 67
screen Use button to return to the Map Page and then press the Thumb Stick In again to place the new waypoint. To add a route point within a route: 1. Follow steps 1 and 2 in the previous instructions. 2. Use the , then press it again after returning to the Route Map. Rino® 120 Owner's Manual 61 - Garmin Rino 120 | Owner's Manual - Page 68
press the Thumb Stick In to begin navigating the route. The screen changes to the Navigation Page. 3. Move to the Map Page to view the route and your current location. 4. Begin moving, watching directional information on the Navigation Page or your progress on the Map Page. Rino® 120 Owner's Manual - Garmin Rino 120 | Owner's Manual - Page 69
that option for the selected data field. UNIT OPERATION > ROUTE PAGE Changing the Route Data Fields Data field options for Route Page: • Distance to Point • ETA To Point • ETE To Point • Leg Course • Leg Distance • Leg Time • Pointer • Sunrise At Point • Sunset At Point Rino® 120 Owner's Manual 63 - Garmin Rino 120 | Owner's Manual - Page 70
log and display the Tracks Page. The Tracks Page shows the track name (which can be renamed using the keyboard for data entry), the total distance of the track, track area (if available), a Show on Map option, and on-screen buttons for Map, OK, and Tracback. Tracks Page 64 Rino® 120 Owner's Manual - Garmin Rino 120 | Owner's Manual - Page 71
you start traveling. The percentage of memory used by the current track log is displayed in a window Map Page as you navigate. You may save up to 20 tracks with 250 points per track in the unit. Saved Contact tracks count towards this total. Tracks are marked BEGIN and END. Rino® 120 Owner's Manual - Garmin Rino 120 | Owner's Manual - Page 72
To End) are displayed. 2. Highlight the desired option and press the Thumb Stick In to enable. 3. Use the Map Page or the Navigation Page to navigate the Track. Setting up the Track Log You can set the Interval options change to accommodate the Record Method choices. 66 Rino® 120 Owner's Manual - Garmin Rino 120 | Owner's Manual - Page 73
to open Proximity Waypoints Page Rino® 120 Owner's Manual UNIT OPERATION > PROXIMITY PAGE To add a proximity point: 1. Use the Thumb Stick to highlight open the item. 2. From the Review Page, select Use. Press In again to begin entry of the proximity radius. Use the Thumb Stick to enter a - Garmin Rino 120 | Owner's Manual - Page 74
the Sky View. Satellites and their signals appear as hollow shapes until a signal is received and then they appear darkened in. The stronger the signal, the taller the signal your current location showing satellites and their assigned numbers. The outer ring represents 68 Rino® 120 Owner's Manual - Garmin Rino 120 | Owner's Manual - Page 75
achieve navigational status. GPS signals do not travel through heavy objects or people. For best results, keep the unit in clear view of the sky. The Rino® 120 Owner's Manual UNIT OPERATION > SATELLITE PAGE WAAS system is only available in the U.S. Satellite Page using WAAS Satellite Strength At - Garmin Rino 120 | Owner's Manual - Page 76
page and then press it In. 2. Use the Thumb Stick to highlight the Use With GPS Off option and then press it In. The Rino 120 stops tracking satellites and cannot be used for navigation. However, the next time you turn the unit on, it returns to Normal GPS operation. 70 Rino® 120 Owner's Manual - Garmin Rino 120 | Owner's Manual - Page 77
automatically. If you choose Use Map, a map page displays with instructions stating, "Point to your approximate location and press ENTER." Use the Thumb Stick to move the map pointer to your location on the map and press the Thumb Stick In. Rino® 120 Owner's Manual UNIT OPERATION > SATELLITE PAGE - Garmin Rino 120 | Owner's Manual - Page 78
UNIT OPERATION > SETUP PAGES Setup Pages The Setup Pages allow you to customize the Rino 120 to your personal preferences. You can choose time settings, units of measure, display PM cycles) or 24hour time format ( a 24-hour cycle, also called Military Time). 72 Rino® 120 Owner's Manual - Garmin Rino 120 | Owner's Manual - Page 79
Thumb Stick In. Rino® 120 Owner's Manual UNIT OPERATION > SETUP PAGES 6. If you choose Other, you must enter a UTC offset value. The correct time displays at the bottom of the page. Units Setup Page The Units features are best used by individuals with a working knowledge of map grids and datums - Garmin Rino 120 | Owner's Manual - Page 80
unit memory, it always references the LORAN chain number and secondary stations currently selected in the Setup TD field. If you enter a different may download Garmin's Loran TD Position Format Handbook from the Garmin Web site at http://www.garmin.com/support/ userManual.jsp. Rino® 120 Owner's Manual - Garmin Rino 120 | Owner's Manual - Page 81
title block of the map. If you are comparing GPS coordinates to a paper map, chart, or other reference, the map datum in this field must match the horizontal map datum used to generate the map or other reference. The seconds, one minute, or two minutes before timing out. Rino® 120 Owner's Manual 75 - Garmin Rino 120 | Owner's Manual - Page 82
UNIT OPERATION > SETUP PAGES Contrast Adjustment-Can be adjusted from light to dark using the slider adjacent to the contrast bar. To access the Display Setup Page: 1. Press the In. 2. Highlight the desired option and then press the Thumb Stick In. 76 Heading Setup Page Rino® 120 Owner's Manual - Garmin Rino 120 | Owner's Manual - Page 83
to choose from different input/output serial data formats. This feature is used when connecting to external NMEA devices, a DGPS beacon receiver, a personal computer, etc. See the "Appendix" for using the Rino 120 with MapSource. Rino® 120 Owner's Manual UNIT OPERATION > SETUP PAGES To access the - Garmin Rino 120 | Owner's Manual - Page 84
to manually tune the receiver. Refer to the beacon receiver instructions. To select a serial data format: 1. Highlight the Serial Data Format field and then press the Thumb Stick In. 2. Highlight an option and then press the Thumb Stick In to activate it. Interface Setup Page 78 Rino® 120 Owner - Garmin Rino 120 | Owner's Manual - Page 85
Setup Page. The Option Menu allows you restore defaults or display the current version of unit operating software and the Unit I.D. Number. Software updates and instructions for downloading are available from the Garmin Web site (www.garmin.com). UNIT OPERATION > SETUP PAGES Choose one of the four - Garmin Rino 120 | Owner's Manual - Page 86
reference note for a selected date: 1. Use the Thumb Stick to highlight the day of the month and then press In to display the pop-up Menu (containing New Note, View Sun & Moon, and View Hunt & Fish). 2. Highlight and select New Note to begin entering text from the keyboard. Rino® 120 Owner's Manual - Garmin Rino 120 | Owner's Manual - Page 87
using the Thumb Stick. 2. Review the note in the note window below the calendar. 3. Press the Thumb Stick In to display the pop-up menu. 4. Select View Sun & Moon to view the Sun & Moon Page for that date. Select View Hunt & Fish to view the Hunt & Fish Page for that date. Rino® 120 Owner's Manual - Garmin Rino 120 | Owner's Manual - Page 88
control field menu. Remember to enter alarm times in the same time format (UTC or local) you are using for your system. The unit must be on for the alarm clock to work. To access the Alarm Clock: appears on the screen. Press the Thumb Stick In to acknowledge the alarm. 82 Rino® 120 Owner's Manual - Garmin Rino 120 | Owner's Manual - Page 89
Stick In to display the Scientific/ Standard and Radian/Degrees options. 2. Highlight the option you want to change and then press the Thumb Stick In. 3. Use the Thumb Stick to move about the calculator, enter numbers, and perform calculations. Calculator Page Rino® 120 Owner's Manual 83 - Garmin Rino 120 | Owner's Manual - Page 90
Reset the stopwatch when the timer is stopped. Use the Thumb Stick to highlight the Reset field and then press In. You may also press the Zoom (Z) key to reset to manually marking each lap, open the Option Menu and select the Lap by Button Press option. Stopwatch Page 84 Rino® 120 Owner's Manual - Garmin Rino 120 | Owner's Manual - Page 91
, then press the Thumb Stick In to begin data entry of individual characters. 2. To display the current date and time, highlight the page Option Menu and press the Thumb Stick In to display Use Current Time. Press the Thumb Stick In. Rino® 120 Owner's Manual UNIT OPERATION > SUN & MOON To set the - Garmin Rino 120 | Owner's Manual - Page 92
your current location. 3. If you choose Use Map, a map page displays. Use the map pointer to identify the desired location and then press In on the Thumb Stick. If you choose Use Find 'N Go Menu, follow instructions for using responsibility to know and abide by these laws. Rino® 120 Owner's Manual - Garmin Rino 120 | Owner's Manual - Page 93
5. Use the Thumb Stick to store the area as a saved track. Rino® 120 Owner's Manual UNIT OPERATION > AREA CALCULATOR Area Calculation Page To review the area of a saved track: 1. On the Tracks Page, highlight a Saved Track. 2. Press the Thumb Stick In to see a map with the area shown in a data field - Garmin Rino 120 | Owner's Manual - Page 94
. Highlight the appropriate icon and then press the Thumb Stick In to play the desired game. Brief instructions are displayed when you start each game. All players must be on the same channel/squelch code to and press In. 3. Highlight Start and press In to begin the game. Rino® 120 Owner's Manual - Garmin Rino 120 | Owner's Manual - Page 95
that object! Adjust the rules to your liking! • To fire at the cursor location, press the Thumb Stick In. • To fire at your current location, press the Talk key. • Press Call to view the scoreboard at any time. • Press Page to quit the game at any time. Waypoint Bomber Rino® 120 Owner's Manual 89 - Garmin Rino 120 | Owner's Manual - Page 96
point and assign it a symbol to be used as a stationary team member. Wait 30 instructions, to turn the sound On/Off, or to quit. Beast Hunt The objective is to find and kill the beast with an arrow before it incinerates you or you fall into one of several Beast Hunt 90 Rino® 120 Owner's Manual - Garmin Rino 120 | Owner's Manual - Page 97
x 1.6" D; 7" H with antenna (11.4 x 5.8 x 4.1; GPS Receiver: WAAS Enabled, Differential-ready, 12 parallel channel Rino® 120 Owner's Manual APPENDIX > SPECIFICATIONS Acquisition time: Approx. 15 seconds (warm start) Approx. 45 seconds (cold start) Approx. 5 minutes (First Time/AutoLocate®) Update - Garmin Rino 120 | Owner's Manual - Page 98
temperature decreases. Extensive use of screen backlighting and the radio significantly reduces battery life. Different brands of batteries vary in performance. 45, 5, 90 Duty Cycle - 5% receive with audio unmuted, 5% transmit and 90% standby (receive with audio muted) 92 Rino® 120 Owner's Manual - Garmin Rino 120 | Owner's Manual - Page 99
your Rino. APPENDIX > ACCESSORIES Headset with VOX Boom Mic-Hands-free at its best! Utilize the Rino's VOX (Voice Operated Transmission) feature with this headset and voice activated boom mic. Instructional Video-For getting accustomed to your Rino basic operations quickly. MapSource Map Data CD - Garmin Rino 120 | Owner's Manual - Page 100
Roads and Recreation 8. WorldMap Map data transfer requires the use of a PC, a Garmin MapSource CD-ROM, and the PC Interface Cable with RS-232 serial port connector supplied with this unit. Follow detailed instructions for data transfer in the MapSource User's Manual. 94 Rino® 120 Owner's Manual - Garmin Rino 120 | Owner's Manual - Page 101
until it is fully seated in the unit. 4. Turn on the Rino 120 and follow instructions for map data transfer provided in the MapSource User's Manual. See also the "Interface Setup Page" section for unit interface settings. APPENDIX > TRANSFERRING MAPSOURCE DATA Rino® 120 Owner's Manual 95 - Garmin Rino 120 | Owner's Manual - Page 102
. They may or may not hear you and members of your group on their own radios. Squelch codes act as a filter, blocking your FRS radio from hearing other unwanted FRS users. Remember though, these are public-use frequencies and everyone has a right to talk or listen in. 96 Rino® 120 Owner's Manual - Garmin Rino 120 | Owner's Manual - Page 103
, but instead radiate in a straight line from the transmitting antenna. If there Rino® 120 Owner's Manual APPENDIX > WHAT IS FRS? is an obstruction between the transmitting FRS radio and the receiving FRS radio, the signal will not be received. Smaller obstructions, such as trees, cars, and even - Garmin Rino 120 | Owner's Manual - Page 104
Map Setup Map option and activate the check box. Access the Tracks Page, highlight the On button and press the Thumb Stick In. Use the Map Page Setup Page to reduce map clutter or change the map scale. Highlight the on-screen button and then press the Thumb Stick In. 98 Rino® 120 Owner's Manual - Garmin Rino 120 | Owner's Manual - Page 105
APPENDIX > RADIO TROUBLESHOOTING GUIDE Radio Troubleshooting Guide Symbol Probable Cause Remedy Radio not transmitting Messages not being received by others. keys except Talk will work. Rino® 120 Owner's Manual Talk key may not be fully depressed FRS/GMRS Radio feature may not be on. Incorrect - Garmin Rino 120 | Owner's Manual - Page 106
Receive use in countries outside of the U.S. or Canada, please check with that government for any restrictions on FRS or GMRS use. GMRS repeater channels are not approved for use by the Canadian government, so they are disabled on Rino 120 units sold in Canada. 100 Rino® 120 Owner's Manual - Garmin Rino 120 | Owner's Manual - Page 107
GMRS Frequency Chart Channel # Transmit Frequency (MHz) Receive Frequency (MHz) 15 462.5500 462.5500 16 462.5750 462.5750 17 Primary 8 GMRS Repeater 1 GMRS Repeater 2 GMRS Repeater 3 GMRS Repeater 4 GMRS Repeater 5 GMRS Repeater 6 GMRS Repeater 7 GMRS Repeater 8 Rino® 120 Owner's Manual 101 - Garmin Rino 120 | Owner's Manual - Page 108
FRS radios from third party manufacturers be aware that there are CTCSS differences in some radios. Some of the tones on one radio may not be available on other radios. Charts showing the different Squelch Codes and manufacturers can be located on the Internet. 102 Rino® 120 Owner's Manual - Garmin Rino 120 | Owner's Manual - Page 109
GPS Accuracy-The estimated accuracy of the GPS signal. Heading-Your moving direction. Location (lat/lon)-Your current GPS position. (Trip Computer Page Only.) Location (selected)-The lat/lon of point defined on map Pointer-Indicates the direction to the next destination. Rino® 120 Owner's Manual 103 - Garmin Rino 120 | Owner's Manual - Page 110
> DATA FIELD reset. Turn-The angle difference (in degrees) between the bearing to your destination and your current line of travel. L means turn Left. R means turn Right. Velocity Made Good-The speed at which you are closing on a destination along a desired course. 104 Rino® 120 Owner's Manual - Garmin Rino 120 | Owner's Manual - Page 111
hard-wired to a serial connector using a Data Only Cable. Refer to the wiring diagram and the Rino 120 unit data connection illustrated below. The PC Interface Cable provided with this unit allows you to connect your Rino 120 to a PC-compatible computer's serial port. Rino® 120 Owner's Manual 105 - Garmin Rino 120 | Owner's Manual - Page 112
that is on a different circuit than the receiver's circuit. • Consult the dealer or an experienced radio/TV technician for help. The Rino 120 does not contain any user-serviceable parts. Repairs should only be made by an authorized Garmin service center. Unauthorized repairs or modifications could - Garmin Rino 120 | Owner's Manual - Page 113
FCC Licensing Information The Rino 120 two-way radio operates on General Mobile Radio Service (GMRS) frequencies regulated by the Federal Communications Commission (FCC) in the United States. Operation on the GMRS frequencies is subject to additional rules as specified in 47 CFR Part 95. In order to - Garmin Rino 120 | Owner's Manual - Page 114
shipping instructions and an RMA tracking number. The unit should be securely packed with the tracking number clearly written on the outside of the package. The unit should then be sent, freight charges prepaid, to any Garmin warranty service station. A copy of the original Rino® 120 Owner's Manual - Garmin Rino 120 | Owner's Manual - Page 115
Taiwan for service. The Garmin Rino 120 has no user-serviceable parts. Should you ever encounter a problem with your unit, please take it to an authorized Garmin dealer for repairs. The Rino 120 is fastened shut with screws. Any attempt to open the case to change or modify the unit in any way will - Garmin Rino 120 | Owner's Manual - Page 116
using your Rino 120, or if you have any questions, in the U.S.A. contact Garmin Product Support by phone: 913/397.8200 or 800/800.1020, Monday-Friday, 8 AM-5 PM Central Time; or by e-mail at [email protected]. In Europe, contact Garmin (Europe) Ltd. at 44/0870.8501241. 110 Rino® 120 Owner's Manual - Garmin Rino 120 | Owner's Manual - Page 117
and receiver. When it is on, it receives and also sends out radio frequency (RF) signals. In August 1996, The Federal Communications Commissions (FCC) adopted RF exposure guidelines with safety levels for handheld wireless radios. Those guidelines are consistent with Rino® 120 Owner's Manual 111 - Garmin Rino 120 | Owner's Manual - Page 118
discuss alternatives. Other Medical Devices-If you use any other personal medical device, consult the manufacturer of your device to determine if it is adequately shielded from external RF energy. Your physician may be able to assist you in obtaining this information. 112 Rino® 120 Owner's Manual - Garmin Rino 120 | Owner's Manual - Page 119
or storage facilities; vehicles using liquefied petroleum gas (such as propane or butane); areas where the air contains chemicals or particles, such as grain, dust, or metal powders; and any other area where you would normally be advised to turn off your vehicle engine. Rino® 120 Owner's Manual 113 - Garmin Rino 120 | Owner's Manual - Page 120
50 Find 'N Go 44, 56, 58 FRS 1, 8, 11, 96, 102 G Games 88 Garmin sentences 105 General Mobile Radio Service 1. See also GMRS GMRS 1, 8, 11, 16, 96 GMRS Repeater Channels 16 Goto 45, 46, 47, 48, 49, 50, 56 GPS 7 On/Off 17, 69 Status 18 GRI Chain 74 H Headset Microphone 16 Rino® 120 Owner's Manual - Garmin Rino 120 | Owner's Manual - Page 121
LORAN TD Format 74 M Main Display Pages 4 Main Menu 36 Rino® 120 Owner's Manual MapSource 1, 24, 52, 57, 78 Map Data 31, 52, 94 Map Detail 30 Map Page 24 Options 26 Overview 24 Pan Map 26 Restore Defaults 26 Scale 25 Setup Map 26, 29 Map Pointer 27 Mark Waypoint 18 Measure Distance 26, 31 Message - Garmin Rino 120 | Owner's Manual - Page 122
15, 20, 23 Send Note 55 Setup Map 26, 29 Page 72 Radio 15 Scanlist 17 TD field 74 Time Page 72 Tones 17 Set Alarm Clock 82 Shortcut Menu 5, 39 Show... 26 Show Data Fields 34 Sight 'N Go 34 Signal Strength 40, 41 Create 40, 41 Delete 43 Edit 42 Move 43 Project 42 Z Zoom 25, 30 Rino® 120 Owner's Manual - Garmin Rino 120 | Owner's Manual - Page 123
- Garmin Rino 120 | Owner's Manual - Page 124
the latest free software updates (excluding map data) throughout the life of your Garmin products, visit the Garmin web site at www.garmin.com. © Copyright 2002-2006 Garmin Ltd. or its subsidiaries Garmin International, Inc. 1200 East 151st Street, Olathe, Kansas 66062, U.S.A. Garmin (Europe) Ltd
-
 1
1 -
 2
2 -
 3
3 -
 4
4 -
 5
5 -
 6
6 -
 7
7 -
8
-
9
-
10
-
11
-
12
-
13
-
14
-
15
-
16
-
17
-
18
-
19
-
20
-
21
-
22
-
23
-
24
-
25
-
26
-
27
-
28
-
29
-
30
-
31
-
32
-
33
-
34
-
35
-
36
-
37
-
38
-
39
-
40
-
41
-
42
-
43
-
44
-
45
-
46
-
47
-
48
-
49
-
50
-
51
-
52
-
53
-
54
-
55
-
56
-
57
-
58
-
59
-
60
-
61
-
62
-
63
-
64
-
65
-
66
-
67
-
68
-
69
-
70
-
71
-
72
-
73
-
74
-
75
-
76
-
77
-
78
-
79
-
80
-
81
-
82
-
83
-
84
-
85
-
86
-
87
-
88
-
89
-
90
-
91
-
92
-
93
-
94
-
95
-
96
-
97
-
98
-
99
-
100
-
101
-
102
-
103
-
104
-
105
-
106
-
107
-
108
-
109
-
110
-
111
-
112
-
113
-
114
-
115
-
116
-
117
-
118
-
119
-
120
-
121
-
122
-
123
-
124
 |
 |

®
120
2-way radio & personal navigator
®
owner’s manual