Garmin Rino 650t Owners Manual
Garmin Rino 650t Manual
 |
View all Garmin Rino 650t manuals
Add to My Manuals
Save this manual to your list of manuals |
Garmin Rino 650t manual content summary:
- Garmin Rino 650t | Owners Manual - Page 1
rino® 600 series owner's manual - Garmin Rino 650t | Owners Manual - Page 2
in the content of this manual without obligation to notify any person or organization of such changes or improvements. Go to www.garmin.com for current updates and supplemental information concerning the use of this product. Garmin®, the Garmin logo, Rino®, BlueChart®, and City Navigator® are - Garmin Rino 650t | Owners Manual - Page 3
of Contents Getting Started 3 Keys 3 Manual Conventions 4 Battery Information 4 Acquiring Satellite Signals 6 Registering a Saved Track 17 Navigation 18 Navigating to a Destination 18 Map 19 Compass 19 Navigating to a Contact 21 Geocaches 21 Routes Rino 600 Series Owner's Manual 1 - Garmin Rino 650t | Owners Manual - Page 4
the Software 39 Viewing Device Information 39 Specifications 39 About the Batteries 40 Caring for the Device 41 Data Management 42 Additional Maps 45 Optional Accessories 45 Data Field Options 46 Troubleshooting 51 FCC Licensing Information 53 Index 54 2 Rino 600 Series Owner's Manual - Garmin Rino 650t | Owners Manual - Page 5
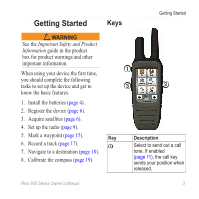
Important Safety and Product Information guide in the product box for to set up the device and get to know the basic features. 1. Install the batteries (page 4). 2. Register the device (page 6). 3. Acquire satellites (page 6). 4. sends your position when released. Rino 600 Series Owner's Manual 3 - Garmin Rino 650t | Owners Manual - Page 6
Yes." Installing the Lithium-ion Battery note: The lithium-ion battery pack can be used only with the Rino® 650 and 655t. 1. Locate the battery pack ➊ that came in the product box. ➊ Battery Information The device operates on the included lithium-ion battery pack or four AA batteries. For tips on - Garmin Rino 650t | Owners Manual - Page 7
pack, you can use alkaline, NiMH, or lithium batteries. This is especially handy when you are on the trail and cannot charge the lithium-ion battery pack. Use NiMH or lithium batteries for best results. 1. Turn the D-ring counter-clockwise, and remove the cover. Rino 600 Series Owner's Manual - Garmin Rino 650t | Owners Manual - Page 8
the original sales receipt, or a photocopy, in a safe place. Turning On the Backlight The backlight will turn off after a period of inactivity. To change the backlight timeout, see page 29. • Select . • Touch the screen. Alerts and messages also activate the backlight. Rino 600 Series Owner's Manual - Garmin Rino 650t | Owners Manual - Page 9
on the lithium-ion battery. This is to extend the AA battery life. 1. While the device is on, select . 2. Use + and - to adjust the brightness level. Locking the Screen note: This action does not lock the keys. 1. Select . 2. Select Lock Screen. Rino 600 Series Owner's Manual Getting Started - Garmin Rino 650t | Owners Manual - Page 10
radio page provides the user interface for Family Radio Service (FRS) and General Mobile Radio Service (GMRS) radio operations. About the Radio The Rino has a total of 30 channels and 121 squelch 1. Select > Setup Scanlist. 2. Select a channel to add. 3. Select . 8 Rino 600 Series Owner's Manual - Garmin Rino 650t | Owners Manual - Page 11
not available on devices sold in Canada. Position reporting is not allowed by the FCC on repeater channels. • Headset Type-allows you to select the type of headset you are using. To purchase accessories, go to http://buy.garmin.com or contact your Garmin dealer. Rino 600 Series Owner's Manual 9 - Garmin Rino 650t | Owners Manual - Page 12
review previously received notes from your contacts. You can edit and save favorite notes to quickly send them later. Creating a Note 1. Select Notes > . 2. Write the note. The maximum character limit is 13. 3. Select . 4. Select an option: 10 Rino 600 Series Owner's Manual - Garmin Rino 650t | Owners Manual - Page 13
restrictions. You can send your location to another Rino using peer-to-peer positioning. You can also track the movement of other Rino users and navigate to their locations. Radio Enabling Use FRS/GMRS. 3. Select a category. 4. Select an item. 5. Select Send. Rino 600 Series Owner's Manual 11 - Garmin Rino 650t | Owners Manual - Page 14
US only on the Rino 650 and 655t. SAME (Specific map with color-coded watches and warnings. Select Weather Map to view the weather alert on the map. You can scan over a county warning on the map and select the information button to see more detailed information. 12 Rino 600 Series Owner's Manual - Garmin Rino 650t | Owners Manual - Page 15
Radio 2W Transmit power at 2 watts. Radio 5W Transmit power at 5 watts. note: If your device battery is too low, the power level is decreased automatically. The transmit power is limited to 2 watts in Canada. The maximum output power of the Rino 610 is 1 Watt. Rino 600 Series Owner's Manual 13 - Garmin Rino 650t | Owners Manual - Page 16
Radio Status Bar Description The radio is on. The radio is receiving. The radio is transmitting. Peer-to-peer is enabled and is ready to transmit the position. Weather alert is turned on. The radio is muted (page 8). 14 Rino 600 Series Owner's Manual - Garmin Rino 650t | Owners Manual - Page 17
create a waypoint. 1. Select Waypoint Manager. 2. Select a waypoint. 3. Select an item to edit. 4. Enter the new information. Rino 600 Series Owner's Manual Waypoints and Tracks 5. Select . Deleting a Waypoint 1. Select Waypoint Manager. 2. Select a waypoint. 3. Select Delete Waypoint. Increasing - Garmin Rino 650t | Owners Manual - Page 18
m) of the compatible Garmin device. 1. Select Share Wirelessly. 2. Follow the on-screen instructions. Tracks A track is , Do Not Show or Record, Show On Map. If you select Record, Show On Map, a line on the map indicates your track. 3. Select Record Method. . 16 Rino 600 Series Owner's Manual - Garmin Rino 650t | Owners Manual - Page 19
> Current Track. 2. Select an option: • To show the current track on the map, select View Map. • To show the elevation plot for the current track, select Elevation Plot. Saving 1. Select Track Manager. 2. Select a saved track. 3. Select View on Map. 4. Select Go. Rino 600 Series Owner's Manual 17 - Garmin Rino 650t | Owners Manual - Page 20
can be helpful when finding your way back to camp or the trail head. 1. Select Track Manager > Current Track > View Map. 2. Select Tracback. The map page opens with your route marked with a magenta line. 3. Navigate using the map (page 19) or compass (page 19). 18 Rino 600 Series Owner's Manual - Garmin Rino 650t | Owners Manual - Page 21
an active route. 1. Select Map. 2. Follow the magenta line to your destination. Compass NOTE: The 3-axis compass is available only with the Rino 650 and 655t. You can use a bearing pointer or a course pointer to navigate to your Rino 600 Series Owner's Manual Navigation destination. To customize - Garmin Rino 650t | Owners Manual - Page 22
setting to Course (CDI) (page 32). 1. Begin navigation to a destination (page 18). 2. Select Compass. 3. Use the course pointer to navigate to the destination (page 20). Rino 600 Series Owner's Manual - Garmin Rino 650t | Owners Manual - Page 23
1. Select Contacts. 2. Select a contact. 3. Select View Map > Go. Geocaches Geocaching is a type of treasure hunting, account. 4. Sign in. Navigation 5. Follow the on-screen instructions to find and download geocaches to your device. Navigating to a is complete. Rino 600 Series Owner's Manual 21 - Garmin Rino 650t | Owners Manual - Page 24
Select an option: • To view the point on the map, select Review. • To change the order of the point on the Map 1. Select Route Planner. 2. Select a route. 3. Select View Map. Deleting a Route 1. Select Route Planner. 2. Select a route. 3. Select Delete Route. 22 Rino 600 Series Owner's Manual - Garmin Rino 650t | Owners Manual - Page 25
(MOB) location, and start navigation back to it. 1. Select Man Overboard > Start. The map page opens with your route marked with a magenta line. 2. Navigate using the map (page 19) or compass (page 19). Stopping Navigation Select Where To? > Stop Navigation. Rino 600 Series Owner's Manual 23 - Garmin Rino 650t | Owners Manual - Page 26
Camera and Photos Camera and Photos You can take photos with the Rino 655t. When you take a photo, the geographic location is automatically saved in the Photos 1. Select Photo Viewer. 2. Select . 3. Select Most Recently, Near a Location, or On a Specific Date. 24 Rino 600 Series Owner's Manual - Garmin Rino 650t | Owners Manual - Page 27
a photo. 3. Select . Deleting a Photo 1. Select Photo Viewer. 2. Select a photo. 3. Select > Yes. Navigating to a Photo 1. Select Where To? > Photos. 2. Select a photo. 3. Select Go. 4. Navigate using the map (page 19) or compass (page 19). Rino 600 Series Owner's Manual Camera and Photos 25 - Garmin Rino 650t | Owners Manual - Page 28
26). 3. Select Setup > Profiles. 4. Select Create New Profile > OK. Editing a Profile Name 1. Select Setup > Profiles. 2. Select a profile. 3. Select Edit Name. 4. Enter the new name. 5. Select . Rino 600 Series Owner's Manual - Garmin Rino 650t | Owners Manual - Page 29
the data fields before you can edit them. 1. Select Setup > Map > Data Fields. 2. Select the number of data fields to display. Rino 600 Series Owner's Manual Customizing Your Device Changing the Data Fields Before you can change the map fields, you must enable them (page 27). 1. Open the page - Garmin Rino 650t | Owners Manual - Page 30
location and velocity information. ◦◦ RTCM-Radio Technical Commission for Maritime Services allows the device to accept DGPS Differential Global Positioning System information from a device supplying RTCM data in an SC-104 format. • Battery Save-turns the screen 28 Rino 600 Series Owner's Manual - Garmin Rino 650t | Owners Manual - Page 31
the battery life. > Screen Calibration. 2. Follow the on-screen instructions. Setting the Device Tones You can customize tones Map Settings Select Setup > Map. • Orientation-adjusts how the map is shown on the page. ◦◦ North Up-shows north at the top of the page. Rino 600 Series Owner's Manual - Garmin Rino 650t | Owners Manual - Page 32
the appropriate zoom level for optimal use on your map. When Off is selected, you must zoom in or out manually. • Data Fields-page 46. • Advanced Map Setup-sets the zoom levels, the text size, record the tracks at a variable rate to create an optimum representation of Rino 600 Series Owner's Manual - Garmin Rino 650t | Owners Manual - Page 33
cleared automatically based on the user setting. • Color-changes the color of the track line on the map. Changing the Units of Measure You can customize units of measure for distance and speed, elevation, the time zone automatically based on your GPS position. Rino 600 Series Owner's Manual 31 - Garmin Rino 650t | Owners Manual - Page 34
the position format in which a given location reading appears. • Map Datum-sets the coordinate system on which the map is structured. • Map Spheroid-shows the coordinate system the device is using. The default a set period of time (Auto), or turns the compass off. 32 Rino 600 Series Owner's Manual - Garmin Rino 650t | Owners Manual - Page 35
is turned on. This can be useful when you are watching for pressure fronts. ◦◦ Save Always-records pressure data every 15 minutes, even Rino 600 Series Owner's Manual Customizing Your Device when the device is turned off. • Plot Type ◦◦ Elevation/Time-records elevation changes over a period of time - Garmin Rino 650t | Owners Manual - Page 36
chirp™ Searching-turns on or off chirp searching. A chirp is a small accessory that you can program and leave in a geocache. • Program chirp™-programs the chirp accessory. See the chirp Owner's Manual at www.garmin .com. Routing Settings Select Setup > Routing. • Guidance Method-sets the calculation - Garmin Rino 650t | Owners Manual - Page 37
depth soundings. Simplifies map presentation for optimal use while fishing. • Appearance-allows you to set the appearance of marine navigation aids on the map. • Marine Alarm Setup ◦◦ Anchor Drag Alarm-alarm sounds when you exceed a specified drift distance while Rino 600 Series Owner's Manual 35 - Garmin Rino 650t | Owners Manual - Page 38
3. Select On. 4. Enter a distance. 5. Select . Fitness For more information on optional fitness accessories, see page 45. Resetting Data You can reset trip data, delete all waypoints, clear the current Setup > Reset > Reset Defaults to Factory Settings > Yes. 36 Rino 600 Series Owner's Manual - Garmin Rino 650t | Owners Manual - Page 39
. Calculating the Size of an Area 1. Select Area Calculation > Start. 2. Walk around the perimeter of the area you want to calculate. 3. Select Calculate when finished. Rino 600 Series Owner's Manual 37 - Garmin Rino 650t | Owners Manual - Page 40
selected time. If the device is off at the alarm time, the device turns on and sounds the alarm. Opening the Stopwatch Select Stopwatch. 38 Rino 600 Series Owner's Manual - Garmin Rino 650t | Owners Manual - Page 41
pack (010-11599-00) or Alkaline battery pack (010-11600-00), which uses four AA batteries (alkaline, NiMH, or lithium) Up to 18 hours, typical usage using AA batteries Up to 14 hours, typical usage using the lithium-ion battery pack From 32°F to 113°F (from 0 to 45°C) Rino 600 Series Owner's Manual - Garmin Rino 650t | Owners Manual - Page 42
you are not taking photos. • Turn the backlight off when not needed. • Lower the backlight brightness (page 7). • Decrease the backlight timeout (page 29). • Enable battery save mode (page 29). Selecting the Battery Type 1. Select Setup > System > Battery Type. 40 Rino 600 Series Owner's Manual - Garmin Rino 650t | Owners Manual - Page 43
-Term Storage When you do not plan to use the device for several months, remove the batteries. Stored data is not lost when batteries are removed. Rino 600 Series Owner's Manual Device Information Caring for the Device NOTICE Avoid chemical cleaners and solvents that can damage plastic components - Garmin Rino 650t | Owners Manual - Page 44
preloaded on memory cards. Go to http://buy.garmin.com for more information. 1. Turn the D-ring counter-clockwise, and remove the battery pack. 2. Slide the card holder ➊ toward the top edge of the device, and lift up, as instructed in the battery compartment. 42 Rino 600 Series Owner's Manual - Garmin Rino 650t | Owners Manual - Page 45
card holder. 5. Slide the card holder toward the bottom of the device to lock it. 6. Replace the battery pack, and turn the D-ring clockwise. Connecting the Device to a Computer 1. Connect the USB cable to a computers and as mounted volumes on Mac computers. Rino 600 Series Owner's Manual 43 - Garmin Rino 650t | Owners Manual - Page 46
Before you can delete files, you must connect the device to your computer (page 43). 1. Open the "Garmin" drive or volume. 2. If necessary, open a folder or volume. 3. Select the files. 4. Press the icon to the Trash . 2. Disconnect the device from your computer. 44 Rino 600 Series Owner's Manual - Garmin Rino 650t | Owners Manual - Page 47
at http://buy.garmin.com or from your Garmin dealer. Optional Fitness Accessories NOTE: The fitness option is available with only the Rino 650 and 655t. Appendix Before you can use the fitness accessory with your device, you must install the accessory according to the instructions included with the - Garmin Rino 650t | Owners Manual - Page 48
Accessories with Your Garmin Device • Verify that the ANT+ accessory is compatible with your Garmin device. • Before you pair the ANT+ accessory with your Garmin device, move 10 m away from other ANT+ accessories. • Bring the Garmin elevation distance ascended. 46 Rino 600 Series Owner's Manual - Garmin Rino 650t | Owners Manual - Page 49
Data Field Barometer Battery Level Bearing Cadence (cadence accessory required) Course Depth Descent Average Description The calibrated current pressure. The remaining battery power. The direction from estimated time of day you will reach your final destination. Rino 600 Series Owner's Manual 47 - Garmin Rino 650t | Owners Manual - Page 50
which you have strayed from the original path of travel. The data field arrow points in the direction of the next waypoint or turn. 48 Rino 600 Series Owner's Manual - Garmin Rino 650t | Owners Manual - Page 51
estimated time needed to reach the next waypoint on the route. To Course The direction in which you must move to return to the route. Rino 600 Series Owner's Manual 49 - Garmin Rino 650t | Owners Manual - Page 52
or loss over time. Waypoint at Dest. The last point on a route to your destination. Waypoint at The next point on Next your route. 50 Rino 600 Series Owner's Manual - Garmin Rino 650t | Owners Manual - Page 53
Ensure the temperature is between 32°F and 113°F (from 0 to 45°C). • Turn down the backlight (page 7). My battery gauge does 1. Leave the device on until the battery runs out. not seem accurate. 2. Fully charge the battery without interrupting the charge cycle. Rino 600 Series Owner's Manual 51 - Garmin Rino 650t | Owners Manual - Page 54
, Windows may have trouble assigning drive letters to your Garmin drives. See the help file for your operating system to learn how to assign drive letters. I need replacement Go to http://buy.garmin.com, or contact your Garmin parts or accessories. dealer. 52 Rino 600 Series Owner's Manual - Garmin Rino 650t | Owners Manual - Page 55
.fcc.gov /services/personal/generalmobile/. Canada. However, GMRS repeater channels are not approved for use by the Canadian government. For use in countries outside of the U.S. and Canada, please check with that government for any restrictions of FRS or GMRS use. Rino 600 Series Owner's Manual - Garmin Rino 650t | Owners Manual - Page 56
accessories 45 wirelessly 16 contacts 10 accepting 10 editing 10 navigating 21 viewing on map 10 course pointer 20 creating routes 21 waypoints 15 customizing data fields 26 device settings 28-35 profiles 26 D dashboard 27 customizing 27 data fields 26, 27 options 46 Rino 600 Series Owner's Manual - Garmin Rino 650t | Owners Manual - Page 57
17 F Family Radio Service (FRS) 8 fitness options 45 G General Mobile Radio Service (GMRS) 8 geocaches 21 headset 9 HomePort 42 L language 28 locking screen 7 M man overboard 23 map 19 datum 32 detail 30 information 30 showing tracks 17 Rino 600 Series Owner's Manual Index viewing routes 22 map - Garmin Rino 650t | Owners Manual - Page 58
up 8 Sight 'N Go 23 software updating 39 version 39 specifications 39 squelch codes 8 stopwatch 38 storing the device 41 system settings 28 T text size, maps 30 time alarms 38 data fields 49 settings 31 stopwatch 38 sunrise and sunset 49 zone 31 tones 29 TracBack 18 tracks clearing current 17 - Garmin Rino 650t | Owners Manual - Page 59
files 44 using USB 44 wirelessly 16 trip computer 37 troubleshooting 51 U unit ID 39 updating software 39 USB cable 52 connecting 43 disconnecting 44 W waypoints averaging 15 creating 15 deleting 15 editing 15 navigating to 15 weather alerts 12 Z zoom 30 Rino 600 Series Owner's Manual 57 - Garmin Rino 650t | Owners Manual - Page 60
East 151st Street, Olathe, Kansas 66062, USA Garmin (Europe) Ltd. Liberty House, Hounsdown Business Park, Southampton, Hampshire, SO40 9LR UK Garmin Corporation No. 68, Zhangshu 2nd Road, Xizhi Dist., New Taipei City, 221, Taiwan (R.O.C.) www.garmin.com April 2013 190-01183-00_0C Printed in
-
 1
1 -
 2
2 -
 3
3 -
 4
4 -
 5
5 -
 6
6 -
 7
7 -
8
-
9
-
10
-
11
-
12
-
13
-
14
-
15
-
16
-
17
-
18
-
19
-
20
-
21
-
22
-
23
-
24
-
25
-
26
-
27
-
28
-
29
-
30
-
31
-
32
-
33
-
34
-
35
-
36
-
37
-
38
-
39
-
40
-
41
-
42
-
43
-
44
-
45
-
46
-
47
-
48
-
49
-
50
-
51
-
52
-
53
-
54
-
55
-
56
-
57
-
58
-
59
-
60
 |
 |
rino
®
600 series
owner’s manual