Garmin Ultra High-Definition Scanning Sonar System TransomTrolling Mount Trans - Page 1
Garmin Ultra High-Definition Scanning Sonar System Manual
 |
View all Garmin Ultra High-Definition Scanning Sonar System manuals
Add to My Manuals
Save this manual to your list of manuals |
Page 1 highlights
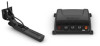
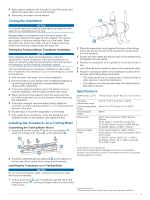
TRANSOM/TROLLING MOUNT TRANSDUCER INSTALLATION INSTRUCTIONS Important Safety Information WARNING See the Important Safety and Product Information guide in the chartplotter or fishfinder product box for product warnings and other important information. You are responsible for the safe and prudent operation of your vessel. Sonar is a tool that enhances your awareness of the water beneath your boat. It does not relieve you of the responsibility of observing the water around your boat as you navigate. CAUTION Failure to install and maintain this equipment in accordance with these instructions could result in damage or injury. Always wear safety goggles, ear protection, and a dust mask when drilling, cutting, or sanding. NOTICE When drilling or cutting, always check what is on the opposite side of the surface. To obtain the best performance and to avoid damage to your boat, you must install the Garmin® device according to these instructions. Read all installation instructions before proceeding with the installation. If you experience difficulty during the installation, go to support.garmin.com for more information. Software Update You must update the Garmin chartplotter software when you install this device. If your chartplotter has Wi‑Fi® technology, you should update the software using the ActiveCaptain® app on a compatible Android™ or Apple® device. If your chartplotter does not have Wi‑Fi technology, you should update the software using a memory card and a Windows® or Mac® computer. For more information, go to support.garmin.com. Tools Needed • Drill and drill bits • Number 2 Phillips screwdriver • Masking tape • Marine sealant Mounting Consideration To ensure peak performance with the lowest noise and interference, you should route the transducer cable away from ignition wires, house batteries and wires, trolling motor batteries and wires, and high-energy wires such as radar, audio amplifier, and autopilot pump wires. Preparing the Transducer for Long-Term Exposure to Water NOTICE Do not use acetone or acetone-based products on the transducer. Acetone damages the plastic transducer housing. When you install a transducer on a boat that spends a significant amount of time in the water, you should coat the transducer and mounting hardware with a water-based antifouling paint to prevent marine growth. 1 Lightly sand the transducer and mounting hardware with a fine-grit abrasive pad. 2 Wipe the transducer and mounting hardware with isopropyl alcohol. 3 Apply water-based anti-fouling paint to the transducer and mounting hardware. Installing the Transducer on a Transom Mounting Location Considerations • The transducer should be mounted parallel to the water line. • The transducer should be mounted as close to the center of the boat as possible. • If your propeller moves clockwise when the boat moves, the transducer should be mounted on the starboard side. • If your propeller moves counter-clockwise when the boat moves, the transducer should be mounted on the port side. • The transducer should not be mounted behind strakes, struts, fittings, water intake or discharge ports, or anything that creates air bubbles or causes the water to become turbulent. The transducer must be in clean (non-turbulent) water for optimal performance. • The transducer should not be mounted in a location where it might be jarred when launching, hauling, or storing. • On single-drive boats, the transducer must not be mounted in the path of the propeller. The transducer can cause cavitation that can degrade the performance of the boat and damage the propeller. • On boats with outboard or inboard/outboard motors, the transducer should be mounted at least 38 cm (15 in.) from the propeller. • On twin-drive boats, the transducer should be mounted between the drives, if possible. Assembling the Transducer with a Transom Mount Bracket 1 Attach the mount to the transducer with the included star washers , and screws . February 2020 GUID-D3F0E62E-688B-4A6E-B061-D35EB013F5FB v1
-
 1
1 -
 2
2 -
 3
3 -
 4
4
 |
 |
