Garmin VHF 315 Owners Manual PDF - Page 6
Selecting the Frequency Band, Selecting a Channel, Transmitting with the Radio, Scanning and Saving
 |
View all Garmin VHF 315 manuals
Add to My Manuals
Save this manual to your list of manuals |
Page 6 highlights
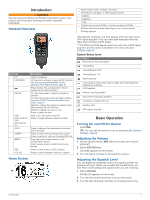
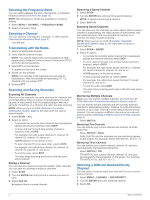
Selecting the Frequency Band You can switch between the USA, International, or Canadian frequency bands (Channel Lists, page 10). NOTE: Not all frequency bands are available on all device models. 1 Select MENU > CHANNEL > FREQUENCY BAND. 2 Select a frequency band. Selecting a Channel You can select an International, Canadian, or USA channel (Selecting the Frequency Band, page 2). Turn the dial. Transmitting with the Radio 1 Select an appropriate channel. 2 Verify that the channel is clear. NOTE: You cannot obstruct the communications of other people due to Federal Communications Commission (FCC) and international guidelines. 3 Select PTT on the handset. appears at the top of the screen. 4 Speak into the handset. NOTE: Five minutes is the maximum time allowed for transmission. After five minutes of transmitting, PTT is disabled until you release PTT. 5 Release PTT. Scanning and Saving Channels Scanning All Channels When you scan channels, the radio searches for channels that are broadcasting. When a channel is broadcasting, the radio pauses on that channel until the broadcast stops. After four seconds of inactivity on a channel, the radio resumes scanning. NOTE: When you turn on ATIS (Automatic Transmitter Identification System, page 8), the radio does not scan or save channels. 1 Select SCAN > ALL. 2 Select an option: • To exclude the currently active channel from subsequent passes and resume scanning, select SKIP. • To scan channel 16 each time another channel is scanned, select +CH16. For example, the radio scans channel 21, channel 16, channel 22, channel 16, and so on. +CH16 appears on the device screen. • To scan channel 16 in its usual order, select -CH16. For example, the radio scans channel 14, channel 15, channel 16, channel 17, and so on. • To end the scan, select EXIT. The radio stops scanning and tunes to the last used, active channel. Saving a Channel You can save any channel except the weather (WX) channels. You can save an unlimited number of channels. 1 Select SCAN. 2 Turn the ENTER dial until you find a channel you want to save. 3 Select SAV CH. appears above a saved channel. Removing a Saved Channel 1 Select SCAN. 2 Turn the ENTER dial until you find a saved channel. NOTE: A saved channel has above it. 3 Select SAV CH. Scanning Saved Channels You can scan only the channels you have saved. When a saved channel is broadcasting, the radio pauses on that channel until the broadcast stops. After four seconds of inactivity on a channel, the radio resumes scanning. NOTE: When you turn on ATIS (Automatic Transmitter Identification System, page 8), the radio does not scan or save channels. 1 Select SCAN > SAVED. 2 Select an option: • To exclude the currently active channel from subsequent passes and resume scanning, select SKIP. • To scan channel 16 each time another saved channel is scanned, select +CH16. For example, the radio scans saved channel 21, channel 16, saved channel 25, channel 16, and so on. +CH16 appears on the device screen. • To stop scanning channel 16, select -CH16. For example, the radio scans saved channel 21, saved channel 25, and so on. • To end the scan, select EXIT. The radio stops scanning and tunes to the last used active channel. Monitoring Multiple Channels Before you can monitor multiple channels, you must turn off ATIS (Automatic Transmitter Identification System, page 8). You can monitor priority channels and the currently selected channel for broadcasting activity. Channel 16 is the first-priority channel on your radio. Channel 9 is the default second-priority channel. You can program a different channel as your secondpriority channel (Selecting a Different Second-Priority Channel, page 2). Select WATCH. Monitoring Two Channels You can monitor your current channel and channel 16 at the same time. Select WATCH > DUAL. DUAL WATCH and the channels you are monitoring appear on the screen. For example, DUAL WATCH CH:, and 16 + 9. Monitoring Three Channels You can monitor your current channel, channel 16, and your second-priority channel at the same time. Select WATCH > TRI. TRI WATCH, your current channel, channel 16, and your second-priority channel appear on the screen. For example, TRI WATCH CH:, and 75 + 16 + 9. Selecting a Different Second-Priority Channel You can select a channel other than channel 9 as your secondpriority channel. 1 Select MENU > CHANNEL > 2ND PRIORITY. 2 Turn the ENTER dial to the preferred channel. 3 Select OK. 2 Basic Operation
-
 1
1 -
 2
2 -
 3
3 -
 4
4 -
 5
5 -
 6
6 -
 7
7 -
 8
8 -
 9
9 -
 10
10 -
 11
11 -
 12
12 -
13
-
14
-
15
-
16
-
17
-
18
 |
 |
