Garmin eTrex Legend C Quick Reference Guide
Garmin eTrex Legend C Manual
 |
UPC - 753759045555
View all Garmin eTrex Legend C manuals
Add to My Manuals
Save this manual to your list of manuals |
Garmin eTrex Legend C manual content summary:
- Garmin eTrex Legend C | Quick Reference Guide - Page 1
Menu Button A Goto on the Navigation Page Map Page on a Goto Map Page Options Menu © Copyright 2005 GARMIN Ltd. or its subsidiaries Part Number: 190-00234-01 Rev. C Printed in Taiwan LEGEND QUICK START GUIDE Internal GPS Antenna External Power/Data Connector (on back) Thumb Stick Page - Garmin eTrex Legend C | Quick Reference Guide - Page 2
the Satellite Page. 2. Use the ZOOM IN and OUT buttons to adjust the contrast. *To set the backlight feature for longer On Time, refer to the Owner's Manual. Additional Map Data Available You can transfer optional detailed map data to the eTrex Legend from a GARMIN MapSource® CD-ROM. Available
-
 1
1 -
 2
2
 |
 |
Step-by-Step Instructions
to Get You Started
(Turn this page and begin with Step 1)
QUICK START
GUIDE
Basic Navigation
Basic Navigation
Internal
GPS
Antenna
Waterproof
Case
LCD Display
(with Backlight)
Battery
Compartment
(on back)
External
Power/Data
Connector
(on back)
Thumb
Stick
Page
Button
Power
Button
© Copyright 2005 GARMIN Ltd. or its subsidiaries
Part Number: 190-00234-01 Rev. C
Printed in Taiwan
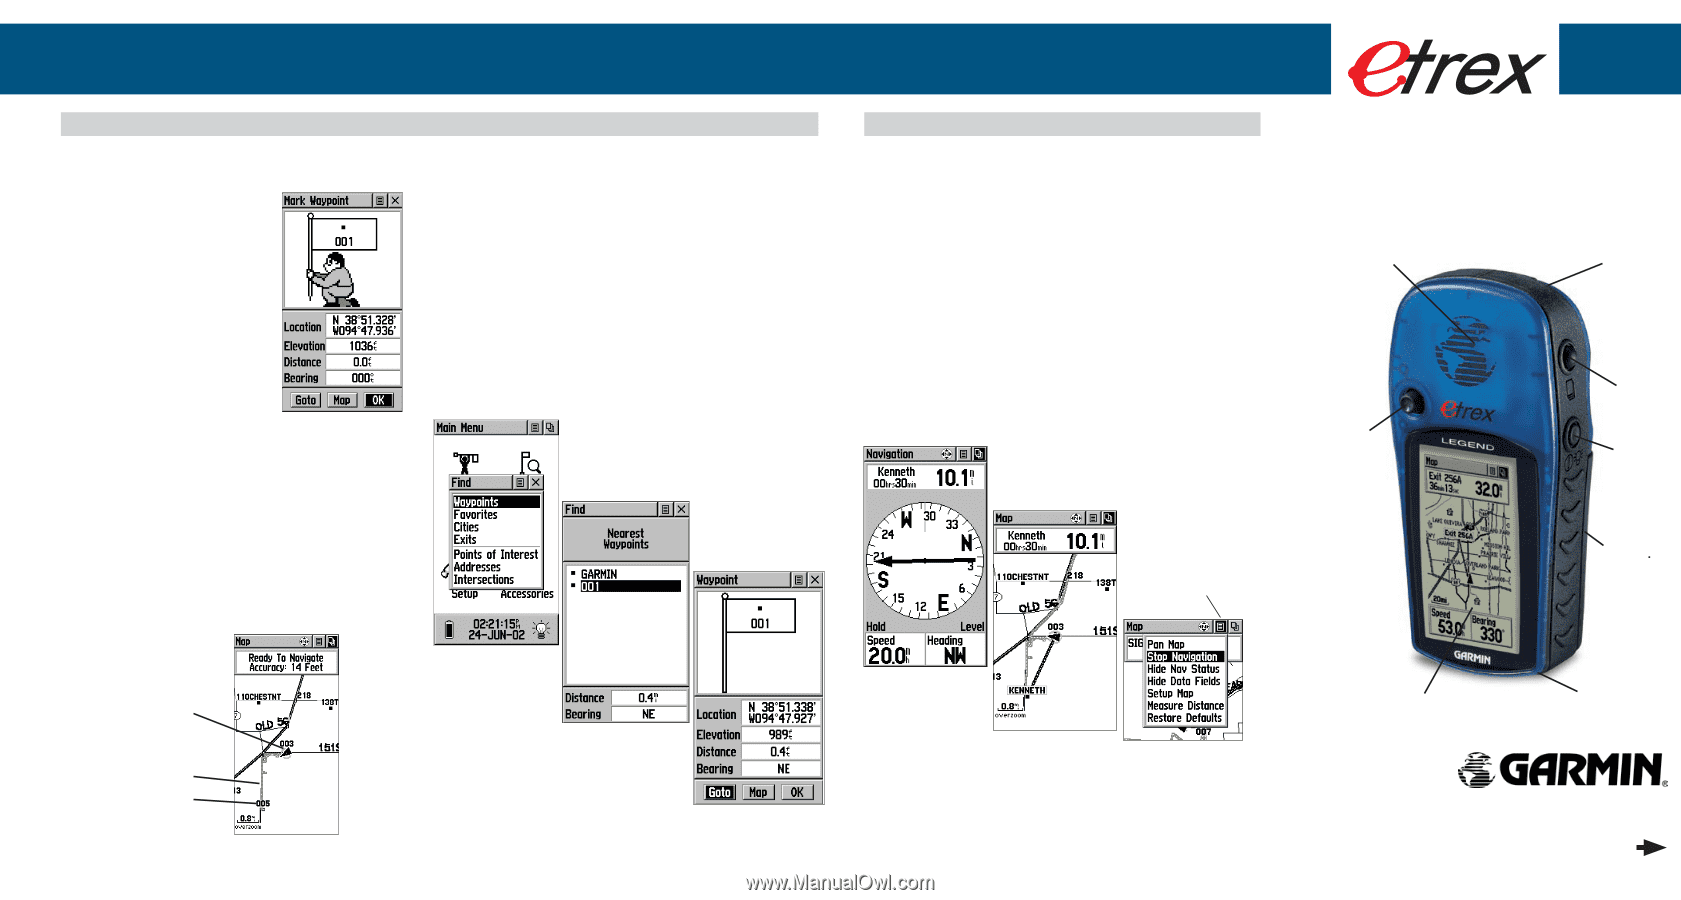
Basic Navigation
To mark a waypoint:
1.
Press in and hold the
THUMB STICK
for two
seconds to display the Mark
Waypoint Page. Your current
location is marked as a
waypoint and automati-
cally assigned a three digit
number.
2. The ‘OK’ button is
highlighted so press the
THUMB STICK
to save the
To return to a waypoint using Goto:
1. Press the
FIND
button to display the Find Menu.
2. Use the
THUMB STICK
to highlight ‘Waypoints’ and then
press it in.
3. Use the
THUMB STICK
to highlight ‘Nearest’ and then press it
in.
4. Use the
THUMB STICK
to highlight the waypoint and then
press it in to display the Information Page.
5.
With the on-screen ‘Goto’ button highlighted, press the
THUMB STICK
to activate the Goto navigation feature.
To move about with the Map Page:
1. Use the
PAGE
button to access the Map Page and view the
new waypoint.
Press the
ZOOM IN
button to get a more detailed view of
the map.
2.
Walk or drive around for a few minutes, make a right or left
turn, then continue for a few more minutes and then stop.
The ‘position icon’ shows your location and the dotted line
shows your path of travel (a Track).
Position Icon
showing your
current location
Track Line
The newly
marked
Waypoint
LEGEND
To finish your return:
1. The Navigation Page displays the ‘Bearing Pointer’ indicating
the direction to go.
Because you can’t always travel in a
straight line, refer to the Bearing Pointer from time to time.
As you move and whenever possible, turn in the direction
the Bearing Pointer directs.
2. Use the
PAGE
button to move to the Map Page to see your
location marked by the Position Icon and a straight dark line
leading to the waypoint.
Move back and forth between the Map Page and the Navi-
gation page to check your progress and verify your bearing.
3.
To stop navigating, highlight the Options Menu button on
either page, press the
THUMB STICK
, select ‘Stop Naviga-
tion’, and then press the
THUMB STICK
.
Returning to a Waypoint with a Goto
Basic navigation with your eTrex Legend requires only three steps: mark, move, and return. Mark your location as a waypoint,
move a distance away, and then return after choosing one of several methods to help you find your way.
Starting to Navigate
Waypoints List
Waypoint Information
Page
Find Menu
A Goto on the
Navigation
Page
Map
Page on a
Goto
Map Page Options
Menu
Options Menu
Button