Garmin echo 301dv Owner's Manual - Page 7
Adjusting the Range of the Depth Scale - fishfinder
 |
View all Garmin echo 301dv manuals
Add to My Manuals
Save this manual to your list of manuals |
Page 7 highlights
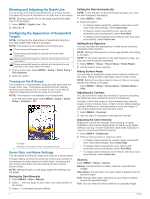
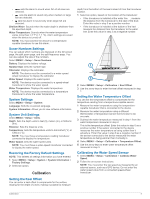
Depth at your present location À Depth scale Á Numbers Page You can view numeric information instead of a graphic from the numbers page. Select MENU > Pages > Numbers. Resetting the Odometer Before you can reset the odometer, you must connect the device to a speed-wheel transducer. From the Numbers page, select MENU > Reset Odometer. Sonar The full screen page, the split zoom page, the split frequency page, and the flasher page are visual representations of the area beneath your boat. You can customize these sonar views. NOTE: Not all devices have these features. DownVü Sonar View NOTE: Not all models support DownVü sonar technology and transducers. NOTE: To receive DownVü scanning sonar, you need a compatible chartplotter or fishfinder and a compatible transducer. DownVü high-frequency sonar provides a clearer picture below the boat, providing a more detailed representation of structures the boat is passing over. Traditional transducers emit a conical beam. The DownVü scanning sonar technology emits a narrow beam, similar to the shape of the beam in a copying machine. This beam provides a clearer, picture-like image of what is beneath the boat. Sonar Frequencies NOTE: The frequencies available depend on the transducer being used. Adjusting the frequency helps adapt the sonar for your particular goals and the present depth of the water. Higher frequencies use narrow beam widths, and are better for high-speed operation and rough sea conditions. Bottom definition and thermocline definition can be better when using a higher frequency. Lower frequencies use wider beam widths, which cover a larger area and can let the fisherman see more targets, but could also generate more surface noise and reduce bottom signal continuity during rough sea conditions. Wider beam widths generate larger arches for fish target returns, making them ideal for locating fish. Wider beam widths also perform better in deep water, because the lower frequency has better deep water penetration. They can be used to search for structures such as brush piles. Viewing two frequencies concurrently using the split frequency view, allows you to see deeper with the lower frequency return and at the same time see more detail from the higher frequency return. Selecting a Frequency 1 Select MENU. 2 Select Frequency or FREQ. 3 Select a frequency. Adjusting the Range of the Depth Scale You can adjust the range of the depth scale that appears on the right side of the screen. Automatic ranging keeps the bottom within the lower third of the sonar screen, and can be useful for tracking the bottom where there are slow or moderate terrain changes. When the depth changes dramatically, like a drop off or cliff, manually adjusting the range allows a view of a specified depth range. The bottom is shown on the screen as long as the bottom is anywhere within the manual range established. 1 Select MENU > Range. 2 Select an option. • To allow the device to adjust the range automatically based on the depth, select Auto. • To increase or decrease the range manually, select Manual, and select or . NOTE: Setting the range on one page applies that setting to all pages. Adjusting the Zoom You can adjust the zoom manually by specifying the span and a fixed starting depth. For example, when the depth is 15 meters and a starting depth of 5 meters, the device displays a magnified area from 5 meters deep to 20 meters deep. You also can allow the device to adjust the zoom automatically by specifying a span. The device calculates the zoom area from the bottom of the water. For example, if you select a span of 10 meters, the device displays an magnified area from the bottom of the water to 10 meters above the bottom. 1 Select MENU > Zoom. 2 Select Manual Zoom or Auto Zoom. 3 Select Span and select or to increase or decrease the magnification of the magnified area. 4 If necessary, select Depth to adjust the zoomed window up or down. NOTE: The zoomed window tracks the bottom in auto mode only. Locking the Screen to the Water Bottom You can lock the screen to the water bottom. For example, if you select a span of 20 meters, the device shows an area from the water bottom to 20 meters above the bottom. The span appears on the right side. 1 From a sonar view, select MENU > Zoom > Bottom Lock. 2 Select a span. Pausing the Sonar Screen From a sonar view, select MENU > Pause/Rewind Sonar or MENU > Pause Sonar. Opening the Sonar History NOTE: Not all devices have this feature. 1 From a sonar view, select MENU > Pause/Rewind Sonar. 2 Select or to adjust the vertical line. 3 Select or to adjust the horizontal depth line. Setting the Sonar Scroll Speed You can set the rate at which the sonar scrolls from right to left. A higher scroll speed shows more detail, especially while moving or trolling. A lower scroll speed displays sonar information on the screen longer. 1 Select MENU > Setup > Sonar Setup > Scroll Speed. 2 Select a scroll speed. NOTE: Setting the scroll speed on one page applies that setting to all the pages. Sonar 3
-
 1
1 -
 2
2 -
 3
3 -
 4
4 -
 5
5 -
 6
6 -
 7
7 -
 8
8 -
 9
9 -
 10
10 -
 11
11 -
 12
12
 |
 |