Gateway E-4620 6-bay mBTX Pro Hardware Reference Guide. (for computers with Wi - Page 64
If your replacement system board includes a processor
 |
View all Gateway E-4620 manuals
Add to My Manuals
Save this manual to your list of manuals |
Page 64 highlights
CHAPTER 4: Upgrading Your Computer 7 Remove the seven system board screws. Screws Screws 8 Lift the system board up and out of the case. 9 Align the new system board on the screw holes in the case, then secure it into the case with the screws. 10 If your replacement system board does not include a processor, go to the next step. -ORIf your replacement system board includes a processor, go to Step 18. Caution The heat sink has thermal paste located on the bottom of it. Use caution when you remove the old heat sink or unpack the new heat sink so you do not damage the thermal paste. 11 Loosen the four screws that secure the heat sink to the system board, then remove the heat sink. 58
-
 1
1 -
2
-
3
-
4
-
5
-
6
-
7
-
8
-
9
-
10
-
11
-
12
-
13
-
14
-
15
-
16
-
17
-
18
-
19
-
20
-
21
-
22
-
23
-
24
-
25
-
26
-
27
-
28
-
29
-
30
-
31
-
32
-
33
-
34
-
35
-
36
-
37
-
38
-
39
-
40
-
41
-
42
-
43
-
44
-
45
-
46
-
47
-
48
-
49
-
50
-
51
-
52
-
53
-
54
-
55
-
56
-
57
-
58
-
 59
59 -
 60
60 -
 61
61 -
 62
62 -
 63
63 -
 64
64 -
 65
65 -
 66
66 -
 67
67 -
 68
68 -
 69
69 -
70
-
71
-
72
-
73
-
74
-
75
-
76
-
77
-
78
-
79
-
80
-
81
-
82
-
83
-
84
-
85
-
86
-
87
-
88
-
89
-
90
-
91
-
92
-
93
-
94
-
95
-
96
-
97
-
98
-
99
-
100
-
101
-
102
-
103
-
104
-
105
-
106
-
107
-
108
-
109
-
110
-
111
-
112
-
113
-
114
-
115
-
116
-
117
-
118
-
119
-
120
-
121
-
122
-
123
-
124
-
125
-
126
-
127
-
128
-
129
-
130
-
131
-
132
-
133
-
134
-
135
-
136
-
137
-
138
-
139
-
140
 |
 |

CHAPTER 4: Upgrading Your Computer
58
7
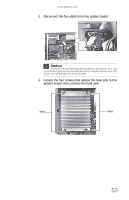
Remove the seven system board screws.
8
Lift the system board up and out of the case.
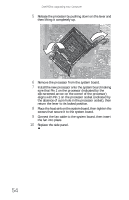
9
Align the new system board on the screw holes in the
case, then secure it into the case with the screws.
10
If your replacement system board does not include a
processor, go to the next step.
-OR-
If your replacement system board includes a processor,
go to Step
18
.
11
Loosen the four screws that secure the heat sink to the
system board, then remove the heat sink.
Caution
The heat sink has thermal paste located on the bottom of it. Use
caution when you remove the old heat sink or unpack the new heat sink
so you do not damage the thermal paste.
Screws
Screws