Gateway M520 User Guide Gateway M520 Notebook - Page 64
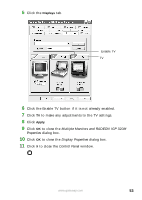
Adjust Power Properties, Power Schemes, Always On, Alarms, Low battery alarm, Critical battery alarm
 |
View all Gateway M520 manuals
Add to My Manuals
Save this manual to your list of manuals |
Page 64 highlights
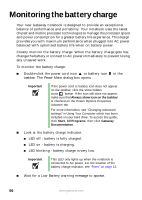
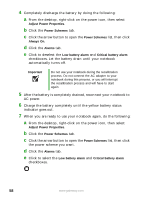
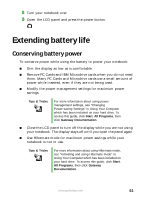
4 Completely discharge the battery by doing the following: a From the desktop, right-click on the power icon, then select Adjust Power Properties. b Click the Power Schemes tab. c Click the arrow button to open the Power Schemes list, then click Always On. d Click the Alarms tab. e Click to deselect the Low battery alarm and Critical battery alarm checkboxes. Let the battery drain until your notebook automatically turns off. Important Do not use your notebook during the recalibration process. Do not connect the AC adapter to your notebook during this process, or you will interrupt the recalibration process and will have to start again. 5 After the battery is completely drained, reconnect your notebook to AC power. 6 Charge the battery completely until the yellow battery status indicator goes out. 7 When you are ready to use your notebook again, do the following: a From the desktop, right-click on the power icon, then select Adjust Power Properties. b Click the Power Schemes tab. c Click the arrow button to open the Power Schemes list, then click the power scheme you want. d Click the Alarms tab. e Click to select the Low battery alarm and Critical battery alarm checkboxes. 58 www.gateway.com
-
 1
1 -
2
-
3
-
4
-
5
-
6
-
7
-
8
-
9
-
10
-
11
-
12
-
13
-
14
-
15
-
16
-
17
-
18
-
19
-
20
-
21
-
22
-
23
-
24
-
25
-
26
-
27
-
28
-
29
-
30
-
31
-
32
-
33
-
34
-
35
-
36
-
37
-
38
-
39
-
40
-
41
-
42
-
43
-
44
-
45
-
46
-
47
-
48
-
49
-
50
-
51
-
52
-
53
-
54
-
55
-
56
-
57
-
58
-
 59
59 -
 60
60 -
 61
61 -
 62
62 -
 63
63 -
 64
64 -
 65
65 -
 66
66 -
 67
67 -
 68
68 -
 69
69 -
70
-
71
-
72
-
73
-
74
-
75
-
76
-
77
-
78
-
79
-
80
-
81
-
82
-
83
-
84
-
85
-
86
-
87
-
88
-
89
-
90
-
91
-
92
-
93
-
94
-
95
-
96
-
97
-
98
-
99
-
100
-
101
-
102
-
103
-
104
-
105
-
106
-
107
-
108
-
109
-
110
-
111
-
112
-
113
-
114
-
115
-
116
-
117
-
118
-
119
-
120
-
121
-
122
-
123
-
124
-
125
-
126
-
127
-
128
-
129
-
130
-
131
-
132
-
133
-
134
-
135
-
136
-
137
-
138
-
139
-
140
-
141
-
142
-
143
-
144
-
145
-
146
-
147
-
148
-
149
-
150
-
151
-
152
-
153
-
154
-
155
-
156
-
157
-
158
-
159
-
160
-
161
-
162
-
163
-
164
-
165
-
166
-
167
-
168
 |
 |
