Gateway NX270 Gateway Notebook Reference Guide R2 for Windows Vista - Page 93
Step 14, Step 10
 |
View all Gateway NX270 manuals
Add to My Manuals
Save this manual to your list of manuals |
Page 93 highlights
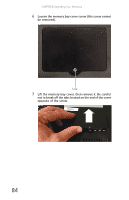
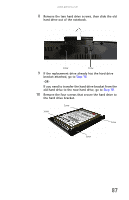
www.gateway.com 8 Remove the two hard drive screws, then slide the old hard drive out of the notebook. Screw Screw 9 If the replacement drive already has the hard drive bracket attached, go to Step 14. -OR- If you need to transfer the hard drive bracket from the old hard drive to the new hard drive, go to Step 10. 10 Remove the four screws that secure the hard drive to the hard drive bracket. Screw Screw Screw Screw 87
-
 1
1 -
2
-
3
-
4
-
5
-
6
-
7
-
8
-
9
-
10
-
11
-
12
-
13
-
14
-
15
-
16
-
17
-
18
-
19
-
20
-
21
-
22
-
23
-
24
-
25
-
26
-
27
-
28
-
29
-
30
-
31
-
32
-
33
-
34
-
35
-
36
-
37
-
38
-
39
-
40
-
41
-
42
-
43
-
44
-
45
-
46
-
47
-
48
-
49
-
50
-
51
-
52
-
53
-
54
-
55
-
56
-
57
-
58
-
59
-
60
-
61
-
62
-
63
-
64
-
65
-
66
-
67
-
68
-
69
-
70
-
71
-
72
-
73
-
74
-
75
-
76
-
77
-
78
-
79
-
80
-
81
-
82
-
83
-
84
-
85
-
86
-
87
-
 88
88 -
 89
89 -
 90
90 -
 91
91 -
 92
92 -
 93
93 -
 94
94 -
 95
95 -
 96
96 -
 97
97 -
 98
98 -
99
-
100
-
101
-
102
-
103
-
104
-
105
-
106
-
107
-
108
-
109
-
110
-
111
-
112
-
113
-
114
-
115
-
116
-
117
-
118
-
119
-
120
-
121
-
122
-
123
-
124
-
125
-
126
-
127
-
128
-
129
-
130
-
131
-
132
-
133
-
134
-
135
-
136
-
137
-
138
-
139
-
140
-
141
-
142
 |
 |

www.gateway.com
87
8
Remove the two hard drive screws, then slide the old
hard drive out of the notebook.
9
If the replacement drive already has the hard drive
bracket attached, go to
Step 14
.
-OR-
If you need to transfer the hard drive bracket from the
old hard drive to the new hard drive, go to
Step 10
.
10
Remove the four screws that secure the hard drive to
the hard drive bracket.
Screw
Screw
Screw
Screw
Screw
Screw