GE 28112EE2 Instruction Manual - Page 3
Belt clip and Optional Headset - phone system
 |
UPC - 044319606683
View all GE 28112EE2 manuals
Add to My Manuals
Save this manual to your list of manuals |
Page 3 highlights
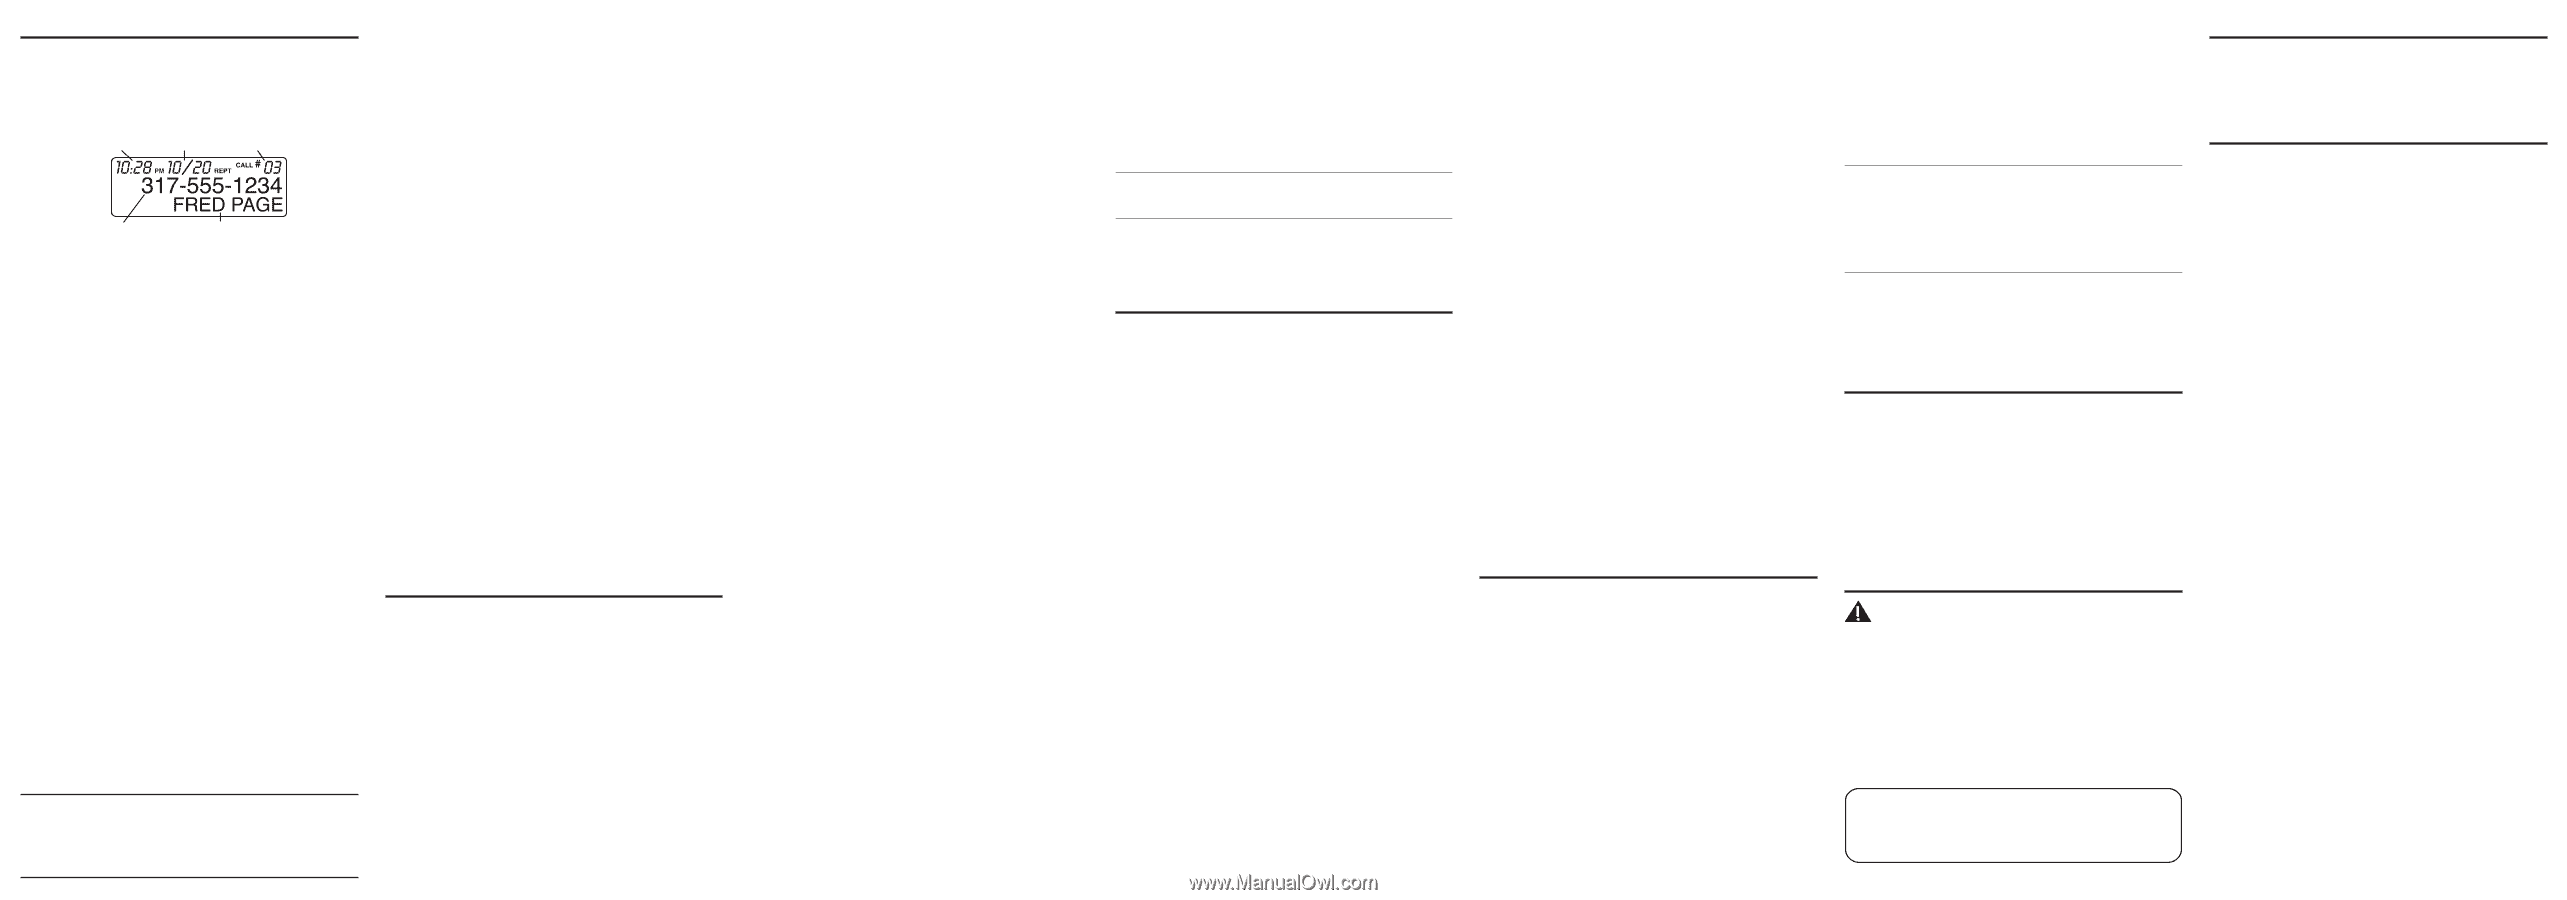
Caller ID (CID) IMPORTANT: In order to use this unit's Caller ID features, you must subscribe to either the standard Name/Number Caller ID Service or Call Waiting Caller ID Service. To know who is calling while you are on the phone, you must subscribe to Call Waiting Caller ID Service. This unit receives and displays information transmitted by your local phone company. This information can include the phone number, date, and time; or the name, phone number, date, and time. Time call received Date call received Number of calls Caller's phone number Caller's name Call Waiting Caller ID Provided you subscribe to Call Waiting Caller ID service from your phone company; if you receive an incoming call and you are using the GE multi handset system, a beep indicates the presence of a Call Waiting call on the line. The Call Waiting Caller ID information will be displayed and stored in the history of all handsets in the system. • When you hear the call waiting beep in the handset receiver, press the flash/ answerer button to put the current call on hold and answer the incoming call. Press FLASH/ answerer again to return to the original call. Receiving CID Records When you receive a call, the Caller ID information is transmitted between the first and second ring. The Caller ID information appears on the display while the phone rings, giving you a chance to monitor the information and decide whether or not to answer the call. Storing CID Records (In CID Memory) If you are not at home or cannot answer, your telephone's Caller ID memory stores the data for the 40 most recent calls you received so you can see who called while you were unavailable. When the 41st call is received, the oldest Caller ID record (1st call) is automatically deleted. You may review the stored information at any time. Calls received since your last review show as NEW in the display. Calls that have not been previously reviewed but were received from the same number more than once show as REPT in the display. Reviewing CID Records As calls are received and stored, the display is updated to let you know how many calls have been received. To scroll CID records: 1. Make sure the phone is OFF (not in talk mode). 2. Press the caller ID-volume ( 6 ) button to review the newest CID record. 3. Press the caller ID-volume ( 5 ) button to review the oldest CID record first. Dialing a CID Number 1. Make sure the phone is OFF (not in TALK mode). 2. Use the caller ID-volume ( 6 or 5) button to display the desired record. 3. Press the TALK/CALL BACK or SPEAKER button. The number dials automatically. NOTE: Depending on (a) how the incoming caller's phone number is formatted when it is received, and (b) whether or not you previously preprogrammed your local area code into the set up menu, you may need to adjust the format of the incoming caller's stored phone number before making the call, press the format/conf button to adjust the number, and try again. Available formats include: Number of digits Explanation Example Eleven digits long distance code "1 " +3-digit area code +7-digit telephone number. 1-317-888-8888 Ten digits 3-digit area code + 7-digit telephone number. 317-888-8888 Seven digits 7-digit telephone number. 888-8888 Storing CID Records in Internal Memory You may also store CID information in the phone's internal memory. NOTE: It is important that you format CID records correctly BEFORE storing in internal memory as you cannot reformat CID records stored in memory. 1. Make sure the phone is OFF (not in talk mode). 2. Use the caller ID-volume ( 6 or 5) button to scroll to the desired CID record. 3. Press the Memory button to display SELECT MEMORY 01-50. 4. Use the touch-tone pad to enter a memory location to store the number in that memory location. You will hear a confirmation tone. NOTE: If the memory location is occupied, REPLACE MEMO? is displayed, and you must confirm replacement by pressing the memory button. NOTE: Press the *TONE/exit button once to keep the previous setting (making no changes) and return to the menu. NOTE: If the selected CID record contains any information that is nonnumeric, the unit will not allow this record to transfer to the internal user memory. The handset will display UNABLE TO STORE. To Replace a Stored CID Record 1. Repeat steps 1 through 3 in Storing CID Records in Internal Memory. After you enter the memory location, REPLACE MEMO? shows in the display. 2. Press the Memory button again, and the new CID record replaces the old memory in that location. You will hear a confirmation tone. Deleting a CID Record 1. Make sure the phone is OFF (not in TALK mode). 2. Use the caller ID-volume ( 6 or 5) button to display the CID record you want to delete. 3. Press the delete button. The display shows DELETE CALL ID? 4. Press the delete button to erase the record showing in the display. The display shows DELETED. NOTE: Press the *TONE/exit button to return to the standby mode without deleting any CID records. Deleting All CID Records 1. Make sure the phone is OFF (not in TALK mode). 2. Use the caller ID-volume ( 6 or 5) button to display any Caller ID record. 3. Press and hold the delete button until DELETE ALL? shows in the display. 4. Press delete button to erase all of the current CID records. The display shows DELETED followed by NO CALLS. NOTE: Press the *TONE/exit button to return to the standby mode without deleting any CID records. Memory Each handset can store up to fifty 20-digit numbers with up to 15-character names in memory for quick dialing. This memory feature is in addition to the CID memory log, which stores up to 40 CID records in each handset. Storing a Name and Number in Memory 1. Make sure the phone is OFF (not in talk mode). 2. Press the memory button to display SELECT MEMORY 01-50. 3. Press the desired memory location button (01 through 50) or use the caller IDvolume ( 6 or 5) button to scroll to desired the memory location. NOTE: If the memory location is occupied, the memory location number and stored name and telephone number shows in the display. If the memory location is empty, EMPTY shows in the display. 4. Press the memory button. The display shows ENTER NAME. 5. Use the touch-tone pad to enter a name (up to 15 characters). More than one letter is stored in each of the number keys. For example, to enter Bill Smith, press the 2 key twice for the letter B. Press the 4 key 3 times for the letter I. Press the 5 key 3 times for the letter L. Press the 5 key 3 times for the second letter L, and press the 1 key to insert a space between the first and last name. Press the 7 key 4 times for the letter S; press the 6 key once for the letter M; press the 4 key 3 times for the letter I; press the 8 key for the letter T; press the 4 key twice for the letter H. NOTE: If you make a mistake press the delete button to backspace and erase the wrong character(s) or number(s). 6. Press the memory button to confirm and save the record. The display shows ENTER TEL NUMBR. 7. Use the touch-tone pad to enter the telephone number (up to 20 digits, including pauses (press #PAUSE button), and press the memory button again to save the record. The unit beeps to confirm. NOTE: The system treats PAUSES as delays or spaces in the dialing sequence. 8. To enter another name and number in a different memory location, return to step 2 and repeat the process. Storing the Last Number Dialed You may transfer all three redial numbers into internal user memory. 1. Make sure the phone in OFF (not in TALK mode). 2. Press redial button to display the most recent redial number. 3. Use the caller ID-volume ( 6 or 5) button to scroll to desired redial number. 4. Press memory button to display SELECT MEMORY 01 - 50. 5. Use touch-tone pad to enter two digit desired memory location (01 through 50). Display will show ENTER NAME. 6. Follow step 5 in the "Storing a Name and Number in Memory" section to enter name. NOTE: If the memory location is occupied, REPLACE MEMO? is displayed, and you must confirm replacement by pressing the memory button. 7. Press memory button to save. 8. To enter another name and number in a different memory location, return to step 2 and repeat the process. NOTE: If the redial number has more than 20 digits, it cannot be stored in memory. Inserting a Pause in the Dialing Sequence (of a Stored Number) Press the #pause/ringer button on the handset's touch-tone pad to insert a delay in dialing sequence when a pause is needed to wait for a dial tone (for example, after you dial 9 for an outside line, or to wait for a computer access tone.) Each pause counts as one digit in the dialing sequence. Reviewing Records Stored in Memory 1. Make sure the phone is OFF (not in talk mode). 2. Press the memory button to display SELECT MEMORY 01-50. 3. Press the caller ID-volume ( 6 or 5) buttons to scroll the records, or use the handset's touch-tone pad to enter the memory location number. Changing Records Stored in Memory Follow the procedure for Storing Names and Numbers in Memory, except replace a stored telephone number with a new one. Deleting Records Stored in Memory 1. Make sure the phone is OFF (not in talk mode). 2. Press the memory button to display SELECT MEMORY 01-50. 3. Press the caller ID-volume ( 6 or 5) button to scroll to the record you want to delete or use the touch-tone pad to enter the desired memory location. 4. Press the delete button to mark the record for deletion. The display shows DELETE? 5. Press the delete button to delete the record. DELETED shows in the display. NOTE: If you don't want to change or delete a record, simply press the *TONE/exit button, or wait for one minute to exit the review mode automatically. Dialing a Number from Memory 1. Make sure the phone is ON (in talk mode) by pressing the TALK/CALL BACK or SPEAKER button. 2. Press the memory button to display MEMO # - -. 3. Use the touch tone pad to enter the memory location number. The number dials automatically. -OR- 1. Make sure the phone is OFF (not in talk mode). 2. Press the memory button to display SELECT MEMORY 01-50. 3. Press the memory location for the phone number you want to dial, or use the caller ID-volume ( 6 or 5) button to scroll to the number you want to dial. 4. Press the TALK/CALL BACK or SPEAKER button. The number dials automatically. Chain Dialing from Memory Use this feature to make calls from records stored in memory which require a sequence of numbers, such as a calling card number used for a frequently called long distance number. The following example shows how you can store each part of the dialing sequence and use chain dialing to make a call through a long distance service: The Number For Memory Location Long Distance Access Number 7 Authorization Code 8 Frequently called long distance number 9 1. Make sure the phone is ON (in talk mode) by pressing the TALK/CALL BACK or SPEAKER button. 2. Press the memory button, and then press 07. 3. When you hear the access tone, press the memory button, and then press 08. 4. At the next access tone, press the memory button and then 09. Answering System Operation This section discusses the buttons and features on the answering system. Message Counter Indicator The message counter gives you a numeric display of how many messages you have. The new message indicator flashes to indicate you have new messages. See below for the details. a) Message counter has a number displayed without flashing - No new messages. Shows total number of old messages. b) Message counter has a flashing number displayed - There are new messages. Shows total number of old and new messages. c) Message counter has bars ( - - ) - Answerer is off. d) Message counter has an "F" flashing on the display - Memory is full. e) Message counter has a "CL" flashing on the display - Clock is not set since power up or after power failure. f) Message counter has six horizontal bars flashing on the display - MEMO recording. g) Message counter has a "An" flashing on the display - Answering incoming calls and recording an incoming call. h) Message counter has "LA" - The answering system is being accessed remotely. i) Message counter has a "A1" or "A2" on the display - Announcement 1 or Announcement 2 is selected as an current outgoing announcement during Announcement selection and announcement recording/playing. j) Message counter has "En" on the display - English is selected as the current voice prompt during language selection. k) Message counter has "Fr" on the display - French is selected as the current voice prompt during language selection. l) Message counter has "SP" on the display - Spanish is selected as the current voice prompt during language selection. NOTE: While the messages are playing, the message counter will display the messages in the order they were received. NOTE: The maximum recording time for each message is 3 minutes and the total recording time of this unit is 12 minutes. Leaving a Message/Memo Use the memo feature to leave a message. 1. Press and hold the memo button. 2. Begin speaking after you hear "RECORD MESSAGE" and start tone. 3. Release the memo button when you are finished recording the memo. NOTE: Maximum recording time for memo is 3 minutes. Screening Calls from the Base 1. When the answering system answers the call, listen while the caller leaves a message (to determine who is calling). 2. To speak to the caller, pick up the handset, and press the TALK/CALL BACK or SPEAKER button. The answering system automatically stops recording when you activate the handset or pick up an extension phone. TIP: Make sure the volume on the base is set loud enough to hear your incoming calls. Messages Playback The message counter let you know when you have message(s) or new message(s). To play the messages, press the PLAY/STOP button. While a message is playing, you may do the following: • Press the corresponding PLAY/STOP to stop the message playback. • Press and release the review button to restart the current message. • Press and release the review button twice to go to the previous message. • Press and release the skip button to go to the next message. • Press the delete button to erase the current message. Memory Full When the answering system memory is full, the system answers after 10 rings. You should erase some messages so the answering system may record new messages. Erasing Messages You may erase messages in the following three ways: To erase a message while it is playing 1. Press and release PLAY/STOP button. 2. Press the review and skip buttons to select and play the message you want to erase. 3. Press the delete button, the current message is erased, and the next message plays. To erase all previously played Messages in a mailbox 1. Make sure the phone is OFF (not in talk mode) 2. Press and hold the delete button until "ALL OLD MESSAGES ERASED" is announced. To erase a message from the handset : 1. Press the flash/answerer button on the handset 2. Press the play/stop (key 2) on the handset. 3. Press the erase (key 0) on the handset to erase a message during playback. NOTE: Erased messages cannot be restored. Remote Access You may access the answering system with the cordless handset or from any tone-dial compatible telephone. Cordless Handset Use the corresponding handset keys just like you would use the base buttons (see "Answering System Setup"). The button functions are located on the handset above each number key. For example, to play messages: • Press the flash/answerer button. The display shows ANSWERER REMOTE ACCESS. • Press 2 (play/stop) to play the message. • When you are finished listening to your messages, press the flash/answerer button again. Screening Calls from the Handset Use the handset to screen calls even when you can't hear the answering system. When the answering system picks up: 1. Press the flash/answerer button to access the answering system. CALL SCREENING shows on the display. 2. Listen as the caller leaves a message. 3. Press the TALK/CALL BACK or SPEAKER buttons to speak to the person or press the flash/answerer button to stop screening the call. Accessing the Answering System from Another Location You can access your answering system from any touch-tone phone by entering your 3-digit security code during the playing of outgoing announcement or after you hear the outgoing announcement. 1. Dial the telephone number to which the answering system is connected. 2. Enter the security code during the outgoing announcement or after you hear the tone. Note: The default security code is 123 3. Follow the voice menu to use the answering system's remote functions. The remote feature lets you perform the following functions: To Press this button Review message 1 Play back messages 2 Stop message playback 2 Erase message 0 (during message playback) Skip message 3 Turn off/on answerer 4 Review voice menu options 7 Memory Full When answering system memory is full, the system answers after 10 rings, beeps and waits for you to enter the 3-digit security code. If you don't enter the security code within 8 seconds, the phone hangs up. You should erase some messages so the answering system can record new messages. NOTE: The unit also answers after the 10th ring if it is turned off. To access the answering system, enter your 3-digit security code. Belt clip and Optional Headset Connecting the Belt Clip 1. To attach the belt clip, insert the sides of the belt clip into the slots on each side of the handset. 2. Snap the ends of the belt clip into place. Connecting an Optional Headset to the Handset Each handset can be used with an optional headset hands free operation. 1. Connect the headset to the headset jack on the side of the handset. The handset receiver and microphone are disabled when the headset is connected. 2. Adjust the headset to rest comfortably on top of your head and over your ear. Move the microphone to approximately two to three inches from your mouth. 3. Press the TALK/CALL BACK button to answer a call or make calls using the headset. 4. To return to normal operation, unplug the headset from the jack. Changing the Battery CAUTION: To reduce the risk of fire or personal injury, use only the Thomson Inc. approved model 5-2721 Nickel-metal Hydride battery (Ni-MH), which is compatible with this unit. 1. Make sure the telephone is OFF (not in TALK mode) before you replace the battery. 2. Remove the battery compartment door. 3. Disconnect the battery plug from the jack inside the battery compartment and remove the battery pack from the handset. 4. Insert the new battery pack and connect the cord to the jack inside the battery compartment. 5. Put the battery compartment door back on. 6. Place handset in the base or handset charge cradle to charge. Allow the handset battery to properly charge (for 16 hours) prior to first use or when you install a new battery pack. If you do not properly charge the phone, battery performance will be compromised. NOTE: The RBRC seal on the battery used in your Thomson Inc. product indicates that we are participating in a program to collect and recycle the rechargeable battery (or batteries). For more information go to the RBRC web site at www.rbrc.org or call 1-800-8-BATTERY or contact a local recycling center. Battery Safety Precautions • Do not burn, disassemble, mutilate, or puncture. Like other batteries of this type, toxic materials could be released which can cause injury. • To reduce the risk of fire or personal injury, use only the Nickel-metal Hydride battery listed in the User's Guide. • Keep batteries out of the reach of children. • Remove batteries if storing over 30 days. Display Messages The following messages shows the status of the phone, provides Caller ID information, or helps you set up and use your phone. BLOCKED NUMBER Indicates the person is calling from a number which is blocked from transmission. CHARGING... Indicates the handset needs to charge for a period of time before it can resume normal function. DELETE ALL? Prompt asking if you want to erase all CID records. DELETE CALL ID? Prompt asking if you want to erase the CID record showing on the display. DELETE? Prompt asking if you want to erase one of the 50 records stored in the phone's memory. DUPLICATE NUMBER Under VIP melody feature, if the desired number/record was selected in any one of TEN VIP melody records before, DUPLICATE NUMBER shows in the display. END OF LIST Indicates that there is no additional information in CID memory. ENTER NAME Prompt telling you to enter a name in one of the 50 memory locations. ENTER TEL NUMBR Prompt telling you to enter a telephone number in one of the 50 memory locations. NEW Indicates call or calls which have not been reviewed. HANDSET NAME Prompt telling you to enter the user name for the registered handset. HANDSET NEEDS REGISTRATION INCOMPLETE DATA Indicates you must register a non-registered handset prior to use. Caller information is interrupted during transmission or the phone line is excessively noisy. Indicates no CID information was received, you are not subscribed to CID service, or CID service is not working. LINE IN USE Displays on handset while the line is in use. LONG DISTANCE Indicates CID record is from a long distance call. LOW BATTERY Indicates the battery needs to be charged. NEW VOICE MAIL CALL SCREENING Indicates voice mail has not been retrieve from service provider. Indicates you may use the handset to screen calls before answering the call NEW CALL XX XX represents the number of new CID records not reviewed. NO CALLS Indicates there are no CID records in memory. NO USER MEMORY Indicates the memory location contains no user memories and the user is trying to mark a specific user record for VIP MELODY. OUT OF RANGE May indicate handset is too far away from the base or that the power has been interrupted. Move closer and check connections. PAGING or PAGING FROM Someone pressed the page button on the base or int button on the handset REPT Indicates a repeat call message. Indicates a new call from the same number was received more than once. SEARCHING Indicates handset is searching for the base. SPKR Indicates the handset is in speakerphone mode. UNKNOWN CALLER/ Indicates incoming call is from an area not serviced by CID or NAME/NUMBER the CID information was not sent.
-
 1
1 -
 2
2 -
 3
3 -
 4
4
 |
 |