GE AJEH12DC Owners Manual
GE AJEH12DC Manual
 |
View all GE AJEH12DC manuals
Add to My Manuals
Save this manual to your list of manuals |
GE AJEH12DC manual content summary:
- GE AJEH12DC | Owners Manual - Page 1
--Optional ........ Window Installation-- 19, 13 13, 14 15 Optional on models so equipped 16-91 Troubleshooting Tips ........ 92 Nomml Operating Sounds .... 92 Consumer Support Consumer Support ... Back Coxer _A'anantv 93 Cool Ordy: A,[CH O& 10 ACB 4!(:H la 12 41cq 06 A!(:Q o& lo - GE AJEH12DC | Owners Manual - Page 2
electric shock or personal injury. SAFETYPRECAUTIONS Use this appliance only %r its intended puq)ose as described in this Owner's Manual. iiiiiiTiihiiiiis_iiiair conditioner must be properly installed ira accordance with the Installation Instructions check with the company handling disposal about - GE AJEH12DC | Owners Manual - Page 3
rise an extension cord, it is absolutely necessm T flint it be a UL-listed, 14 gauge, 3-wire grounding type appliance extension cord having a grounding type plug and outlet and tilat rite electrical rating of tile cord be 15 ampeies (minimum) and 125 _lts. CAUtiON: DO NOT use an extension cord - GE AJEH12DC | Owners Manual - Page 4
conditioner controls, use to set COOLor FANmode at HIGH,MED or LOW To cancel (CI,) tile OffTimer OFFpad again. press tile tim speed. Indicator lights on tile air conditioner controls will show tile mode To cancel tile timex; press tile Omor OFF pads/mtil tile display time disappears. and - GE AJEH12DC | Owners Manual - Page 5
MODEpad until tile COOLindicator lig]lt is lit and the LOW, MEDor Hlindicator light is lit fbr dm (]esix_(] thn speed. 2. Px_ss the INCREASE&/DECREASET ControPl anel Px_ss die MODEpad until tile FANindicator light is lit and tile LOW, MEOor HIindicator light is lit tbr the desix_d tan speed. Vent - GE AJEH12DC | Owners Manual - Page 6
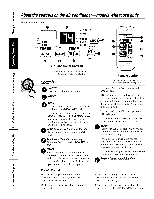
About the controlson the air conditionermmodels with touchpads. Auxiliary Controls- TemperatureLimiting To reach the auxiliary controls remove the fl'ont g_ille, Access them through the small rectangular opening above the control panel. Temperature limiting can reduce energy costs by limiting the - GE AJEH12DC | Owners Manual - Page 7
Notes. m www.GEAppliances.com m m :X 7 - GE AJEH12DC | Owners Manual - Page 8
at mid point. Heat Pump Models When the outdoor temperature is lower than 25°F., heat is provided by the electric heater in the air conditioner instead ot bv the heat pump. NOTE"Theelectricresistanceheaterin the 115-vo/t heatpumpmode/operatesdunbgdefrostwhenthe outdoorco//temperaturies - GE AJEH12DC | Owners Manual - Page 9
Fan Switch To reach tile tim switch (es) remove tile front grille. On HeagCool and Heat Pump models, tile tim switch leveI_ are located in holes accessed through tile control box. Tile top switch is fin" COOL settings and tile bottom sMtch is fin" H_lTsettings. Use a small screwdriver to change tile - GE AJEH12DC | Owners Manual - Page 10
outdoor side of the air conditioner should be checked regularly. If they are clogged with dirt or soot they may be professionally steam cleaned, a service available through yore" GE se_wice outlet. Front Grille The fl'ont grille can be removed tot more thorough cleaning or to make the model and - GE AJEH12DC | Owners Manual - Page 11
and efficiency (ff the trait. Replacement filtexs are ax filable fl'om yore" salesl)e_on, (;E deale_; (;E Sertice and Parts Center or authorized ()lstomer Care _' servicers. How to Insert the Batteries ] ]_.emove the battery ('oxer b) sliding it according to the arrow direction. ] Insert new - GE AJEH12DC | Owners Manual - Page 12
instructions with the Consumer. • Note to Consumer - Keep these instructions for future reference. ° Skill level- Installation of this appliance minimizes the possibility of electric shock hazard. If Aluminum house wiring may present special problems--consult a qualified electrician. IMPORTANT! GE - GE AJEH12DC | Owners Manual - Page 13
Installation Instructions Read these instructions completely and carefully, TOOLS YOU MAY NEED Phillips head screwdriver Adjustable Wrench Drill Pencil Hand or Saber Saw Ruler or Tape Measure Scissors or knife - GE AJEH12DC | Owners Manual - Page 14
INSTALLING A J-MODEL IN AN EXISTING WALL CASE Read these instructions completely and carefully. [] REMOVE LOCKING PLATE ON FRONT LEFT SIDE Locking plate Remove screw [] REINSTALL LOCKING PLATE WITH TAB BEHIND WALL CASE FLANGE. TIGHTEN SCREW [] - GE AJEH12DC | Owners Manual - Page 15
INSTALLING THROUGH THE WALL Read these instructions completely and carefully. [] PREPARE OPENING IN WALL Make wall members. Lintel - Use a lintel in brick veneer and brick and block types of wall to support the bricks or blocks above the opening. Do not allow the wall case to be used in lieu - GE AJEH12DC | Owners Manual - Page 16
AJES08ASB, AJES10DSB Read these instructions completely and carefully. and AJHS08ASB Sill support bracket (2) X_k Case the window opening dimensions to the right. • All supporting parts must be secured to firm wood, masonry or metal. • The electrical outlet must be within reach of the power cord, - GE AJEH12DC | Owners Manual - Page 17
Installation Instructions 1-21STORIVIWINDOW REQUIREMENTS A storm window frame will not allow the air conditioner to tilt towards the outside and will keep it from draining properly. To adjust - GE AJEH12DC | Owners Manual - Page 18
Installation Instructions WINDOW INSTALLATION--OPTIONAL (cont.) [] PREPAREWINDOW [] Mark the centerline of the stool, Measure from the centerline 13%" on both sides for the panel cuts. Stoo Centerline [] Measure 12%" from the centerline on both sides for the sill support brackets. Centerline - GE AJEH12DC | Owners Manual - Page 19
Installation Instructions [] MEASURE, CUT AND INSTALL FILLER PANELS [] Measure from the edge of the panel marks (see Prepare the Window) to the inside of from the top and the bottom. Squeeze and push the clips to fit in the window track and the tab into the sill support. Hook the tab into the sill - GE AJEH12DC | Owners Manual - Page 20
Installation Instructions WINDOW INSTALLATION--OPTIONAL (cont.) [] INSTALL CASE IN WINDOW [] Peel off the backing from the bottom window gasket. [] Place the gasket on the stool and over - GE AJEH12DC | Owners Manual - Page 21
Installation Instructions [] INSTALL WINDOW GASKET AND LOCKING BRACKET [] Cut the foam top window gasket to the window width. [] Stuff the foam between the glass and the window - GE AJEH12DC | Owners Manual - Page 22
Before youcall for service... Troubleshooting -tips:Save time and money! Review the chart below first and you may not need to call for service. Air conditioner doesnot start Possible Causes The air conditioner is unplugged, The fuse is blown/drcuit breaker is tripped, Power failure. What To Do - GE AJEH12DC | Owners Manual - Page 23
the defective part, Service trips to your home to teach you how to use the product. hnproper h_stallation, delivery or maintenance. If you have an installation problem, or if consumer affairs office or your state's Attorney General Warrantor: General Electric Company. Louisville, KY 40225 23 - GE AJEH12DC | Owners Manual - Page 24
Grille frontale 32 Grille et boitier 32 Seq)entins extOfieurs 32 Instructions de montage Avant de commencer .......... 34, 35 Installation d'un materiel 38-43 En ms de panne A_ant d'appeler le service ......... 44 Bruits nommux de fonctionnement 44 Soutien au consommateur - GE AJEH12DC | Owners Manual - Page 25
] que pour son usage pievu, tel que d_crit dans le Manuel de 1' utilisateur. Vous devez bien monter ce conditionnem; confom_ment aux Instructions de montage, avant de l'utilisei: Ne d_bmnchezjamais ",_tre conditionneur en tirant sur le cordon d'alimentation. Saisissez fem_ement la fiche et sortez - GE AJEH12DC | Owners Manual - Page 26
RENSEIGNEMENTIMSPORTANTESNMATIEREDESECURITE. LISEZTOUTESLESINSTRUCTIONSAVANT USAGE. AVERTISSEMENT! UTILISATIODNERALLONGES--modOdlees115volts uniquement z_cause du danger qu'elles font courir dans certaines conditions, nous vous recommandons instamment de ne pas utiliser de rallonge. Cependant, si - GE AJEH12DC | Owners Manual - Page 27
Commandessur le conditionneur-modeles dotesde touchesa effleurement. L'aspect pout varier. Minuterie an position Marche [ I_ 1 So',r_meil " I_ • COOL-- cli_ti+_ti0_+ H_'t-• HIGH +_-+• LOW TEMP __ Marche www.electromenagersge.ca 4, 4, Commandesdu conditionneur LestGmoinslumineuxa - GE AJEH12DC | Owners Manual - Page 28
Commandossur le conditionneur-modeles dotesde touchesa effleurement. MODE CLIMATISATION (COOL) Telecoruruande ]. Appuyezsur la touche COOL. 2. Appmez sur les touches LOW,MEOou Hlpour r_gler la _itesse de _enfilateur wmlue. 3.Appuyezsur leatouchesINCREASEA/DECREASEpTour r@er la temp&ature wmlue - GE AJEH12DC | Owners Manual - Page 29
www.electromenagersge.ca Commandesauxiliaires- Limitation de temperature Pore" atteindre les commandes auxiliaires, enlevez la grille fl'ontale. Vous pot/\'ez y avoir acc_s en passant par la petite ouverttu'e rectangulaire situ_e au - GE AJEH12DC | Owners Manual - Page 30
Commandessituees sur le conditionneur-modeles dotesde boutonsde reglage. LOW FAN LOW==I I I _aLOW OFF LOWa _ FAN ,__COO HIGHa • I| a LOW L •-- HIGH FAN --_w COOL COMMANDEDU MODE O Commandes COMMANDEDE LA TEMPI RATURE O _r h IC_eos mf_)mncdaonnds edHuIGmHCoOdOeLet LOWCOOLg'4n_rem du - GE AJEH12DC | Owners Manual - Page 31
vvww.electromenagersge.ca Interrupteur du ventilateur Pour atteindre le(s) intexTupteur(s) tie ventilateur, enle_ez la grille fi'ontale. Surles modelesHOT/COOL(rechauffemeng refroidissemente)ta pompede chaleur,le leder d'interruption du _entilateur est situ(_darts un trou au fired de la boite de - GE AJEH12DC | Owners Manual - Page 32
de la salet_ ou de la suie, il est possible de les tifire nettover _'lla wlpetlr par des proti_ssionnels en passant par votre Centre de services GE. Grille frontale I,a grille nettoyage num0ros fl'ontale peut _tre refirOe en pi'oii)ndetlr Oil pol./I" de module et de s0rie. pour un acceder - GE AJEH12DC | Owners Manual - Page 33
et de la ventilation. Vous pouvez vous procurer des filtres de remplacement aupr_s de votre vendem; votre revendem" GE, votre Centre de services et pi_ces (;E ou de rg_paratem_ Customer Care': autoris_s. Comment inserer les piles E_] Enlevez le couvercle du logement des piles en le tidsant - GE AJEH12DC | Owners Manual - Page 34
le Manuel du proprietaire. • Note au consommateur - Conservez ces instructions pour consultation ulterieure. • Niveau de competence - L'installation de Un c_blage de la maison en aluminium peut occasionner des problemes particuliers--consultez un electricien qualifi& IM PORTANT! GErecommfaonrtdeme - GE AJEH12DC | Owners Manual - Page 35
de montage Veuillez life toutes ces instructions attentivernent. OUTILS DONT VOUS POUVEZ AVOIR BESOIN Tournevis a t6te Phillips Cle anglaise /'_ _" "4,_d4_ Perceuse Crayon Scie a main ou scie sauteuse Metre a ruban ou ridge Scissors - GE AJEH12DC | Owners Manual - Page 36
de montage INSTALLATION D'UN MODI_LE _ J _ DANS UN LOGEMENT MURAL EXISTANT Veuillez lire toutes ces instructions attentivement. [] RETIREZ LA PLAQUE DE VERROUILLAGE SUR LE COTI_ GAUCHE AVANT Plaque de verrouillage Enlleavevzis _J / / / [] RI_INSTALLEZ LA PLAQUE DE VERROUILLAGE EN.PLAqANT - GE AJEH12DC | Owners Manual - Page 37
INSTALLATION A TRAVERS LE MUR Veuillez lire toutes ces instructions attentivement. R-IPRI_PARATION DE L'OUVERTURE DANS LE MUR charpente du mur. Linteau - Pour les murs de ma£onnerie, utilisez un linteau pour supporter les briques ou les blocs au-dessus de I'ouverture. Le Iogement mural ne doit - GE AJEH12DC | Owners Manual - Page 38
pour la ferrure de support Type A (9) Type C (peintes) (6) Type D (2) Type B (2) Type E (4) Agrafe d'ecartement (2) Contre-ecrou (2) $ Boulon de reglage (2) Grande rondelle (2) [] INSTRUCTIONS RELATIVES A LA FENETRE I I B===8 • Ces instructions s'appliquent aux fen_tres guillotine - GE AJEH12DC | Owners Manual - Page 39
de montage []INSTRUCTIONS RELATIVES A LA CONTRE-FENETRE Le cadre de la contre-fen_tre emp_che le conditionneur de pencher vers I'exterieur et donc de se drainer adequatement. Pour regler ce probleme, fixez une piece de bois sur le rebord de fen_tre. 1/2 pc _ plus eleve -- que le _ cadre - GE AJEH12DC | Owners Manual - Page 40
Instructions de montage INSTALLATION DE FENETRE (EN OPTION) (suite) [] PRI_PAREZ LA FENETRE [] . Serrez les vis de montage de I'agrafe d'ecartement. Les vis sont en place Encoche en _ V _ du support ---_ Seuil decale (comme la brique ou la pierre) NOTES : • Dans le cas d'un seuil etroit, I'espace - GE AJEH12DC | Owners Manual - Page 41
Instructions de montage [] MESUREZ, COUPEZ ET INSTALLEZ LES PANNEAUX DE FERMETURE [] De les Ioger dans les rails de la fen6tre et inserez la languette darts le support de seuil. Inserez la languette dans le support de seuil [] Assemblez les composants des panneaux. Enlevez le doublage en papier - GE AJEH12DC | Owners Manual - Page 42
Instructions de montage INSTALLATION DE FENETRE (EN OPTION) (suite) [] MONTEZ LE LOGEMENT DANS LA FENETRE [] Enlevez le doublage en papier du joint d'etancheite inferieur de la fen6tre. [] Placez le joint d'etancheite sur le rebord de la fen6tre et par-dessus les supports, a egalite avec le bord - GE AJEH12DC | Owners Manual - Page 43
Instructions de montage [] MONTEZ LE JOINT D'I:!:TANCHEITI:!: EN MOUSSE DE LA FENI_TRE ET LA FERRURE DE VERROUlLLAGE [] Coupez, a la largeur de la fen_tre, le joint d'etancheite - GE AJEH12DC | Owners Manual - Page 44
et de/argent! E-tudiezle tableau ci-dessous ."votre appel de service est peut-Otre inutile. Leconditionneutrie se metpas en marche Causes • Nettovez le tiltre mt moi/ls tolls les 30jours. Cousulmr ]a seciion Instructions do fonctionnomont. La chambre etait chaude. L'air froid s'echappe de la - GE AJEH12DC | Owners Manual - Page 45
un an, nous tournirons _galement, gratuitement, toute la main-d'ceuw'e et le service fi la maison n_cessaires pour remplacer la piece d_tbctueuse. Toutelement rill systeme de bureau local ou provincial de protection des consommateurs. Garant : General Electric Company. Louisville, KY 40225 45 - GE AJEH12DC | Owners Manual - Page 46
par n'importe quel utilisateur. Les autres r_parations doivent generalement _tre effectu_es par un technicien qualifi_. Soyez prudent, Vous trouverez darts les pagesjaunes de votre annuaire le num&'o du (:entre de service Cam(-o le plus proche. Autrement, appele>nous au 1.888.261.3055. Contactez - GE AJEH12DC | Owners Manual - Page 47
Instrucdones de sequridad ... 48, 49 Instrucdones de operaci6n Controles--botones de control Controles--mclas de toque 54, 55 .... 50-59 Cuidado y limpieza Fihro de aire 57 Rejilla dehmtera 56 Rejilla y caja 56 gobinas para exteriores .......... 56 Inslrucdones de instalad6n - GE AJEH12DC | Owners Manual - Page 48
INFORMACIONIMPORTANTEDE SEGURIDAD. LEATODASLASINSTRUCCIONEASNTESDEUSAR. iAD VERTENCIA! Por sElseguridad, se debe seguir la informaci6n en este manual para minimizar el riesgo de incendios, descargas el#ctricas o lesiones personales. PRECAUCIONDEESSEGURIDAD Use este electrodom_stico solamente para - GE AJEH12DC | Owners Manual - Page 49
www.GEAppliances.com iAD VERTENCIA! USODECABLEDSEEXTENSi ION--Modedleo1s15voltiossolamente Debido al potencial de riesgos de seguridad bajo ciertas condiciones, en#rgicamente recomendamos contra el uso de cables de extensidn. ! PRECAUCION: NO USE un cable de extension con ninguno de los modelos - GE AJEH12DC | Owners Manual - Page 50
Acerca de los controlesen el acondicionadorde aim-modeloscon teclas de toque. La apariencia podrfa variar. 1 • COOL-- F.o • FAN-- Vendlado, o Sinctonizador I Dormir._,..• AMIetod-_-eH•MIEGDH B_4io LOW k Encendido TEMP @ Controles del acondicionador de aire Las lucesal lad• de las - GE AJEH12DC | Owners Manual - Page 51
www.GEAppliances.com MODO COOL (FRIO) Controrlemoto interno se enfl'iarfin,is.Silo _{justa un nfimeromn?ol; 1.Presioneel bot(m COOL. la temperamradel hireinternose calentar_mi ils. 2. Pred(melosbotonesLOW(bajo)M, EDOnedioo) Hl(alto)pnrn NORAS:iofaconflicionaddoeraireest#apagadyofuegoso est_d) - GE AJEH12DC | Owners Manual - Page 52
Acerca de los controlesen el acondicionadorde aire-modeloscon teclas de toque. Controlesauxiliares--Limitacion de temperatura Para alcanzar los controles auxiliares remuew_ la parrilla fl'ontal, i,ogre acceso pequefia abertura rectangular de control, a ellos a tra\'(_s de la encima del panel E1 - GE AJEH12DC | Owners Manual - Page 53
Notas. www.GEAppliances.com w I m "€= m 53 "z - GE AJEH12DC | Owners Manual - Page 54
Sobre los controles del acondicionadorde aim-modelos con botonesde control. LOW FAN 0FF•_•_'_ LOW==I I I _aLOW OFF LOWa _ a LOW FAN _COOL HIGHa • II •-- HIGH _J FAN v_w COOL CONTROLDE MODO 0 CONTROLDE LATEMPERATURA 0 Controles o IC,oos nnti_roe]leds eHMIGoHdCoOOL_ LOW COOL enfHan - GE AJEH12DC | Owners Manual - Page 55
www.GEAppliances.com Interruptor del ventilador Para alcanzar el inter_ uptor del _entilador(es) x_rrmeva la parrilla ti'ontal. Enlosmodelosde Calentamiento/Enfriamientyode Bombadecalentamiento,]aspakm(as (]el interruptor (]el _entilador est_in localb'adas en un ag-ujero al que se fiene acceso a - GE AJEH12DC | Owners Manual - Page 56
hacia arriba. 2. Retire los dos tornillos de la rejilla. tt Enaigunosmodelos 3. Hale la rejilla pot abajo y lex rote pot las pestafias en la parte superior de la caja. Enalgunosmodelos Para reemplazar: Enganche las pesmfias en la rejilla delantera al mismo nivel con las pestafias al fi'ente de la - GE AJEH12DC | Owners Manual - Page 57
de la tmidad. I,os filtros de reemplazo est:hl disponil)les a tra\'(_s de su concesionario GE, centro de servicios y partes de GE o de los tg_cnicos de servicio al cliente (Custolner Cai'e_). Como insertar las baterias ] Rdeetiarceuerla(h)(ubiecrotna la ddeirelaccbi6anterfade delaslifzleficnhdao - GE AJEH12DC | Owners Manual - Page 58
Instrucciones Acondicionadores de instalacion de Aire I r-?l _,Preguntas? Llame a1800.GE.CARES (800.432.2737) o bien visite nuestra pagina Web: GEAppliances.com I ANTES DE INICIAR f A PRECAUCION: Lea estas instrucciones completa y cuidadosamente. • IMPORTANTE - Guardeestas instrucciones para - GE AJEH12DC | Owners Manual - Page 59
Instrucciones para la instalacion Lea estas instrucciones completa y cuidadosamente. HERRAMIENTAS QUE PODRJA NECESITAR Destornillador de estrella Llave ajustable Talador ((((((_) Lapiz Sierra de mano o de vaiven Regla o cinta de medir Tijeras o cuchillo Nivel NUMEROS DE KIT DE GE USE EL KIT GE - GE AJEH12DC | Owners Manual - Page 60
de pared y que la instalaci6n de la caja sea segura, Cable electrico [] UNA LA REJILLA DELANTERA Una abertura para el cable electrico esta en la parte de abajo de la rejilla delantera. 60 - GE AJEH12DC | Owners Manual - Page 61
Instrucciones para la instalacion COMO INSTALAR A TRAVI S DE LA PARED Lea estas instrucciones completa y cuidadosamente. ITIPREPARE LA ABERTURA DE LA PARED Verifique que haya un receptaculo de pared disponible cercano a la ubicaci6n del orificio o disponga la instalaci6n de un receptaculo. La - GE AJEH12DC | Owners Manual - Page 62
angosta. Consulte las dimensiones de la abertura de la ventana a la derecha. 17" min. 31" a 43" (con paneles de relleno) r- I • Todas las partes de apoyo se deben asegurar a la madera firme, mamposteria o metal. • El tomacorriente debe estar al alcance del cable electrico. 261/4', ml'n. (sin - GE AJEH12DC | Owners Manual - Page 63
envio al interior del acondicionador de aire al lado del compresor. / de bloqueo tornillo [] Retire y deseche el tornillo de envio en la parte posterior del acondicionador de aire para retirar el acondicionador de aire de la caja. tornillo protectors de empaque [] Retire la rejilla posterior que - GE AJEH12DC | Owners Manual - Page 64
Instrucciones para la instalacion INSTALACION EN UNA VENTANA--OPCIONAL (cont.) [] PREPARELA VENTANA [] Marque la linea central de la alfajia interior. Mida desde la linea central 133/8" en ambos lados para los cortes de los paneles. [] Mida 12%" desde la linea central en ambos lados para los - GE AJEH12DC | Owners Manual - Page 65
superior y la [] Marque las medidas A y Ben cada lado de la placa del panel de relleno. Corte los paneles y deseche la pieza del centro. Observe la parte inferior. Apriete y empuje los ganchos para que encajen en el riel de la ventana y la pestaha en el soporte de la alfajia exterior. posici6n de - GE AJEH12DC | Owners Manual - Page 66
la ventana se encuentra con la caja. [] Pele el respaldo del empaque para la parte superior de la caja. [] Sostenga la caja, abra la ventana y coloque el empaque a Io largo de la marca de la caja. Coloque el empaque en la parte superior de la caja donde la ventana se va a cerrar. Empaque para la - GE AJEH12DC | Owners Manual - Page 67
Instrucciones pard la instalacion [] INSTALE EL EMPAQUE PARA LA VENTANA Y EL SOPORTE DE BLOQUEO [] Corte el empaque de espuma pard la parte superior de la ventana al ancho de la ventana. [] Rellene la espuma entre el vidrio y la ventana pard evitar que el dire y los insectos entren - GE AJEH12DC | Owners Manual - Page 68
Antes de Ilamar para solicitar servicio... Ideas para la identificaci6n y soluciSn de problemas: iAhorre dinero y tiempo! Revise la siguiente tabla primero y quizDsno tonga que Ilamar para soficitar servicio. El acondicionador de aire no enciende Elacondicionaddoeraire no enfriacomo deberia - GE AJEH12DC | Owners Manual - Page 69
Notas. www.GEAppliances.com w I m "€= m 69 "z - GE AJEH12DC | Owners Manual - Page 70
a#o A partir de la fecha fie la comfira origina! Cincoa_os A part#de la fecha de la compra original Nosotros reemplazaremos: Cualquierpartedel acondicionador de o la oficina del Attomey General o Procurador General en su Iocalidad. Garante: General Electric Company. Louisville, KY 40225 7O - GE AJEH12DC | Owners Manual - Page 71
electr(,dom_stico? ;Pmebe la pfigina _'eb de GE Appliances 24 horas al dfa, cualquier dfa del afio_ Para mayor conveniencia v servicio mils rfipido, )_ puede desca_gar los Manuales oficina. (;E Consumer Home Services estarfi afin ahf cuando General Manage_; Customer Relations GE Appliances, Appliance - GE AJEH12DC | Owners Manual - Page 72
at 800.626.2002 during nomml business hom_. Instructions contained in this manual cover procedures to be performed by any user. Other servicing generally should be referred to qualified service personnel. Caution must be exercised, since improper servicing may cause unsafe operation. ContactUs www
-
 1
1 -
 2
2 -
 3
3 -
 4
4 -
 5
5 -
 6
6 -
 7
7 -
8
-
9
-
10
-
11
-
12
-
13
-
14
-
15
-
16
-
17
-
18
-
19
-
20
-
21
-
22
-
23
-
24
-
25
-
26
-
27
-
28
-
29
-
30
-
31
-
32
-
33
-
34
-
35
-
36
-
37
-
38
-
39
-
40
-
41
-
42
-
43
-
44
-
45
-
46
-
47
-
48
-
49
-
50
-
51
-
52
-
53
-
54
-
55
-
56
-
57
-
58
-
59
-
60
-
61
-
62
-
63
-
64
-
65
-
66
-
67
-
68
-
69
-
70
-
71
-
72
 |
 |

wvvw.GEAppliances.com
©
©
Safely Instructions
.........
2, 3
Operating
Instructions
Controls_Control
I{a_obs
....
8, 9
Controls---Touch
Pads
.......
4-6
Care and
Cleaning
Air Filter
...................
11
Front
Grille
.................
10
Grille
and
Case
..............
10
Outdoor
Coils
...............
l0
Installation
Instructions
Before
You Begin
..........
19, 13
Installing
a J-Model
in
an Existing
_4'all Case
......
13, 14
Through-the-_'all
Installation--Optional
........
15
Window
Installation--
Optional
on
models
so equipped
..............
16-91
Troubleshooting
Tips
........
92
Nomml
Operating
Sounds
....
92
Consumer Support
Consumer
Support
...
Back
Coxer
_A'anantv
...................
93
Write themodel andserial numbershere:
Model #
Serial #
Find
these
nmnbers
on a label on the ti'ont
ot the base pan
behind
the fl'ont grille.
Cool
Ordy:
A,[CH
O& 10
ACB
4!(:H
la
12
I)CB
41cq
06
t_cB
A!(:Q o&
lo
ACB
Aj(:Q
m,
12
D(:B
AJ(;S
06
LCB
4!(:s
o_,',m
AC/J
4!(:s
09, m,
12
D(:B
H_,at/Cooh
4/EH
12
DCB
4flcs
06
[_sB
4fl,;s
o_s,
A,S'B
4fl';s
09, m,
12
DCB
4flcs
lo
DSB
Heat P'ump:
4/H5"
08
ASB
41HS
o& lo
DCB
Conditionneurs
d'air
La section frangaise
commence
a la page 24
Acondicionadores
Aire
La
seccion
en espa#ol
empieza en la pag&a
47
TINSEA380JBRZ
49-7485
02-04 Jfl