GE CSB48WSKSS Use and Care Manual - Page 17
Dimensions And Clearances, Side Panels
 |
View all GE CSB48WSKSS manuals
Add to My Manuals
Save this manual to your list of manuals |
Page 17 highlights
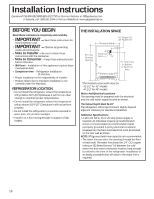
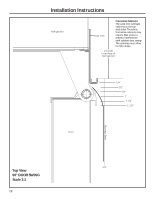
Installation Instructions DIMENSIONS AND CLEARANCES 41", or 47" Case Width *83-1/2" at Rear 25-3/4" * Shipping height. The refrigerator can be adjusted to fit into a cutout that *84" is 84-1/2" in height. From Use leveling legs Floor and wheels for a maximum 1" height adjustment. 36", 42" or 48" Frame to Frame Depth Including Handles: 27-3/4" Product Clearances These refrigerators are equipped with a 3-position door stop. The factory-set 115° door swing can be adjusted to 90° if clearance to adjacent cabinets or walls is restricted. 115° Door Swing A B 90° Door Swing 23-9/16" Behind Frame SIDE PANELS 24" Side panels must be used whenever the sides of the refrigerator will be exposed. The 1/4" side panels will slip into the side case trim. 3/16" 1-7/8" Secure the panels to the refrigerator with stick-on *84" hook and loop fastener strips. Order the side panels from the cabinet manufacturer. • Cut a notch in the top front corner as shown to allow clearance for *3" to 4" corner keys in the front side trim. 2-9/16" * Depending on installation height. C Models A 42" 13" 48" 15" B C 19" 26-5/8" 20" 28-5/8" *Min. Distance to Wall *4" Stainless and Trimmed Models. 5" Pro Series For a 90° door swing, allow 4" min. clearance to a wall, for framed and stainless steel models. Allow 5" min. clearance for professional series models. If the 90° door stop position is used, pan access is maintained, but pan removal is restricted. See the illustrations on pages 41 and 42 to determine door swing interaction with adjacent cabinets or countertops. 17
-
 1
1 -
2
-
3
-
4
-
5
-
6
-
7
-
8
-
9
-
10
-
11
-
 12
12 -
 13
13 -
 14
14 -
 15
15 -
 16
16 -
 17
17 -
 18
18 -
 19
19 -
 20
20 -
 21
21 -
 22
22 -
23
-
24
-
25
-
26
-
27
-
28
-
29
-
30
-
31
-
32
-
33
-
34
-
35
-
36
-
37
-
38
-
39
-
40
-
41
-
42
-
43
-
44
-
45
-
46
-
47
-
48
-
49
-
50
-
51
-
52
-
53
-
54
-
55
-
56
-
57
-
58
-
59
-
60
-
61
-
62
-
63
-
64
-
65
-
66
-
67
-
68
-
69
-
70
-
71
-
72
-
73
-
74
-
75
-
76
-
77
-
78
-
79
-
80
-
81
-
82
-
83
-
84
-
85
-
86
-
87
-
88
-
89
-
90
-
91
-
92
 |
 |
