GE CSHS6UGZSS Use and Care Manual - Page 9
About the refrigerator doors., Operating Instructions
 |
View all GE CSHS6UGZSS manuals
Add to My Manuals
Save this manual to your list of manuals |
Page 9 highlights
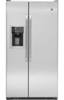
Safety Instructions Operating Instructions Installation Instructions Troubleshooting Tips Consumer Support About the refrigerator doors. GEAppliances.com Refrigerator Doors The refrigerator doors may feel different than the ones you are used to. The special door opening/closing feature makes sure the doors close all the way and are securely sealed. When opening and closing the door you will notice a stop position. If the door is opened past this stop point, the door will remain open to allow you to load and unload food more easily. When the door is only partially open, it will automatically close. The resistance you feel at the stop position will be reduced as the door is loaded with food. When the door is only partially open, it will automatically close. Beyond this stop the door will stay open. Door Alignment If doors are uneven, adjust the refrigerator door. Using a 7/16" socket wrench, turn the door adjusting screw to the right to raise the door; to the left, to lower it. (A nylon plug, imbedded in the threads of the pin, prevents the pin from turning unless a wrench is used.) After one or two turns of the wrench, open and close the refrigerator door and check the alignment at the top of the doors. To remove the base grille, open the doors, remove the screw at each end of the base grille and then pull the grille straight out. 7/16" Socket Wrench Raise Support Leg Before moving the refrigerator, you will need to screw up the support leg. Once the unit is relocated, you will need to screw down the support leg again. Screw down the support leg until it touches the floor. This will prevent door misalignment. 9
-
 1
1 -
2
-
3
-
 4
4 -
 5
5 -
 6
6 -
 7
7 -
 8
8 -
 9
9 -
 10
10 -
 11
11 -
 12
12 -
 13
13 -
 14
14 -
15
-
16
-
17
-
18
-
19
-
20
-
21
-
22
-
23
-
24
-
25
-
26
-
27
-
28
-
29
-
30
-
31
-
32
-
33
-
34
-
35
-
36
-
37
-
38
-
39
-
40
-
41
-
42
-
43
-
44
-
45
-
46
-
47
-
48
-
49
-
50
-
51
-
52
-
53
-
54
-
55
-
56
-
57
-
58
-
59
-
60
-
61
-
62
-
63
-
64
-
65
-
66
-
67
-
68
-
69
-
70
-
71
-
72
-
73
-
74
-
75
-
76
-
77
-
78
-
79
-
80
-
81
-
82
-
83
-
84
-
85
-
86
-
87
-
88
-
89
-
90
-
91
-
92
-
93
-
94
-
95
-
96
-
97
-
98
-
99
-
100
-
101
-
102
-
103
-
104
-
105
-
106
-
107
-
108
-
109
-
110
-
111
-
112
 |
 |
