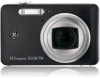
GE E1250TW Quick Start Guide (E1250TW Quickstart Guide)
GE E1250TW Manual
 |
UPC - 810027012500
View all GE E1250TW manuals
Add to My Manuals
Save this manual to your list of manuals |
GE E1250TW manual content summary:
- GE E1250TW | Quick Start Guide (E1250TW Quickstart Guide) - Page 1
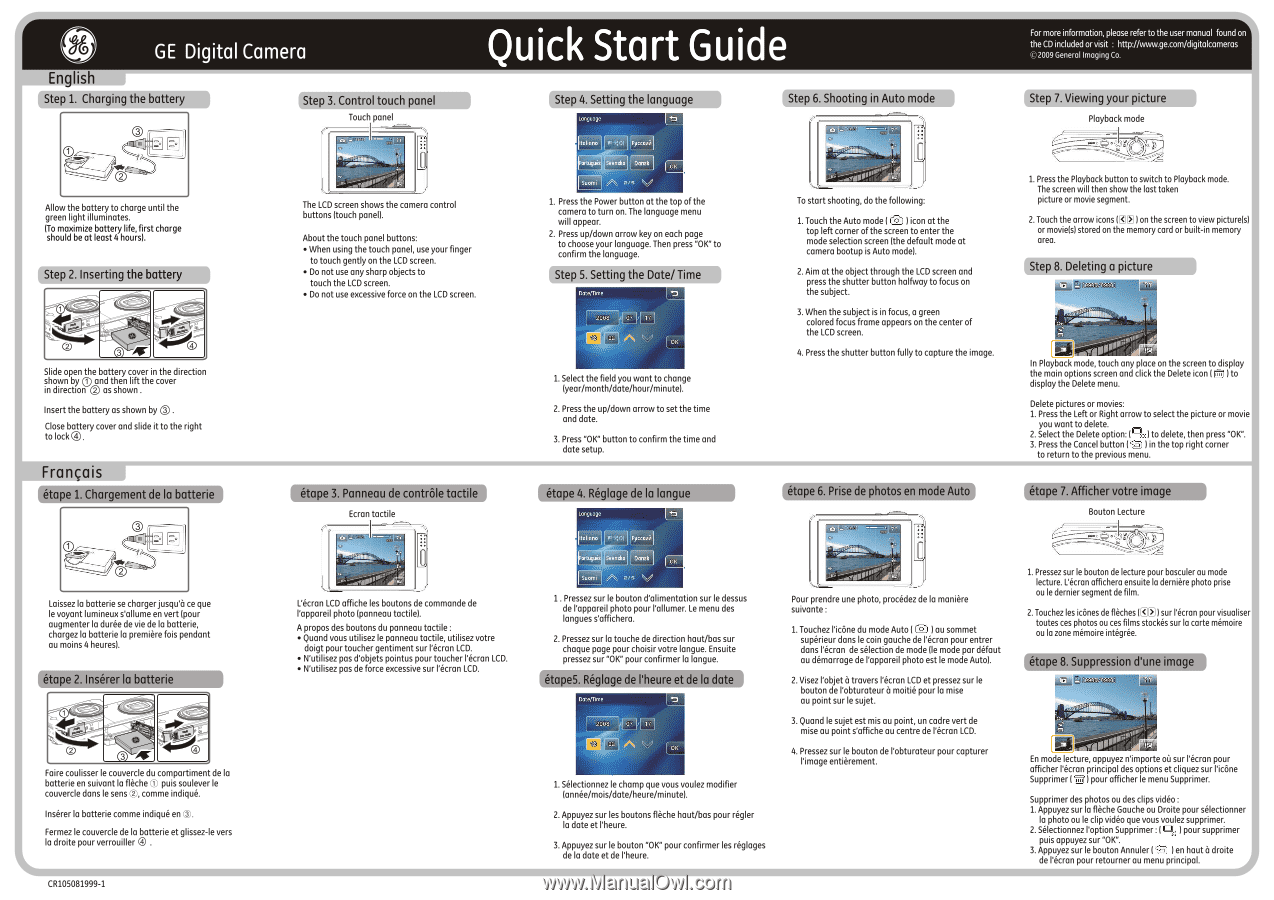
GE Digital Camera English Step 1. Charging the battery Step 3. Touch panel Quick Start Guide Step 4. Setting the language Language ■ Allow the battery to charge until the green light illuminates. (To maximize battery life, first charge should be at least 4 hours). Step 2. InsertinIllinery 1 U - GE E1250TW | Quick Start Guide (E1250TW Quickstart Guide) - Page 2
a la pantalla de seleccian de modo (el modo predeterminado al encender la camara es el modo Auto). 2. Apunte al objeto a times de la pantalla tirada ou o ultimo clip de video gravado. 2. Toque nos icone de setas IKE] no ecra para ver as fotos ou os clips de video guardados no cartao de memoria ou
-
 1
1 -
 2
2
 |
 |
GE
Digital
Camera
Quick
Start
Guide
For
more
information,
please
refer
to
the
user
manual
found
on
the
CD
included
or
visit
:
©2009
General
Imaging
Co.
English
Step
1.
Charging
the
battery
■
Allow
the
battery
to
charge
until
the
green
light
illuminates.
(To
maximize
battery
life,
first
charge
should
be
at
least
4
hours).
Step
2.
InsertinIllinery
1
U
p
...
?,
,
of
ip,_
_----
r
:;
,
3
......
k
Slide
open
the
battery
cover
in
the
direction
shown
by
®
and
then
lift
the
cover
in
direction
C)
as
shown
.
Insert
the
battery
as
shown
by
C)
.
Close
battery
cover
and
slide
it
to
the
right
to
lock
®.
Step
3.
Touch
panel
The
LCD
screen
shows
the
camera
control
buttons
(touch
panel).
About
the
touch
panel
buttons:
•
When
using
the
touch
panel,
use
your
finger
to
touch
gently
on
the
LCD
screen.
•
Do
not
use
any
sharp
objects
to
touch
the
LCD
screen.
•
Do
not
use
excessive
force
on
the
LCD
screen.
Step
4.
Setting
the
language
Language
Italian
Portugues
Suomi
Svenska
Pyccxnn
DansA
2/5
1.
Press
the
Power
button
at
the
top
of
the
camera
to
turn
on.
The
language
menu
will
appear.
2.
Press
up/down
arrow
key
on
each
page
to
choose
your
language.
Then
press
"OK"
to
confirm
the
language.
Step
5.
Setting
the
Date/
Time
ante/Time
2008
2
171
OK
1.
Select
the
field
you
want
to
change
(year/month/date/hour/minute).
2.
Press
the
up/down
arrow
to
set
the
time
and
date.
3.
Press
"OK"
button
to
confirm
the
time
and
date
setup.
To
start
shooting,
do
the
following:
1.
Touch
the
Auto
mode
(
I
icon
at
the
top
left
corner
of
the
screen
to
enter
the
mode
selection
screen
(the
default
mode
at
camera
bootup
is
Auto
mode).
2.
Aim
at
the
object
through
the
LCD
screen
and
press
the
shutter
button
halfway
to
focus
on
the
subject.
3.
When
the
subject
is
in
focus,
a
green
colored
focus
frame
appears
on
the
center
of
the
LCD
screen.
4.
Press
the
shutter
button
fully
to
capture
the
image.
Step
7.
Viewing
your
picture
Playback
mode
XIV
o
T
d
a
1.
Press
the
Playback
button
to
switch
to
Playback
mode.
The
screen
will
then
show
the
last
taken
picture
or
movie
segment.
2.
Touch
the
arrow
icons
(KE1)
on
the
screen
to
view
picture(s)
or
moviels)
stored
on
the
memory
card
or
built-in
memory
area.
Step
8.
Deleting
a
picture
In
Playback
mode,
touch
any
place
on
the
screen
to
display
the
main
options
screen
and
click
the
Delete
icon
(
Ito
display
the
Delete
menu.
Delete
pictures
or
movies:
1.
Press
the
Left
or
Right
arrow
to
select
the
picture
or
movie
you
want
to
delete.
2.
Select
the
Delete
option:
IR
I
to
delete,
then
press
"OK".
3.
Press
the
Cancel
button
)
in
the
top
right
corner
to
return
to
the
previous
menu.
Francais
ral=rffgement
de
la
batbin
Laissez
la
batterie
se
charger
jusqu'a
ce
que
le
voyant
lumineux
s'allume
en
vert
(pour
augmenter
la
duree
de
vie
de
la
batterie,
chargez
la
batterie
la
premiere
fois
pendant
au
moins
4
heures).
e
99
1
7 4
..
-
ate„
011
-
. 0
*,,,,.
r
g%
I
N
NIX
„
--
-
'-
-
, ... .
©
3
Faire
coulisser
le
couvercle
du
compartiment
de
la
batterie
en
suivant
la
fleche
0
puis
soulever
le
couvercle
dans
le
sens
®,
comme
indique.
Inserer
la
batterie
comme
indique
en
C).
Fermez
le
couvercle
de
la
batterie
et
glissez-le
vers
la
droite
pour
verrouiller
®
.
cir
P
e
contra
e
tactile
Ecran
tactile
foie
L'ecran
LCD
affiche
les
boutons
de
commande
de
l'appareil
photo
(panneau
tactile).
A
propos
des
boutons
du
panneau
tactile
:
•
Quand
vous
utilisez
le
panneau
tactile,
utilisez
votre
doigt
pour
toucher
gentiment
sur
l'ecran
LCD.
•
N'utilisez
pas
d'objets
pointus
pour
toucher
l'ecran
LCD.
•
N'utilisez
pas
de
force
excessive
sur
l'ecran
LCD.
etape
4.
Reglage
de
la
longue
Language
Italian
L'401
Portums
.
Svenska
Suomi
PyccukOri
Dans4
2/5
V
OK
1.
Pressez
sur
le
bouton
d'alimentation
sur
le
dessus
de
l'appareil
photo
pour
l'allumer.
Le
menu
des
longues
s'affichera.
2.
Pressez
sur
la
touche
de
direction
haut/bas
sur
chaque page
pour
choisir
votre
longue.
Ensuite
pressez
sur
"OK"
pour
confirmer
la
longue.
Dote/Time
2008
02
rc
17
OK
1.
Selectionnez
le
champ
que
vous
voulez
modifier
lannee/mois/date/heure/minutel.
2.
Appuyez
sur
les
boutons
fl
eche
haut/bas
pour
regler
la
date
et
l'heure.
3.
Appuyez
sur
le
bouton
"OK"
pour
confirmer
les
reglages
de
la
date
et
de
l'heure.
lEr
6.
Prise
de
photoil
Pour
prendre
une
photo,
procedez
de
la
maniere
suivante
:
1.
Touchez
l'icone
du
mode
Auto
(
I
au
sommet
superieur
dans
le
coin
gauche
de
l'ecran
pour
entrer
dans
l'ecran
de
selection
de
mode
(le
mode
par
defaut
au
demarrage
de
I'appareil
photo
est
le
mode
Auto).
2.
Visez
('objet
a
travers
l'ecran
LCD
et
pressez
sur
le
bouton
de
l'obturateur
a
moitie
pour
la
mise
au
point
sur
le
sujet.
3.
Quand
le
sujet
est
mis
au
point,
un
cadre
vert
de
mise
au
point
s'affiche
au
centre
de
l'ecran
LCD.
4.
Pressez
sur
le
bouton
de
I'obturateur
pour
capturer
('image
entierement.
etape
RIM
votre
Bouton
Lecture
o
T
d
a
1.
Pressez
sur
le
bouton
de
lecture
pour
basculer
au
mode
lecture.
L'ecran
affichera
ensuite
la
derniere
photo
prise
ou
le
dernier
segment
de
film.
2.
Touchez
les
'cones
de
fliches
IKEI
I
sur
l'ecran
pour
visualiser
toutes
ces
photos
ou
ces
films
stockes
sur
la
carte
memoire
ou
la
zone
memoire
integree.
00/09,01
__-
-Jr
OOP'
En
mode
lecture,
appuyez
n'importe
ou
sur
l'ecran
pour
afficher
l'ecran
principal
des
options
et
cliquez
sur
l'icone
Supprimer
(
I
pour
afficher
le
menu
Supprimer.
Supprimer
des
photos
ou
des
clips
video
:
1.
Appuyez
sur
la
fleche
Gauche
ou
Droite
pour
selectionner
la
photo
ou
le
clip
video
que
vous
voulez
supprimer.
2.
Selectionnez
('option
Supprimer
:
P.
I
pour
supprimer
puis
appuyez
sur
"OK".
3.
Appuyez
sur
le
bouton
Annuler
I
en
haut
a
droite
de
l'ecran
pour
retourner
au
menu
principal.
CR105081999-1