GE GDSS0KCXSS Installation Instructions - Page 2
Installation Instructions
 |
UPC - 084691171461
View all GE GDSS0KCXSS manuals
Add to My Manuals
Save this manual to your list of manuals |
Page 2 highlights
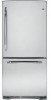
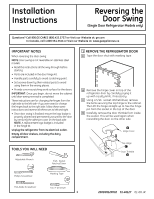
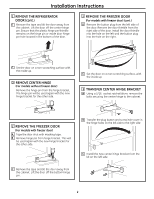
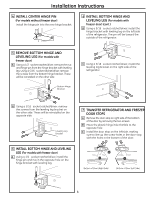
Installation Instructions 1 REMOVE THE REFRIGERATOR DOOR (cont.) E Remove the tape and tilt the door away from the cabinet. Lift the door off the center hinge pin. Ensure that the plastic hinge pin thimble remains on the hinge pin or inside door hinge pin hole located in the bottom of the door. 2 REMOVE THE FREEZER DOOR (For models with freezer door) (cont.) D Remove the button plug from the left side of the door. Remove the door thimble from the right side of the door. Install the door thimble into the hole on the left and the button plug into the hole on the right. F Set the door on a non-scratching surface with the inside up. 2 REMOVE CENTER HINGE (For models without freezer door) Remove the hinge pin from the hinge bracket. The hinge pin will be used again with the new hinge bracket for the other side. E Set the door on a non-scratching surface, with the inside up. 3 TRANSFER CENTER HINGE BRACKET A Using a 5/16″ socket ratchet/driver, remove the bolts securing the center hinge to the cabinet. 2 REMOVE THE FREEZER DOOR (For models with freezer door) A Tape the door shut with masking tape. B Remove hinge pin from hinge bracket. This will be used again with the new hinge bracket for the other side. C Remove the tape and tilt the door away from the cabinet. Lift the door off the bottom hinge pin. B Transfer the plug button and screw hole cover in the hinge holes on the left side to the right side. C Install the new center hinge bracket from the kit on the left side. 2
-
 1
1 -
 2
2 -
 3
3 -
 4
4
 |
 |
