GE GE06P06SAG Use and Care Manual - Page 8
To Fill the Water Heater, Electrical Connections, Condensation
 |
View all GE GE06P06SAG manuals
Add to My Manuals
Save this manual to your list of manuals |
Page 8 highlights
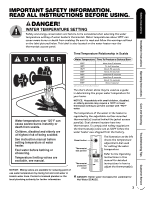
Operating Instructions Installation Instructions Safety Instructions Installing the water heater. WARNING: The tank must be full of water before heater is turned on. The water heater warranty does not cover damage or failure resulting from operation with an empty or partially empty tank. (Refer to the Certificate of Limited Warranty for complete terms and conditions.) To Fill the Water Heater Make certain the drain valve is completely closed. Open the shut-off valve in the cold water supply line. Open each hot water faucet slowly to allow the air to vent from the water heater and piping. A steady flow of water from the hot water faucet(s) indicates a full water heater. Condensation Condensation can form on the tank when it is first filled with water. Condensation might also occur with a heavy water draw and very cold inlet water temperature. This condition is not unusual, and will disappear after the water becomes heated. If, however, the condensation continues, examine the piping and fittings for possible leaks. Additional information on this subject may be found at www.rheem.com under "Library". Scroll down to the Technical Service Bulletins 1300 Series Section and choose Bulletin #1303. Care and Cleaning Troubleshooting Tips CAUTION: The presence of water in the piping and water heater does not provide sufficient conduction for a ground. Non-metallic piping, dielectric unions, flexible connectors etc. can cause the water heater to be electrically isolated. Electrical Connections All wiring must conform to local codes or latest edition of National Electrical Code ANSI/NFPA 70. The voltage requirements and wattage load for the water heater are specified on the rating plate on the front of the water heater. 21/2 gallon models are supplied with a plug connected power supply cord for use only in 120 VAC applications. The cord must be connected to a properly grounded receptacle on a branch circuit with copper conductors, an over current protection device and a suitable disconnect means. If desired, straight field wiring connections can be made to these models by removing the access cover on front of heater and disconnecting the cord set from the thermostat and the grounding plug. Remove the cord set and strain relief bushing from the junction bracket. The hole in the junction bracket will accommodate 1/2″ or 3/4″ electrical fittings. Refer to wiring diagrams in the back of this manual for wiring connections. 6 through 20 gallon models are completely wired to the junction bracket inside jacket at front of water heater. An opening for 1/2″ or 3/4″ electrical fitting is provided for field wiring connections. A separate branch circuit with copper conductors, overcurrent protective device and suitable disconnecting means must be provided by a qualified electrician. Refer to wiring diagrams in the back of this manual for wiring connections. The branch circuit wiring should include either: Metallic conduit or metallic sheathed cable approved for use as a grounding conductor and installed with fittings approved for the purpose. Non-metallic sheathed cable, metallic conduit or metallic sheathed cable not approved for use as a ground conductor shall include a separate conductor for grounding. It should be attached to the ground terminals of the water heater and the electrical distribution box. 8 Customer Service
-
 1
1 -
2
-
 3
3 -
 4
4 -
 5
5 -
 6
6 -
 7
7 -
 8
8 -
 9
9 -
 10
10 -
 11
11 -
 12
12 -
 13
13 -
14
-
15
-
16
-
17
-
18
-
19
-
20
 |
 |
