GE GFWN1100LWW Use and Care Manual
GE GFWN1100LWW Manual
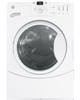 |
UPC - 084691224570
View all GE GFWN1100LWW manuals
Add to My Manuals
Save this manual to your list of manuals |
GE GFWN1100LWW manual content summary:
- GE GFWN1100LWW | Use and Care Manual - Page 1
Unpacking Your Washer 17 Drain Requirements 18 Electrical Requirements 18 Water Supply Requirements 18 Installing the Washer 19, 20 Replacement Parts 20 Troubleshooting Tips 21-24 Consumer Support Warranty 25 Service Telephone Numbers 26 Owner's Manual & Installation Instructions GFWN1000 - GE GFWN1100LWW | Use and Care Manual - Page 2
open door could entice children to hang on the door or crawl inside the washer. n Close supervision is necessary if this appliance is used by or near children. Do not allow children to play on, with or inside this or any other appliance. Installation Instructions Consumer Support Troubleshooting - GE GFWN1100LWW | Use and Care Manual - Page 3
unless specifically recommended in this Owner's Manual, or in published user-repair instructions that you understand and have the skills to carry out. n Do not tamper with controls. rEad and FoLLoW THIS SaFETY InFormaTIon carEFuLLY. SAVE THESE INSTRUCTIONS Troubleshooting Tips Consumer Support 3 - GE GFWN1100LWW | Use and Care Manual - Page 4
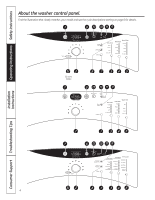
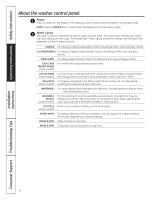
Operating Instructions Safety Instructions Installation Instructions About the washer control panel. Find the illustration that closely matches your model and see the cycle descriptions starting on page 6 for details. (On some models) 4 Consumer Support Troubleshooting Tips - GE GFWN1100LWW | Use and Care Manual - Page 5
GEAppliances.com 5 Safety Instructions Operating Instructions Installation Instructions Troubleshooting Tips Consumer Support - GE GFWN1100LWW | Use and Care Manual - Page 6
WaSH For lightly soiled items that are needed in a hurry. Cycle time is approximately 30 minutes, depending on selected options. DraIn & SPIn Drain and spin at any time. rInSE & SPIn To quickly rinse out any items at any time. Installation Instructions Consumer Support Troubleshooting Tips 6 - GE GFWN1100LWW | Use and Care Manual - Page 7
within 2 hours, the current wash cycle will be cancelled. NOTE: The washer performs automatic system checks after pressing the START button. Water will flow in 45 seconds or less. You may hear the door lock and unlock before water flows; this is normal. 7 Troubleshooting Tips Consumer Support - GE GFWN1100LWW | Use and Care Manual - Page 8
the MY CYCLE button before washing a load. To change the saved cycle, set the desired settings and hold down the MY CYCLE button for 3 seconds. To lock the washer, press and hold the DELAY START button for 3 seconds (on some models use SIGNAL button). To unlock the washer controls, press and hold - GE GFWN1100LWW | Use and Care Manual - Page 9
fill line. overfilling can cause early dispensing of the bleach which could result in damaged clothes. NOTE: do not use powdered bleach in the dispenser. Troubleshooting Tips Consumer Support On some models, the Liquid Bleach Compartment is on the right. 9 - GE GFWN1100LWW | Use and Care Manual - Page 10
. NOTE: do not pour fabric softener directly on the wash load. Installation Instructions Consumer Support Troubleshooting Tips On some models, the Fabric Softener Compartment is in the center. Loading and using the washer. always follow fabric manufacturer's care label when laundering. Sorting - GE GFWN1100LWW | Use and Care Manual - Page 11
) 2 Casual Wear Work Shirts 1 Pair Casual Wear Work Pants Or 3 Soccer Uniforms *Exceeding maximum recommended load sizes may affect cleaning performance and garment care. **Using a nylon mesh bag for small items is recommended. Installation Instructions Troubleshooting Tips Consumer Support 11 - GE GFWN1100LWW | Use and Care Manual - Page 12
BasketClean with 1 Cup (250 ml) of bleach once a month. n After the completion of a BasketClean cycle, the interior of your washer may have a bleach smell. n It is recommended to run a light color load after the BasketClean cycle. Installation Instructions Consumer Support Troubleshooting Tips 12 - GE GFWN1100LWW | Use and Care Manual - Page 13
Replace the filter and turn clockwise. Tighten securely. 7. Flip up the pour spout. 8. Close the access door. GEAppliances.com Pump filter Installation Instructions Troubleshooting Tips Consumer Support Cleaning the Door Gasket Open the washer door. Using both hands, press down the door gasket - GE GFWN1100LWW | Use and Care Manual - Page 14
Operating Instructions Safety Instructions Cleaning the washer. Dispenser Drawer Area: Detergent and fabric the upper and lower parts of the recess. n Return inserts to the proper compartments. Replace the dispenser drawer. Installation Instructions Consumer Support Troubleshooting Tips 14 - GE GFWN1100LWW | Use and Care Manual - Page 15
electrical service to the washer must conform with local codes and ordinances and the latest edition of the national Electrical Code, anSI/nFPa 70. tOOLS rEQUIrED FOr WaSHEr Carpenter's level PartS SUPPLIED o Cable Tie o Water Hoses (2) o Hose Guide StaCk BraCkEt kIt A stack bracket kit is available - GE GFWN1100LWW | Use and Care Manual - Page 16
cm). To make sure the washer does not vibrate or move, you may door rOUgH-In DIMEnSIOnS FRONT 27.0" (68.6 cm) 20.4" (51.9 cm) ELECTRONIC TRANSPARENT VISOR 2.2" (5.6 cm) 40.6"* (103.1 cm) SIDE 30.6" (77.7 cm) 1.6" (3.9 cm) 40.6"* (103.1cm) 39.1" (99.2 cm) *NOTE: With pedestal, 52.6" Stacked - GE GFWN1100LWW | Use and Care Manual - Page 17
. DO NOT lay the washer on its front or back. 3. Turn down the bottom flaps-remove all base packaging, including the cardboard, styrofoam base and styrofoam tub support (inserted in center of base). nOtE: If you are installing a pedestal, proceed to the installation instructions that come with the - GE GFWN1100LWW | Use and Care Manual - Page 18
's responsibility to have a licensed electrician replace it with a properly grounded three-prong grounding-type receptacle. 24 in. (61 cm) Min. nOtE: The drain hose attached to the washer can reach a 58″ (147 cm) high standpipe. For a higher standpipe, contact an authorized parts distributor. 18 - GE GFWN1100LWW | Use and Care Manual - Page 19
floor to help move your washer into its final position. nOtE: To reduce vibration, ensure that all four rubber leveling legs are firmly touching the floor. Push and pull on the back right and then back left of your washer. nOtE: Do not use the dispenser drawer or door to lift the washer. nOtE: If - GE GFWN1100LWW | Use and Care Manual - Page 20
operation. 13. If your washer does not operate, please review the Before You call For Service section before calling for service. 14. Place these instructions in a location near the washer for future reference. rEPLaCEMEnt PartS If replacement parts are needed for your washer, they can be ordered - GE GFWN1100LWW | Use and Care Manual - Page 21
dry weight of the load should be less then 16 lb. • Straighten drain hose and make sure washer is not sitting on it. • Check household plumbing. You may need to call a plumber. • Ensure there is an air gap between hose and drain. Installation Instructions Troubleshooting Tips Consumer Support 21 - GE GFWN1100LWW | Use and Care Manual - Page 22
the Pump Filter. this is normal Incorrect operation • Front-load washers start up differently than top-load washers, and it takes 30 seconds to check the system. The door will lock and unlock. • Simply open and close the door firmly; then press START. Consumer Support Troubleshooting Tips 22 - GE GFWN1100LWW | Use and Care Manual - Page 23
the washer promptly after machine stops running. • Leave the door slightly open for the water to air dry. Close supervision is necessary if this appliance is used by or near children. Do not allow children to play on, with or inside this or any other appliance. Troubleshooting Tips Consumer Support - GE GFWN1100LWW | Use and Care Manual - Page 24
Operating Instructions Safety Instructions Before you call for service... Problem line. • It is normal operation to see detergent leak on door gasket about 20 seconds after filling the dispenser. Dispenser clogged Softener or Installation Instructions Consumer Support Troubleshooting Tips 24 - GE GFWN1100LWW | Use and Care Manual - Page 25
have other rights which vary from state to state. To know what your legal rights are, consult your local or state consumer affairs office or your state's attorney General. Warrantor: General Electric Company. Louisville, KY 40225 Installation Instructions Troubleshooting Tips Consumer Support 25 - GE GFWN1100LWW | Use and Care Manual - Page 26
! For greater convenience and faster service, you can now download Owner's Manuals, order parts or even schedule service on-line. Schedule Service GEAppliances.com Expert GE repair service is only one step away from your door. Get on-line and schedule your service at your convenience any day of - GE GFWN1100LWW | Use and Care Manual - Page 27
de seguridad 2, 3 Instrucciones de funcionamiento Paneles de control 4, 5 Parámetros de control 6, 7 Funciones 8-10 Carga y uso de la consumidor 26 Manual del propietario e instalación GFWN1000 WBVH5200 WBVH5300 WCVH6400 WCVH6800 WHDVH680 Como socio de Energy Star®, GE ha confirmado - GE GFWN1100LWW | Use and Care Manual - Page 28
de funcionamiento INFORMACIÓN DE SEGURIDAD IMPORTANTE. LEA TODAS LAS INSTRUCCIONES ANTES DEL USO. ¡ADVERTENCIA! Para su seguridad, siga la información de este manual con el fin de minimizar el riesgo de incendio, explosión o descarga eléctrica, así como para evitar daños materiales, lesiones o la - GE GFWN1100LWW | Use and Care Manual - Page 29
de sobrecargas eléctricas. El motor de limpieza en seco, queroseno, estado de las mangueras de llenado; GE recomienda cambiar las mangueras cada 5 de manera explícita en el manual del propietario o en instrucciones publicadas interior. n No manipule los controles. lEa dETEnIdamEnTE y SIGa la - GE GFWN1100LWW | Use and Care Manual - Page 30
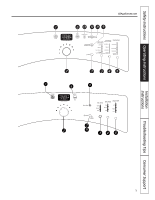
Instrucciones de seguridad Instrucciones de funcionamiento Instrucciones de instalación El panel de control de la lavadora. Busque la ilustración que más se ajusta a su modelo y para más detalles vea las descripciones de ciclo que comienzan en la página 6. (en algunos - GE GFWN1100LWW | Use and Care Manual - Page 31
GEAppliances.com 5 Instrucciones de seguridad Instrucciones de funcionamiento Instrucciones de instalación Consejos para la solución de problemas Servicio al consumidor - GE GFWN1100LWW | Use and Care Manual - Page 32
Instrucciones de seguridad Instrucciones de funcionamiento El panel de control de la lavadora. 1 Encendido/apagado Pulse este botón para "activar" la pantalla. Si la pantalla está activa, púlselo para poner la lavadora en modo de - GE GFWN1100LWW | Use and Care Manual - Page 33
tejidos. Temperatura de lavado 5 Ajuste este control para seleccionar la temperatura del agua adecuada para Wash (Lavado de manchas) y Whites Wash (Lavado de prrendas blancas). que las manchas se adhieran a las prendas. 6 START/PAUSE (Iniciar/pausa) Pulse este botón para iniciar un ciclo de - GE GFWN1100LWW | Use and Care Manual - Page 34
pulsado el botón de DELAY START (Retrasar inicio) durante 3 segundos (en algunos modelos, utiliza el boton SIGNAL). El icono de bloqueo de los controles que aparece en la pantalla se encenderá cuando esté activado. NOTA: El botón de POWER (encendido/apagado) puede seguir utilizándose cuando la - GE GFWN1100LWW | Use and Care Manual - Page 35
Es posible que observe agua en los compartimentos de lejía y suavizante al final del ciclo. Este es el resultado de la acción de trasvase y forma parte del funcionamiento normal de la lavadora. NOTA: El detergente líquido se vaciará en el tambor de la lavadora a medida que se añada. n Es posible que - GE GFWN1100LWW | Use and Care Manual - Page 36
Instrucciones de seguridad Acerca de las funciones de la lavadora. En algunos modelos, el compartimento de suavizante se encuentra a la derecha. Compartimento para el suavizante IMPORTANTE: La posición del compartimento del suavizante varía con cada modelo. Asegúrese de identificar el - GE GFWN1100LWW | Use and Care Manual - Page 37
/pausa) y espere hasta que se desbloquee la puerta. La lavadora puede tardar unos 30 segundos en desbloquear la puerta después de pulsar START/PAUSE (Iniciar/pausa) dependiendo de las condiciones de la misma. No intente forzar la puerta para abrirla cuando esté bloqueada. Una vez que se desbloquee - GE GFWN1100LWW | Use and Care Manual - Page 38
en este manual. Si estas piezas llamando al 800.GE.CARES. Largas parte interior de la lavadora Para limpiar la parte interna de la lavadora, seleccione la característica BasketClean (limpieza de tambor) del panel de control interrumpirse presionando el botón START/PAUSE (inicio/pausa) entre ciclos. Un - GE GFWN1100LWW | Use and Care Manual - Page 39
Pico vertedor Pico vertedor Cómo limpiar el filtro de la bomba Debido a la naturaleza de la lavadora de carga frontal, es posible que a veces pasen partículas pequeñas a la bomba. La lavadora cuenta con un filtro para capturar los elementos perdidos para que no caigan en el drenaje. Para recuperar - GE GFWN1100LWW | Use and Care Manual - Page 40
n Para limpiar la abertura del depósito, utilice un cepillo pequeño a fin de limpiar los huecos. Retire todos los restos de las partes superior e inferior del hueco. n Vuelva a colocar las piezas en los compartimentos correspondientes. Introduzca de nuevo el depósito de detergente. Instrucciones de - GE GFWN1100LWW | Use and Care Manual - Page 41
así como la última edición del código eléctrico nacional, ansi/nfpa 70. o Tuberías de agua (2) o Guía de tuberías Kit de sopoRte de apiLado Un kit de soporte de apilado se encuentra disponible a un costo adicional. Puede solicitarse en los Estados Unidos visitando nuestro sitio Web en GEAppliances - GE GFWN1100LWW | Use and Care Manual - Page 42
, cada uno de 60 pulgadas cuadradas (387 cm2), situados a 3" (7,6 cm) de las partes superior e inferior de la puerta dimensiones apRoXimadas PARTE DELANTERA 27,0" (68,6 cm) 20,4" (51,9 cm) VISOR ELECTRÓNICO TRANSPARENTE 2,2" (5,6 cm) 40,6"* (103,1 cm) COSTADO 30,6" (77,7 cm) 1,6" (3,9 cm) 40 - GE GFWN1100LWW | Use and Care Manual - Page 43
de la caja, coloque con cuidado la lavadora sobre el costado de la misma. NO la tumbe por la parte delantera ni trasera. 3. Abra las tapas inferiores y retire todo el embalaje de la base, incluido el nuestro sitio Web en geappliances.com o llamando a 800.ge.caRes. solicite el kit #Wh49X10039. 17 - GE GFWN1100LWW | Use and Care Manual - Page 44
a falta de normativa local, con el código eléctrico nacional (national electrical code) ansi/nfpa no. 70. ReQuisitos de suministRo de agua Las llaves el suelo debe ser: Altura mínima: 24" (61 cm) Altura máxima: 96" (244 cm) PARTE TRASERA 96 in. (244 cm) Max. 24 in. (61 cm) Min. nota: La tubería - GE GFWN1100LWW | Use and Care Manual - Page 45
de agua caliente y fría para purgar las tuberías de agua y eliminar las partículas que puedan obstruir los filtros de la válvula de agua. 2. Saque las tuber vez situada la lavadora en su posición final, coloque un nivel en la parte superior de la misma (si está instalada debajo de un contador, la - GE GFWN1100LWW | Use and Care Manual - Page 46
a un interruptor/caja de fusibles. 10. Lea el resto del Manual del propietario. Contiene información valiosa y útil que supondrá un ahorro solicitar en Estados Unidos a través del sitio Web GEAppliances.com o llamando a 800.GE.CARES. 8. Enchufe el cable de alimentación en una salida de conexión a - GE GFWN1100LWW | Use and Care Manual - Page 47
Redistribuya las prendas y realice un ciclo drain & spin (drenar y girar) o puerta cuando la misma está abierta. Esto forma parte del funcionamiento normal. • Con cuidado limpie el Limpieza de la Lavadora (Cleaning Washer). uso incorrecto del detergente • instalación nueva, controle que no haya - GE GFWN1100LWW | Use and Care Manual - Page 48
La carga se encuentra desbalanceada • Redistribuya las prendas y realice un ciclo drain & spin (drenar y girar) o rinse & spin (enjuagar y girar). encuentran en contacto firme con el piso • Empuje y tire de la parte posterior derecha y luego posterior izquierda de su lavadora para asegurarse de - GE GFWN1100LWW | Use and Care Manual - Page 49
lavadoras con carga superior, y toma 30 segundos realizar un control del sistema. La puerta se bloqueará y desbloqueará. • Simplemente la llave de paso y quite las tuberías de conexión de agua de la parte trasera superior de la lavadora. Utilice un cepillo o un palillo de dientes para limpiar - GE GFWN1100LWW | Use and Care Manual - Page 50
Instrucciones de seguridad Antes de llamar al servicio de asistencia técnica... Instrucciones de funcionamiento Instrucciones de instalación Problema Causa posible Solución Prendas oscurecidas o amarillentas no hay suficiente detergente no se utiliza detergente de alta eficacia agua dura el - GE GFWN1100LWW | Use and Care Manual - Page 51
está situado en un área que no dispone de servicio por parte de un proveedor de servicio autorizado de GE, podría tener que hacerse cargo de los costes de envío o la oficina del Prucurador (attorney General) en su localidad. Garante: General Electric Company. Louisville, KY 40225 Instrucciones de - GE GFWN1100LWW | Use and Care Manual - Page 52
o llamar al (800.626.2224) durante horas normales de oficina. GE Consumer Home Services estará aún ahí cuando su garantía termine. Piezas y accesorios en este manual cubren los procedimientos a seguir por cualquier usuario. Cualquier otra reparación debería, por regla general, referirse a
-
 1
1 -
 2
2 -
 3
3 -
 4
4 -
 5
5 -
 6
6 -
 7
7 -
8
-
9
-
10
-
11
-
12
-
13
-
14
-
15
-
16
-
17
-
18
-
19
-
20
-
21
-
22
-
23
-
24
-
25
-
26
-
27
-
28
-
29
-
30
-
31
-
32
-
33
-
34
-
35
-
36
-
37
-
38
-
39
-
40
-
41
-
42
-
43
-
44
-
45
-
46
-
47
-
48
-
49
-
50
-
51
-
52
 |
 |
GEAppliances.com
49-90392
12/08/09 GE
Washers
Safety Instructions
. . . . . . . . . . . . . 2, 3
Operating Instructions
Control Panels . . . . . . . . . . . . . . . . . . . . . . 4, 5
Control Settings . . . . . . . . . . . . . . . . . . . . .6, 7
Features . . . . . . . . . . . . . . . . . . . . . . . . . . .8–10
Loading and Using the Washer . . . .10, 11
Cleaning the Washer
. . . . . . . . . . . . .12–14
Installation Instructions
. . . . .15–20
Preparing to Install Your Washer . . . . . .15
Rough-In Dimensions . . . . . . . . . . . . . . . . .16
Location of Your Washer
. . . . . . . . . . . . .16
Unpacking Your Washer . . . . . . . . . . . . . .17
Drain Requirements . . . . . . . . . . . . . . . . . .18
Electrical Requirements . . . . . . . . . . . . . . .18
Water Supply Requirements . . . . . . . . . .18
Installing the Washer . . . . . . . . . . . . .19, 20
Replacement Parts . . . . . . . . . . . . . . . . . . .20
Troubleshooting Tips
. . . . . . . . .21–24
Consumer Support
Warranty . . . . . . . . . . . . . . . . . . . . . . . . . . . . 25
Service Telephone Numbers . . . . . . . . . . 26
Owner’s Manual &
Installation Instructions
Write the model and serial
numbers here:
Model #
__________________
Serial #
__________________
You can find them on a label on the
side of the washer.
As an
E
nERgy
S
tAR
®
partner,
GE has determined that this
product meets the
E
nERgy
S
tAR
®
guidelines for energy efficiency.
GFWN1000
WBVH5200
WBVH5300
WCVH6400
WCVH6800
WHDVH680