GE GSS20DBTWW Owners Manual
GE GSS20DBTWW - 19.9 cu. Ft. Refrigerator Manual
 |
View all GE GSS20DBTWW manuals
Add to My Manuals
Save this manual to your list of manuals |
GE GSS20DBTWW manual content summary:
- GE GSS20DBTWW | Owners Manual - Page 1
Cleaning 11, 12 Light Bulbs 13 Installation Instructions Preparing to Install the Refrigerator 14, 15 Water Line Installation . . . . . .16-20 Troubleshooting Tips Before You Call For Service . . .22-24 Normal Operating Sounds . . . . . .21 Consumer Support Consumer Support . . . . .Back Cover - GE GSS20DBTWW | Owners Manual - Page 2
Troubleshooting Tips Installation Instructions Operating Instructions Safety Instructions IMPORTANT SAFETY INFORMATION. READ ALL INSTRUCTIONS BEFORE USING. WARNING! Use this appliance only for its intended purpose as described in this Owner's Manual. SAFETY PRECAUTIONS When using electrical - GE GSS20DBTWW | Owners Manual - Page 3
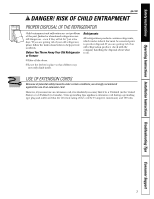
Safety Instructions Operating Instructions Installation Instructions Troubleshooting Tips Consumer Support ge.com DANGER! RISK OF CHILD ENTRAPMENT PROPER DISPOSAL OF THE REFRIGERATOR Child entrapment and suffocation are not problems of the past. Junked or abandoned refrigerators are still - GE GSS20DBTWW | Owners Manual - Page 4
Troubleshooting Tips Installation Instructions Operating Instructions Safety Instructions IMPORTANT SAFETY INFORMATION. READ ALL INSTRUCTIONS BEFORE USING. WARNING! HOW TO CONNECT ELECTRICITY of electric shock hazard from this appliance. Have . When moving the refrigerator away from the wall, - GE GSS20DBTWW | Owners Manual - Page 5
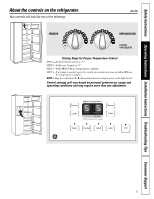
Instructions Operating Instructions Installation Instructions Troubleshooting Tips Consumer Support 89 89 About the controls on the refrigerator. Your controls will look like one of the following: 012 12 34 5 67 FREEZER 34 5 67 FRESH FOOD 9 IS COLDEST 0 IS OFF ge to the light circuit. Control - GE GSS20DBTWW | Owners Manual - Page 6
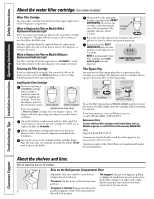
, or call GE Parts and Accessories, 800.626.2002. MWF Suggested Retail $38.95-47.95 Customers in Canada should consult the yellow pages for the nearest Camco Service Center. Customers outside of the United States or Canada should contact the local distributor. Consumer Support About the shelves - GE GSS20DBTWW | Owners Manual - Page 7
Safety Instructions Operating Instructions Installation Instructions Troubleshooting Tips Consumer Support Rearranging the Shelves Refrigerator Shelves: To Remove Lift up and out Tilt up Freezer Shelves: To Remove To Replace Insert top hook Lower to lock in place Freezer Pan: To Remove ge.com - GE GSS20DBTWW | Owners Manual - Page 8
Troubleshooting Tips Installation Instructions Operating Instructions Safety Instructions About the additional features. compartment. Set control lever up to convert the pan to normal refrigerator temperature and provide extra vegetable storage space. Cold air duct is the pan. Consumer Support 8 - GE GSS20DBTWW | Owners Manual - Page 9
Safety Instructions Operating Instructions Installation Instructions Troubleshooting Tips Consumer Support About crisper removal. ge.com Not all features are on all models. Crisper Guides When replacing the crispers, make sure you slide them through the crisper guides. Crisper Removal Crispers - GE GSS20DBTWW | Owners Manual - Page 10
Troubleshooting Tips Installation Instructions Operating Instructions Safety Instructions the refrigerator is Light This pad turns the night light in the dispenser on and off. The light also comes on when the dispenser cradle is pressed. If this light Mechanism Consumer Support Important Facts - GE GSS20DBTWW | Owners Manual - Page 11
Instructions Operating Instructions Installation Instructions Troubleshooting Tips Consumer Support Care and cleaning of the refrigerator. ge cloth lightly dampened with kitchen appliance wax or mild liquid dish detergent. Dry and polish with a clean, soft cloth. Do not wipe the refrigerator with - GE GSS20DBTWW | Owners Manual - Page 12
Troubleshooting Tips Installation Instructions Operating Instructions Safety Instructions Care and cleaning of the refrigerator. Behind the Refrigerator Be careful when moving the refrigerator to the refrigerator. If the temperature can drop below freezing, have a qualified servicer drain the - GE GSS20DBTWW | Owners Manual - Page 13
Safety Instructions Operating Instructions Installation Instructions Troubleshooting Tips Consumer Support Replacing the light bulbs. Turning the control to the 0 (off) position does not remove power to the light circuit. ge.com Refrigerator Compartment-Upper Light Unplug the refrigerator. The - GE GSS20DBTWW | Owners Manual - Page 14
tubing, shutoff valve, fittings and instructions) is available at extra cost from your dealer, by visiting our Website at ge.com (in Canada, at www.geappliances.ca) or from Parts and Accessories, 800.626.2002. REFRIGERATOR LOCATION • Do not install the refrigerator where the temperature will go - GE GSS20DBTWW | Owners Manual - Page 15
Installation Instructions DOOR ALIGNMENT After leveling, make sure that doors are even at the top. To make the doors even, adjust the refrigerator door. Using a After one or two turns of the wrench, open and close the refrigerator compartment door and check the alignment at the top of the doors. To - GE GSS20DBTWW | Owners Manual - Page 16
or icemaker manufacturer. Follow these instructions carefully to minimize the risk of expensive water damage. Water hammer (water banging in the pipes) in house plumbing can cause damage to refrigerator parts and lead to water leakage or flooding. Call a qualified plumber to correct water - GE GSS20DBTWW | Owners Manual - Page 17
Instructions WHAT YOU WILL NEED (CONT.) • A GE water supply kit (containing tubing, shutoff valve and fittings listed below) is available at extra cost from your dealer or from Parts compression fitting. Do not cut formed end from GE SmartConnect™ Refrigerator tubing. 3 DRILL THE HOLE FOR THE VALVE - GE GSS20DBTWW | Owners Manual - Page 18
Installation Instructions INSTALLING THE WATER LINE (cont.) 4 FASTEN THE SHUTOFF fully inserted into the valve. Tighten the compression nut securely. For plastic tubing from a GE SmartConnect™ Refrigerator Tubing kit, insert the molded end of the tubing into the shutoff valve and tighten - GE GSS20DBTWW | Owners Manual - Page 19
one if your water supply has sand or particles that could clog the screen of the refrigerator's water valve. Install it in the water line near the refrigerator. If using a GE SmartConnect™ Refrigerator Tubing kit, you will need an additional tube (WX08X10002) to connect the filter. Do not cut - GE GSS20DBTWW | Owners Manual - Page 20
Installation Instructions INSTALLING THE WATER LINE (cont.) 11 PLUG IN THE REFRIGERATOR Arrange the coil of tubing so that it does not vibrate against the back of the refrigerator or against the wall. Push the refrigerator back to the wall. START THE ICEMAKER Set the icemaker power switch to the - GE GSS20DBTWW | Owners Manual - Page 21
Instructions Installation Instructions Troubleshooting Tips Consumer Support Normal operating sounds. Newer refrigerators sound different from older refrigerators. Modern refrigerators have more features and use newer technology. Do you hear what I hear? These sounds are normal. ge the light bulbs - GE GSS20DBTWW | Owners Manual - Page 22
Instructions Safety Instructions Before you call for service... Troubleshooting Tips Save time and money! Review the charts on the following pages first and you may not need to call for service. Problem Refrigerator does not operate Vibration or rattling (slight vibration is normal) Motor - GE GSS20DBTWW | Owners Manual - Page 23
Instructions Operating Instructions Installation Instructions Troubleshooting Tips Consumer Support ge.com Problem for a long time. Normal when refrigerator is first installed. Water dispenser has (about one and a half gallons). •Call for service. • Call a plumber. •Replace filter cartridge or - GE GSS20DBTWW | Owners Manual - Page 24
Troubleshooting Tips Installation Instructions Operating Instructions Safety Instructions Before you call for service... Problem Possible Causes What To Do Refrigerator has odor Foods transmitting odor to refrigerator. Interior needs cleaning. Defrost water drainage system needs cleaning. • - GE GSS20DBTWW | Owners Manual - Page 25
GE and All Other Brands: One (1) Year One (1) Year TERMS AND CONDITIONS: This warranty applies only for single family domestic use in Canada when the Refrigerator has been properly installed according to the instructions supplied by Camco and is connected to an adequate and proper utility service - GE GSS20DBTWW | Owners Manual - Page 26
which vary from state to state. To know what your legal rights are, consult your local or state consumer affairs office or your state's Attorney General. Warrantor: General Electric Company. Louisville, KY 40225 Consumer Support 26 - GE GSS20DBTWW | Owners Manual - Page 27
months for models without a replacement filter indicator light; up to one year for models with a replacement filter indicator light Pressure requirement: 40-120 psi (2.8-8.2 bar Special Notices Manufacturer: General Electric Company Installation instructions, parts and service availability, and - GE GSS20DBTWW | Owners Manual - Page 28
Notes. 28 Consumer Support Troubleshooting Tips Installation Instructions Operating Instructions Safety Instructions - GE GSS20DBTWW | Owners Manual - Page 29
repairs. Place your confidence in GE and call us in the U.S. toll-free at 800.626.2224 for more information. *All brands covered, up to 20 years old, in the continental U.S. ✁ Cut here Please place in envelope and mail to: General Electric Company Warranty Registration Department P.O. Box 32150 - GE GSS20DBTWW | Owners Manual - Page 30
service. Our service number is 800.GE.CARES (800.432.2737). 3 Read your Owner's Manual carefully. It will help you operate your new appliance Placed In Use Month Day GE Appliances GE Consumer & Industrial Appliances General Electric Company Louisville, KY 40225 ge.com 30 Phone _ _ Year - GE GSS20DBTWW | Owners Manual - Page 31
Please place in envelope and mail to: Veuillez mettre dans une enveloppe et envoyez à : OWNERSHIP REGISTRATION P.O. BOX 1780 MISSISSAUGA, ONTARIO L4Y 4G1 (FOR CANADIAN CONSUMERS ONLY) 31 - GE GSS20DBTWW | Owners Manual - Page 32
32 - GE GSS20DBTWW | Owners Manual - Page 33
de la conduite d'eau . . . . .48-52 Préparation 46, 47 Conseils de dépannage Avant d'appeler un réparateur 54-56 Bruits de normaux de fonctionnement . .53 Service à la clientèle Feuillet de données relatives à la performance de la cartouche 59 Garantie pour la clientèle au Canada . . . .58 - GE GSS20DBTWW | Owners Manual - Page 34
vous réglez la commande sur 0 (arrêt), l'alimentation électrique de l'ampoule n'est pas coupée. I Ne recongelez pas les aliments surgelés qui ont complètement dégelé. Installation Service à la clientèle Conseils de dépannage 34 - GE GSS20DBTWW | Owners Manual - Page 35
COMMENT VOUS DÉBARRASSER CONVENABLEMENT DE VOTRE ANCIEN RÉFRIGÉRATEUR Les enfants pris au piège ou morts d'asphyxie sont toujours d'actualité. Les réfrigérateurs abandonnés sont toujours aussi 15 ampères (minimum) et de 120 volts. Installation Conseils de dépannage Service à la clientèle 35 - GE GSS20DBTWW | Owners Manual - Page 36
le faire rouler sur le cordon d'alimentation afin de ne pas l'endommager. VEUILLEZ LIRE ET SUIVRE ATTENTIVEMENT CES MESURES DE SÉCURITÉ. CONSERVEZ CES DIRECTIVES Installation Service à la clientèle Conseils de dépannage 36 - GE GSS20DBTWW | Owners Manual - Page 37
réglage des commandes variera en fonction des préférences personnelles, de l'usage et des conditions d'utilisation et pourront nécessiter plusieurs ajustements. Installation Conseils de dépannage Service à la clientèle 37 - GE GSS20DBTWW | Owners Manual - Page 38
Water by Culligan, vous devez d'abord retirer l'adaptateur du filtre du support de la cartouche en le faisant pivoter vers la gauche. Si vous avez aux États-Unis, visitez notre site Web à l'adresse ge.com, ou appelez le Service des pièces et accessoires GE au 800.626.2002. MWF Prix suggéré pour la - GE GSS20DBTWW | Owners Manual - Page 39
place Casseroles du congélateur : Pour enlever Fonctionnement Installation Conseils de dépannage Service à la clientèle Enlevez la casserole en le tirant vers l'avant, en la partie extensible de la clayette dans les supports moulés de la porte et poussez vers l'intérieur. Ceci assurera le - GE GSS20DBTWW | Owners Manual - Page 40
tous les modèles. Bacs à fruits et légumes Si une quantité d'eau excessive s'accumule dans le fond des tiroirs, essuyez-les. Fonctionnement Installation Service à la clientèle Conseils de dépannage Bacs à légumes à humidité réglables et bac à en-cas (sur certains modèles) HIGH LOW Réglez la - GE GSS20DBTWW | Owners Manual - Page 41
www.electromenagersge.ca Guides du bac Lorsque vous remettez les bacs en place, assurez-vous que vous les glissez dans les guides. Enlèvement du soulevez-le au delà de sa position d'arrêt. Installation Conseils de dépannage Service à la clientèle Nécessaire de machine à glaçons Si votre réfrigé - GE GSS20DBTWW | Owners Manual - Page 42
enlevez-le et faites tourner le mécanisme d'un quart de tour. Poussez à nouveau le tiroir jusqu'au fond. Tournez Mécanisme d'entraînement Service à la clientèle Conseils de dépannage Renseignements importants concernant votre distributeur I N'ajoutez pas dans le bac à glaçons des I Même si vous - GE GSS20DBTWW | Owners Manual - Page 43
réfrigérateur. Pour y accéder, débranchez d'abord le réfrigérateur puis retirez le panneau d'accès. Le condenseur se trouve sur le côté droit. Conseils de dépannage Service à la clientèle 43 - GE GSS20DBTWW | Owners Manual - Page 44
le cordon d'alimentation ou sur la conduite d'eau de la machine à glaçons. Départ en vacances Lorsque vous vous absentez pendant une période prolongée, videz les aliments et débranchez érateur demeure debout pendant son déménagement. Installation Service à la clientèle Conseils de dépannage 44 - GE GSS20DBTWW | Owners Manual - Page 45
égale ou inférieure. Compartiment réfrigérateur-Éclairage inférieur (sur certains modèles) This light is located above the top drawer. Débranchez le réfrigérateur. Tenez le rebord se trouvant me puissance. Rebranchez le réfrigérateur. Installation Conseils de dépannage Service à la clientèle 45 - GE GSS20DBTWW | Owners Manual - Page 46
GE (contenant la tuyauterie, le robinet d'arrêt, les joints et les instructions) chez votre revendeur, ou en vous adressant à notre site Web à l'adresse www.electromenagersge.ca ou à notre service érateur sur un plancher suffisamment solide pour le supporter lorsqu'il est plein. 46 DÉGAGEMENTS Pré - GE GSS20DBTWW | Owners Manual - Page 47
Instructions d'installation ALIGNEMENT DES PORTES Après avoir réglé les roulettes de nivellement, assurez-vous que les portes sont bien alignées à la partie supérieure. Pour - GE GSS20DBTWW | Owners Manual - Page 48
Instructions d'installation INSTALLATION DE LA CONDUITE D'EAU AVANT DE COMMENCER Nous recommandons les trousses d'alimentation d'eau en cuivre WX8X2, WX8X3, WX8X4, selon le montant de conduite dont vous avez besoin. Nous approuvons les conduites d'eau en matière plastique GE SmartConnect™ - GE GSS20DBTWW | Owners Manual - Page 49
Instructions d'installation CE DONT VOUS AUREZ BESOIN • Tuyaux en cuivre ou rousse GE SmartConnect™ Refrigerator Tubing, diamètre extérieur d'eau GE (contenant un tuyau, un robinet d'arrêt et les joints énumérés ci-dessous) chez votre distributeur local ou en le commandant au service de pi - GE GSS20DBTWW | Owners Manual - Page 50
Instructions d'installation INSTALLATION DE LA CONDUITE D'EAU (SUITE) Installez le robinet d'arrêt sur la canalisation d'eau potable la plus fréquemment utilisée. 1 FERMEZ L'ALIMENTATION PRINCIPALE D'EAU - GE GSS20DBTWW | Owners Manual - Page 51
Instructions d'installation 7 BRANCHEZ LE TUYAU AU ROBINET Placez un écrou de le robinet. Serrez fort l'écrou de compression. Pour le tuyau en matière plastique d'une trousse GE SmartConnect™ Refrigerator Tubing, insérez l'extrémité moulée du tuyau dans le robinet d'arrêt et serrez l'écrou - GE GSS20DBTWW | Owners Manual - Page 52
Instructions d'installation INSTALLATION DE LA CONDUITE D'EAU (SUITE) 9 BRANCHEZ LE TUYAU À le tuyau, serrez le raccord. Si vous utilisez un tuyau en matière plastique d'une trousse GE SmartConnect™ Refrigerator Tubing, insérez l'extrémité moulée du tuyau dans le raccord du réfrigérateur et serrez - GE GSS20DBTWW | Owners Manual - Page 53
distributeur d'eau et de glaçons, veuillez consultez les sections Machine à glaçons automatique et Le distributeur d'eau et de glaçons. Conseils de dépannage Service à la clientèle 53 - GE GSS20DBTWW | Owners Manual - Page 54
vieux glaçons. • Emballez bien les aliments. •Consultez Entretien et nettoyage. Le filtre à eau est bouché. •Remplacez la cartouche du filtre avec une nouvelle. 54 Service à la clientèle Conseils de dépannage - GE GSS20DBTWW | Owners Manual - Page 55
nouvelle cartouche ou installez le bouchon du filtre. •Appuyez et maintenez enfoncée la touche LOCK CONTROL (réglage du verrouillage) pendant 3 secondes. 55 Conseils de dépannage Service à la clientèle - GE GSS20DBTWW | Owners Manual - Page 56
est en position Vous endommagerez le robinet d'eau en le conservant I (marche) mais l'alimentation en en position l (marche). eau du réfrigérateur n'est pas branchée. Service à la clientèle Conseils de dépannage - GE GSS20DBTWW | Owners Manual - Page 57
Notes. 57 Mesures de sécurité Fonctionnement Installation Conseils de dépannage Service à la clientèle - GE GSS20DBTWW | Owners Manual - Page 58
GE et toutes autre marques : Un (1) an Un (1) an Un (1) an Un (1) an TERMES ET CONDITIONS : La présente garantie ne s'applique qu'à l'utilisation domestique par une seule famille au Canada, lorsque le réfrigérateur a été installé conformément aux instructions pour obtenir un service dans le cadre - GE GSS20DBTWW | Owners Manual - Page 59
MWF du système de Filtration d'eau GE SmartWater Ce système a été essayé éciaux Les directives d'installation, la disponibilité de pièces et de service ainsi que la garantie standard sont expédiées avec le produit. Fabriquée pour : General Electric Company, Louisville, KY 40225 EPA EST. No. 070595-MN- - GE GSS20DBTWW | Owners Manual - Page 60
par Internet au site www.electromenagersge.ca 24 heures par jour, tous les jours de l'année. Service de réparations Service de réparations GE est tout près de vous. Pour faire réparer votre électroménager GE, il suffit de nous téléphoner. 1.800.361.3400 Studio de conception réaliste Sur demande - GE GSS20DBTWW | Owners Manual - Page 61
Seguridad Operación Instalación Información de seguridad Cables de extensión 63 Conectar la electricidad 64 Deshacerse debidamente de su refrigerador 63 Precauciones de seguridad 62 Instrucciones de operación Cartucho del filtro de agua 66 Controles del refrigerador 65 Dispensador de agua y - GE GSS20DBTWW | Owners Manual - Page 62
aparato sólo para los fines que se describen en este Manual del propietario. PRECAUCIONES DE SEGURIDAD Cuando use electrodomésticos, , evite el contacto con las partes móviles del mecanismo de expulsión, o con el elemento calefactor localizado en la parte inferior del dispositivo para hacer hielo - GE GSS20DBTWW | Owners Manual - Page 63
Seguridad Operación ge.com ¡PELIGRO! RIESGO DE QUE UN NIÑO PUEDA QUEDAR ATRAPADO DESHACERSE DEBIDAMENTE DE SU REFRIGERADOR El atrapamiento y la sofocación de los niños no son - GE GSS20DBTWW | Owners Manual - Page 64
Seguridad Operación INFORMACIONES IMPORTANTES DE SEGURIDAD. LEA PRIMERO TODA LAS INSTRUCCIONES. ¡ADVERTENCIA! COMO CONECTAR LA ELECTRICIDAD Bajo ninguna circunstancia debe cortar o quitar la tercera punta (tierra) de la clavija. Para su seguridad personal, este aparato deberá conectarse - GE GSS20DBTWW | Owners Manual - Page 65
refrigerador. Los controles tendrán uno de los siguientes aspectos: 012 12 34 5 67 FREEZER 89 89 34 5 67 FRESH FOOD 9 IS COLDEST 0 IS OFF ge.com Pasos de inicio para un correcto control de la temperatura PASO 1: Coloque el Control de alimentos frescos en "5". PASO 2: Coloque el Control del - GE GSS20DBTWW | Owners Manual - Page 66
en los Estados Unidos, visite nuestro sitio Web, ge.com, o llame a GE para partes y accesorios al 800.626.2002. MWF Precio sugerido o resbalen. Ponga un dedo en cada lado de la tapa deslizante hacia la parte trasera y muévala hacia Para reemplazarlos o cambiarlos de lugar: Encaje delante y - GE GSS20DBTWW | Owners Manual - Page 67
congelador: Para retirarlos Para reemplazarlos Inserte el gancho superior Bájelo para asegurarlo en su lugar Cacerolas del congelador: Para retirarlas ge.com Operación Instalación Solucionar problemas Servicio al consumidor Retire la cacerola empujándola hacia el frente, levantando el frente - GE GSS20DBTWW | Owners Manual - Page 68
Seguridad Características adicionales. No todos los modelos tienen todas las características. Estante ShelfSaver™ (en algunos modelos) Use esto estante para almacenar latas de bebidas para un fácil acceso. También puede sostener un plato refractario de 9″ x 13″. Estante para latas en la puerta ( - GE GSS20DBTWW | Owners Manual - Page 69
Operación Sobre retirar la gaveta preservadora de alimentos. ge.com No todos los modelos tienen todas las caracterí al hacer un lote de hielo. Entrepaño en la parte superior del congelador Hay un entrepaño en la parte superior del congelador por encima del dispositivo para hacer hielo - GE GSS20DBTWW | Owners Manual - Page 70
, presione la misma tecla durante 3 segundos nuevamente. Dispenser Light (Luz del dispensador) Esta tecla enciende y apaga la luz la salida del hielo situada en la puerta. Esto es normal y, por regla general, sucede cuando ha dispensado hielo picado repetidamente. La nieve se evaporará por sí - GE GSS20DBTWW | Owners Manual - Page 71
Seguridad Operación Cuidado y limpieza del refrigerador. ge.com Área de goteo del dispensador Limpiar el . Cómo limpiar el condensador: El condensador está ubicado al interior de la parte posterior del refrigerador. Para su acceso, primero desconecte el refrigerador. Después retire - GE GSS20DBTWW | Owners Manual - Page 72
Seguridad Operación Cuidado y limpieza del refrigerador. Atrás del refrigerador Se deberá tener cuidado al retirar el refrigerador de la pared. Todos los tipos de recubrimiento de pisos se pueden dañar, sobre todo los recubrimientos acojinados y los que tienen superficies repujadas. Jale el - GE GSS20DBTWW | Owners Manual - Page 73
Seguridad Operación Reemplazo de bombillas. ge.com Girar el control hacia la posición 0 (apagado) está situada por encima de la gaveta superior. Desenchufe el refrigerador. Tome el borde en la parte inferior del protector de la luz y hálelo hacia arriba y hacia adelante. Después de reemplazar - GE GSS20DBTWW | Owners Manual - Page 74
de cierre, accesorios e instrucciones) está disponible con un costo adicional a través de su proveedor, visitando nuestra página Web ge.com o bien a través de Partes y Accesorios, 800.626.2002. UBICACIÓN DEL REFRIGERADOR • No instale el refrigerador donde las temperaturas van debajo los 60 °F (16 - GE GSS20DBTWW | Owners Manual - Page 75
Instrucciones para Instalación ALINEACIÓN DE LAS PUERTAS Después de nivelar, asegúrese de que las puertas estén al mismo nivel en la parte superior. Para emparejar las puertas, ajuste la puerta de los alimentos frescos. Usando una llave de cubo de 5/16″, gire el tornillo de ajuste de - GE GSS20DBTWW | Owners Manual - Page 76
la tubería) en la tubería de la casa puede causar daños a las partes del refrigerador y conducir a un goteo o inundación por el agua. Llame a NECESITA • Kit de tubería de cobre para el refrigerador o SmartConnect™ de GE, 1/4″ de diámetro externo para conectar el refrigerador al suministro de agua. - GE GSS20DBTWW | Owners Manual - Page 77
para la instalación QUÉ NECESITA (CONT.) • Un kit de suministro de agua de GE (contiene tubería, válvula de cierre y accesorios enumerados abajo) está disponible a un costo adicional en su tienda o por medio de Partes y Accesorios, 800.626.2002. • Un suministro de agua fría. La presión del agua - GE GSS20DBTWW | Owners Manual - Page 78
en la válvula. Apriete la tuerca de compresión firmemente. Para tubería de plástico de un kit de tubería para el refrigerador SmartConnect™ de GE, inserte el extremo moldeado de la tubería en la válvula de cierre y apriete la tuerca de compresión hasta que esté firmemente apretada a mano, luego - GE GSS20DBTWW | Owners Manual - Page 79
recomandamos la instalación de uno si su suministro de agua tiene arena o partículas que podrían obstruir la malla de la válvula de agua del como se muestra. En el kit de tubería para el refrigerador SmartConnect™ de GE, las tuercas ya vienen armadas con la tubería. 10 ABRA LA LLAVE DEL AGUA - GE GSS20DBTWW | Owners Manual - Page 80
CÓMO INSTALAR LA TUBERÍA DEL AGUA (CONT.) 11 CONECTE EL REFRIGERADOR Organice el cable de la tubería de manera que no vibre contra la parte trasera del refrigerador o contra la pared. Empuje el refrigerador hacia la pared. INICIE EL DISPOSITIVO DE HIELO Fije el interruptor del dispositivo de hielo - GE GSS20DBTWW | Owners Manual - Page 81
Seguridad Operación Instalación Sonidos normales de operación. ge.com Los refrigeradores más nuevos producen sonidos diferentes a los a arrancar (esto puede tomar hasta 5 minutos). I El tablero de control electrónico puede causar un sonido de chasquido cuando se activa el relé para controlar - GE GSS20DBTWW | Owners Manual - Page 82
á de solicitar un servicio. Operación Instalación Problema El refrigerador no funciona Vibraciones o sacudidas (una vibración ligera es normal) El motor opera durante períodos prolongados o se arranca y se para con frecuencia. (Refrigeradores modernos con más espacio de almacenamiento y un - GE GSS20DBTWW | Owners Manual - Page 83
Seguridad Operación Instalación ge.com Problema Los cubos tienen mal olor/sabor tapón. • Revise si hay un paquete que mantiene la puerta abierta. •Vea Los controles. •Aplique vaselina en la parte frontal de la junta. •Eso es normal. • Enciende el dispositivo de hielo o el agua. • Remueve los - GE GSS20DBTWW | Owners Manual - Page 84
el contacto. Bombilla fundida. El desagüe en el fondo del congelador está tapado. Cubos atrapados en el orificio. El aire fluye para enfriar el motor. En el proceso de refrigeración es normal que salga calor de la base del refrigerador. Algunos recubrimientos de piso estan sensitivos y se descoloran - GE GSS20DBTWW | Owners Manual - Page 85
situado en un área que no dispone de servicio por parte de un proveedor de servicio autorizado de GE, podría tener que hacerse cargo de los costes de consumidor local o la oficina del Attorney General en su localidad. Garante: General Electric Company. Louisville, KY 40225 Instalación Solucionar - GE GSS20DBTWW | Owners Manual - Page 86
de Filtración GE SmartWater Cartucho ); pH de 7,5 ± 0,5; temp. de 20° ± 3°C ** Medición en partículas/ml. Las partículas usadas eran de 0,5-1 micrón. *** Unidades de turbidez Nefelométrica-NTU Reducción y asbestos NSF® Hecho por General Electric, Appliance Park, Louisville, KY 40225 EPA EST. No - GE GSS20DBTWW | Owners Manual - Page 87
normales de oficina. GE Consumer Home Services estará aún ahí cuando su garantía termine. Piezas y accesorios ge.com Aquellos individuos con o escríbanos a: General Manager, Customer Relations GE Appliances, Appliance Park Louisville, KY 40225 Registre su electrodoméstico ge.com ¡Registre su - GE GSS20DBTWW | Owners Manual - Page 88
Consumer Support. GE Appliances Website In the U.S.: ge.com Have a question or need assistance with your appliance? Try the GE Appliances Website 24 hours a day, any day of the year! For greater convenience and faster service, you can now download Owner's Manuals, order parts, catalogs, or even
-
 1
1 -
 2
2 -
 3
3 -
 4
4 -
 5
5 -
 6
6 -
 7
7 -
8
-
9
-
10
-
11
-
12
-
13
-
14
-
15
-
16
-
17
-
18
-
19
-
20
-
21
-
22
-
23
-
24
-
25
-
26
-
27
-
28
-
29
-
30
-
31
-
32
-
33
-
34
-
35
-
36
-
37
-
38
-
39
-
40
-
41
-
42
-
43
-
44
-
45
-
46
-
47
-
48
-
49
-
50
-
51
-
52
-
53
-
54
-
55
-
56
-
57
-
58
-
59
-
60
-
61
-
62
-
63
-
64
-
65
-
66
-
67
-
68
-
69
-
70
-
71
-
72
-
73
-
74
-
75
-
76
-
77
-
78
-
79
-
80
-
81
-
82
-
83
-
84
-
85
-
86
-
87
-
88
 |
 |
Safety Information
Electricity . . . . . . . . . . . . . . . . . . . . .4
Extension Cords
. . . . . . . . . . . . . . .3
Proper Disposal . . . . . . . . . . . . . . . .3
Safety Precautions . . . . . . . . . . . . . .2
Operating Instructions
Automatic Icemaker
. . . . . . . . . . . .9
Controls
. . . . . . . . . . . . . . . . . . . . .5
Crispers and Pans
. . . . . . . . . . . .8, 9
Ice and Water Dispenser . . . . . . . .10
Shelves, Bins and Racks . . . . . . . .6–8
Water Filter Cartridge . . . . . . . . . . .6
Care and Cleaning
Cleaning
. . . . . . . . . . . . . . . . .11, 12
Light Bulbs
. . . . . . . . . . . . . . . . . .13
Installation Instructions
Preparing to Install
the Refrigerator . . . . . . . . . . . .14, 15
Water Line Installation
. . . . . .16–20
Troubleshooting Tips
Before You Call For Service . . .22–24
Normal Operating Sounds
. . . . . .21
Consumer Support
Consumer Support . . . . .Back Cover
Performance Data Sheet . . . . . . . .27
Product Registration
(Canadian)
. . . . . . . . . . . . . . .31, 32
Product Registration (U.S.) . . .29, 30
State of California Water
Treatment Device Certificate . . . . .27
Warranty (Canadian) . . . . . . . . . . .25
Warranty (U.S.) . . . . . . . . . . . . . . .26
ge.com
Refrigerators
Side by Side
197D3351P008
49-60401
11-05 JR
Write your model and serial numbers here:
Model # _____________________
Serial #
_____________________
Find these numbers on a label inside
the refrigerator compartment at the top
on the right side behind the controls.
Réfrigérateurs
Côte à côte
Refrigeradores
Lado a lado
Models 20, 22 and 25
Manuel d’utilisation
et d’installation
Owner’s Manual and
Installation Instructions
Manual del propietario
e instalación
La section française commence à la page 33
La sección en español empieza en la página 61