GE JB620DRWW Use and Care Manual - Page 12
Using the oven control, clock, and timer features and settings., Using the oven - replacement top
 |
View all GE JB620DRWW manuals
Add to My Manuals
Save this manual to your list of manuals |
Page 12 highlights
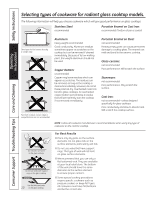
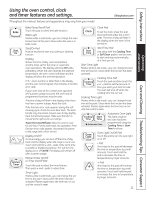
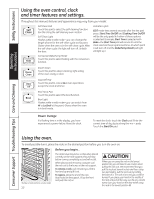
Safety Instructions Operating Instructions Using the oven control, clock and timer features and settings. Throughout this manual, features and appearance may vary from your model. Self Clean Self Clean Pad Touch this pad to select the self-cleaning function. See the Using the self-cleaning oven section. Self Clean Light Flashes while in edit mode-you can change the length of time for the self-clean cycle at this point. Glows when the oven is in the self-clean cycle. After the self-clean cycle, the light will turn off. Unlatch the door. Indicator Lights EDIT mode lasts several seconds after the last pad press. Start Time On/Off and Cooking Time On/Off will be the only pads lit if either of these options is selected. (Example: Start Time is selected with Bake-the Start Time pad will remain lit until the clock reaches the programmed time, at which point it will turn off and the Bake/Temp Recall pad light will light up.) Convection Bake/Temp Recall Touch this pad to select baking with the convection function. Steam Clean Touch this pad for easier cleaning, light soiling of the oven cavity or door. Clear/Off Pad Touch this pad to cancel ALL oven operations except the clock and timer. Broil Hi/Lo Broil Hi/Lo Pad Touch this pad to select the broil function. Broil Light Flashes while in edit mode-you can switch from Hi to Lo Broil at this point. Glows when the oven is in broil mode. Power Outage If a flashing time is in the display, you have experienced a power failure. Reset the clock. To reset the clock, touch the Clock pad. Enter the correct time of day by touching the + or - pads. Touch the Start/On pad. Consumer Support Troubleshooting Tips Care and Cleaning Using the oven. To avoid possible burns, place the racks in the desired position before you turn the oven on. Before you begin... Number of rack positions vary by model. 12 The racks have stop-locks, so that when placed correctly on the rack supports, they will stop before coming completely out and will not tilt. When placing and removing cookware, pull the rack out to the bump on the rack support. To remove a rack, pull it toward you, tilt the front end up and pull it out. To replace, place the end of the rack (stop-locks) on the support, tilt up the front and push the rack in. CAUTION When you are using the rack in the lowest position (A), you will need to use caution when pulling the rack out. We recommend that you pull the rack out several inches and then, using two pot holders, pull the rack out by holding the sides of it. The rack is low and you could be burned if you place your hand in the middle of the rack and pull all the way out. Be very careful not to burn your hand on the door when using the rack in the lowest position (A).
-
 1
1 -
2
-
3
-
4
-
5
-
6
-
 7
7 -
 8
8 -
 9
9 -
 10
10 -
 11
11 -
 12
12 -
 13
13 -
 14
14 -
 15
15 -
 16
16 -
 17
17 -
18
-
19
-
20
-
21
-
22
-
23
-
24
-
25
-
26
-
27
-
28
-
29
-
30
-
31
-
32
-
33
-
34
-
35
-
36
-
37
-
38
-
39
-
40
 |
 |