GE JGB400SEPSS Use and Care Manual - Page 26
Burner Assembly, Burner Grates, Operating, Instructions, Safety Instructions, Installation
 |
UPC - 084691207931
View all GE JGB400SEPSS manuals
Add to My Manuals
Save this manual to your list of manuals |
Page 26 highlights
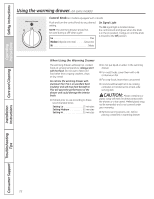
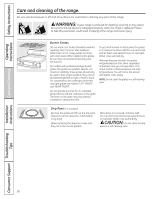
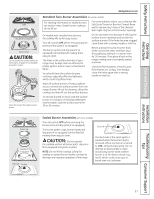
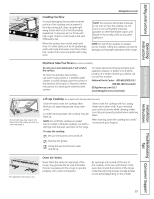
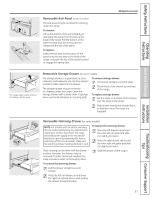
Safety Instructions Operating Instructions Care and cleaning of the range. Be sure electrical power is off and all surfaces are cool before cleaning any part of the range. WARNING: If your range is removed for cleaning, servicing or any reason, be sure the anti-tip device is reengaged properly when the range is replaced. Failure to take this precaution could result in tipping of the range and cause injury. Burner Grates Lift out when cool. Grates should be washed regularly and, of course, after spillovers. Wash them in hot, soapy water and rinse with clean water. When replacing the grates, be sure they are positioned securely over the burners. On models with professional-style double grates, the grates are position-specific. For maximum stability, these grates should only be used in their proper position; they cannot be interchanged left to right or front to back. For convenience, the undersides of the left and right grates are marked "LEFT FRONT" and "RIGHT FRONT." Do not operate a burner for an extended period of time without cookware on the grate. The finish on the grate may chip without cookware to absorb the heat. To get rid of burned-on food, place the grates in a covered container. Add 1/4 cup ammonia and let them soak several hours or overnight. Wash, rinse well and dry. Although they are durable, the grates will gradually lose their shine, regardless of the best care you can give them. This is due to their continual exposure to high temperatures. You will notice this sooner with lighter color grates. NOTE: Do not clean the grates in a self-cleaning oven. Drip Pans (if so equipped) Remove the grates and lift out the drip pans. Drip pans can be cleaned in a dishwasher or by hand. When replacing the drip pans, make sure they are in the correct position. Place them in a covered container. Add 1/4 cup ammonia and let soak several hours or overnight. Wash, rinse well and dry. CAUTION: Do not clean the drip pans in a self-cleaning oven. Care and Cleaning Installation Instructions Troubleshooting Tips Consumer Support 26
-
 1
1 -
2
-
3
-
4
-
5
-
6
-
7
-
8
-
9
-
10
-
11
-
12
-
13
-
14
-
15
-
16
-
17
-
18
-
19
-
20
-
 21
21 -
 22
22 -
 23
23 -
 24
24 -
 25
25 -
 26
26 -
 27
27 -
 28
28 -
 29
29 -
 30
30 -
 31
31 -
32
-
33
-
34
-
35
-
36
-
37
-
38
-
39
-
40
-
41
-
42
-
43
-
44
-
45
-
46
-
47
-
48
-
49
-
50
-
51
-
52
 |
 |