GE JKP35SMSS Owners Manual
GE JKP35SMSS Manual
 |
View all GE JKP35SMSS manuals
Add to My Manuals
Save this manual to your list of manuals |
GE JKP35SMSS manual content summary:
- GE JKP35SMSS | Owners Manual - Page 1
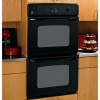
Troubleshooting Tips . . . .26-28 Consumer Support Consumer Support 32 Product Registration . . . . .29, 30 Warranty 31 Owner's Manual JKP30-27 ″ Single Wall Oven JTP30-30 ″ Single Wall Oven JKP70-27 ″ Single Convection Wall Oven JTP70-30 ″ Single Convection Wall Oven JKP35-27 ″ Double Wall Oven - GE JKP35SMSS | Owners Manual - Page 2
Consumer Support Troubleshooting Tips Care and Cleaning Operating Instructions Safety Instructions IMPORTANT SAFETY INFORMATION. READ ALL INSTRUCTIONS BEFORE USING. WARNING! For your safety, the information in this manual must be followed to minimize the risk of fire or explosion, electric shock, - GE JKP35SMSS | Owners Manual - Page 3
Instructions Operating Instructions Care and Cleaning Troubleshooting Tips Consumer Support ge.com WARNING! SAFETY PRECAUTIONS s Do not store flammable materials in an oven. s CAUTION: Items of interest to children should not be stored in cabinets above an oven; children climbing on the oven - GE JKP35SMSS | Owners Manual - Page 4
fire next time you use the pan. s Clean only parts listed in this Owner's Manual. s Do not use aluminum foil to line oven bottoms, except as suggested in this manual. Improper installation of aluminum foil may result in a risk of electric shock or fire. COOK MEAT AND POULTRY THOROUGHLY... Cook - GE JKP35SMSS | Owners Manual - Page 5
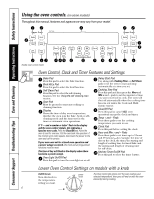
Safety Instructions Operating Instructions Care and Cleaning Troubleshooting Tips Consumer Support Using the oven controls. (on some models) Throughout this manual, features and appearance may vary from your model. ge.com Double oven control shown. Oven Control, Clock and Timer Features and - GE JKP35SMSS | Owners Manual - Page 6
Consumer Support Troubleshooting Tips Care and Cleaning Operating Instructions Safety Instructions Using the oven controls. (on some models) Throughout this manual, features and appearance may vary from your model. Double oven control shown Oven Control, Clock and Timer Features and Settings - GE JKP35SMSS | Owners Manual - Page 7
Instructions Operating Instructions Care and Cleaning Troubleshooting Tips Consumer Support Using the oven. ge.com To avoid possible burns, place the racks in the desired position before you turn the oven NOTE: On some models, the lower oven is controlled with a knob. To set the oven for baking, - GE JKP35SMSS | Owners Manual - Page 8
Consumer Support Troubleshooting Tips Care and Cleaning Operating Instructions Safety Instructions Using the oven. How to Set the Oven for Broiling Close the door. Always broil with the door closed. If your oven is connected to 208 volts, rare steaks may be broiled by preheating the broiler and - GE JKP35SMSS | Owners Manual - Page 9
Safety Instructions Operating Instructions Care and Cleaning Troubleshooting Tips Consumer Support Using the clock and timer. Make sure the clock is set to the correct time of day. To Set the Clock The clock must be set to the correct time of day for the automatic oven timing functions to work - GE JKP35SMSS | Owners Manual - Page 10
Consumer Support Troubleshooting Tips Care and Cleaning Operating Instructions Safety Instructions Using the timed baking and roasting features. (on some models) On models with press pad controls for both ovens, you can use timed baking in one oven while using self-clean in the other; you can also - GE JKP35SMSS | Owners Manual - Page 11
Safety Instructions Operating Instructions Care and Cleaning Troubleshooting Tips Consumer Support Using the convection oven. ge.com Convection Bake NOTE: The convection fan will cycle on and off while cooking to best distribute hot air in the oven. The convection oven fan shuts off when the oven - GE JKP35SMSS | Owners Manual - Page 12
Support Troubleshooting Tips Care and Cleaning Operating Instructions Safety Instructions Using the convection oven walls of the oven. Paper and Plastic Heat-resistant paper and plastic containers that are recommended for use in regular ovens can be used in convection ovens generally require 30-45 - GE JKP35SMSS | Owners Manual - Page 13
Safety Instructions Operating Instructions Care and Cleaning Troubleshooting Tips Consumer Support Using the timed features for convection cooking. ge.com On double oven models, you can use timed baking or roasting in one oven while using self-clean in the other; you can also use timed baking or - GE JKP35SMSS | Owners Manual - Page 14
Consumer Support Troubleshooting Tips Care and Cleaning Operating Instructions Safety Instructions Adjust the oven thermostat-Do it yourself! You may find that your new oven cooks differently than the one it replaced. Use your new oven for a few weeks to become more familiar with it. If you still - GE JKP35SMSS | Owners Manual - Page 15
Safety Instructions Operating Instructions Care and Cleaning Troubleshooting Tips Consumer Support Using the self-cleaning oven. (on some models) ge.com The oven door must be closed and all controls must be set correctly for the cycle to work properly. Wipe up heavy soil on the oven bottom. ( - GE JKP35SMSS | Owners Manual - Page 16
Consumer Support Troubleshooting Tips Care and Cleaning Operating Instructions Safety Instructions Using the self-cleaning oven. (on some models) The oven door must be closed and all controls must be set correctly for the cycle to work properly. or (depending on model) or (depending on model) - GE JKP35SMSS | Owners Manual - Page 17
Safety Instructions Operating Instructions Care and Cleaning Troubleshooting Tips Consumer Support Special features of your oven control. ge.com Your new press pad control has additional features that you may choose to use. The following are the features and how you may activate - GE JKP35SMSS | Owners Manual - Page 18
Support Troubleshooting Tips Care and Cleaning Operating Instructions Safety Instructions Special features of your oven control. Tone Volume (on some models below. Press the Bake and Broil Hi/Lo pads (on double oven models, use the upper oven controls) at the same time for 3 seconds until the - GE JKP35SMSS | Owners Manual - Page 19
Instructions Operating Instructions Care and Cleaning Troubleshooting Tips Consumer Support + or + or (depending on model) ge.com Changing the Speed of the + or - Pads (on some models the Bake and Broil Hi/Lo pads (on double oven models, use the upper oven controls) at the same time for 3 seconds - GE JKP35SMSS | Owners Manual - Page 20
Support Troubleshooting Tips Care and Cleaning Operating Instructions Safety Instructions Using the Sabbath Feature. (Designed for use on the Jewish Sabbath and Holidays.) (on some models oven is baking/roasting. If ⊃ does not appear in the display, start again at step 4. To adjust the oven - GE JKP35SMSS | Owners Manual - Page 21
will not automatically turn off. Press the Start pad. NOTE: If a power outage occurred while the oven was in Sabbath mode, the oven will automatically turn off and the oven control must be reset. 21 Safety Instructions Operating Instructions Care and Cleaning Troubleshooting Tips Consumer Support - GE JKP35SMSS | Owners Manual - Page 22
Support Troubleshooting Tips Care and Cleaning Operating Instructions Safety Instructions Care and cleaning of the oven. Be sure electrical power is off and all surfaces are cool before cleaning any part of the oven groove in stem Control Knob (on some models) The control knobs may be removed for - GE JKP35SMSS | Owners Manual - Page 23
Safety Instructions Operating Instructions Care and Cleaning Troubleshooting Tips Consumer Support ge.com Do not rub or the surface. They may cause a dull spot even after cleaning. Door (on models with a knob for the lower oven) To clean the inside of the door: s Soap and water will normally do - GE JKP35SMSS | Owners Manual - Page 24
Consumer Support Troubleshooting Tips Care and Cleaning Operating Instructions Safety Instructions Care and cleaning of the oven. Socket 31⁄2" Maximum length Bulb Tab Glass cover Oven Light Bulb (on some models) NOTE: The glass cover (on some models) should be removed only when cold. Wearing - GE JKP35SMSS | Owners Manual - Page 25
Instructions Operating Instructions Care and Cleaning Troubleshooting Tips Consumer Support Painted Surfaces Clean with soap and water or a vinegar and water solution. ge.com Do not use commercial oven inside the oven door while cleaning. Stainless Steel Surfaces (on some models) Do not use a - GE JKP35SMSS | Owners Manual - Page 26
Consumer Support Troubleshooting Tips Care and Cleaning Operating Instructions Safety Instructions Before you call for service... Troubleshooting Tips Save time and money! Review the charts on the following pages first and you may not need to call for service. Problem Control signals after - GE JKP35SMSS | Owners Manual - Page 27
Safety Instructions Operating Instructions Care and Cleaning Troubleshooting Tips Consumer Support ge.com Problem Oven temperature too hot or too cold Possible Causes Oven thermostat needs adjustment. What To Do • See the Adjust the oven thermostat-Do it yourself! section. Oven will not work A - GE JKP35SMSS | Owners Manual - Page 28
Consumer Support Troubleshooting Tips Care and Cleaning Operating Instructions Safety Instructions Before you call for service... Troubleshooting Tips Problem "F- and a number or letter" flash in the display Display goes blank Display flashes Unable to get the display to show "SF" Power outage, - GE JKP35SMSS | Owners Manual - Page 29
• Backed by GE • All brands covered • Unlimited service calls • All parts and labor costs GE and call us in the U.S. toll-free at 800.626.2224 for more information. *All brands covered, up to 20 years old, in the continental U.S. ✁Cut here Please place in envelope and mail to: General Electric - GE JKP35SMSS | Owners Manual - Page 30
Registration ✁ Cut here ImpoTMrotadailnayt! Model Number Serial Number First Name Mr. s Ms. s Mrs. s Miss s Street Address Last Name Apt. # City Date Placed In Use Month Day GE Consumer & Industrial Appliances General Electric Company Louisville, KY 40225 ge.com 30 E-mail Address - GE JKP35SMSS | Owners Manual - Page 31
Instructions Operating Instructions Care and Cleaning Troubleshooting Tips Consumer Support GE Built-In Electric Oven Warranty. All warranty service provided by our Factory Service Centers, or an authorized Customer Care® technician. To schedule service, on-line, 24 hours a day, visit us at ge - GE JKP35SMSS | Owners Manual - Page 32
normal business hours. Instructions contained in this manual cover procedures to be performed by any user. Other servicing generally should be referred to qualified service personnel. Caution must be exercised, since improper servicing may cause unsafe operation. Contact Us ge.com If you are - GE JKP35SMSS | Owners Manual - Page 33
Horno de pared eléctrico empotrado ge.com Instrucciones de seguridad 2-4 Instrucciones de 31 Registro del producto 29, 30 Soporte al consumidor 32 Manual del propietario JKP30-Horno simple de pared de 27 ″ JTP30 o en la parte delantera del horno (inferior) detrás de la puerta del horno. 49-80429 02 - GE JKP35SMSS | Owners Manual - Page 34
s No intente reparar o reemplazar ninguna parte de su horno a menos que este manual lo recomiende de manera específica. Todos Enseñe a los niños que no deben jugar con los controles ni con ninguna otra parte del artefacto. s Los rayones o impactos severos sobre las puertas de vidrio podrían romper - GE JKP35SMSS | Owners Manual - Page 35
Seguridad Operación Cuidado y limpieza Solucionar problemas Soporte al consumidor ge.com ¡ADVERTENCIA! PRECAUCIONES DE SEGURIDAD s No guarde materiales inflamables en un horno. s PRECAUCIÓN: Los artículos de interés para los niños no deben guardarse - GE JKP35SMSS | Owners Manual - Page 36
cocina o alimentos en el horno mientras no esté en uso. s No utilice papel de aluminio para revestir la parte inferior del horno, a excepción de lo sugerido en este manual. La instalación incorrecta del papel de aluminio puede provocar un riesgo de descarga eléctrica o incendio. Operación Soporte - GE JKP35SMSS | Owners Manual - Page 37
modelos) A lo largo de este manual, las características y apariencia pueden variar con los de su modelo. ge.com Seguridad Operación Cuidado y función de autolimpieza. Consulte la sección Uso del horno autolimpieza. Botón Oven Light On/Off (Luz del horno encender/apagar) Presione para encender o - GE JKP35SMSS | Owners Manual - Page 38
del horno. (en algunos modelos) A lo largo de este manual, las características y apariencia pueden variar con los de su en la pantalla cuando se haya presentado una interrupción en el fluido eléctrico. Botón Oven Light On/Off (Luz del horno encender/apagar) Presione para encender o apagar la luz del - GE JKP35SMSS | Owners Manual - Page 39
Uso del horno. ge.com Seguridad Operación Cuidado y limpieza Solucionar problemas Soporte al NOTA: es posible que se encienda automáticamente un ventilador de enfriamiento para refrigerar las partes internas. Esto es normal, y el ventilador puede continuar andando incluso después de apagar - GE JKP35SMSS | Owners Manual - Page 40
No voltee el caparazón N/A C 18 a 20 No voltee Corte a través de el caparazón la parte posterior D 18 a 25 N/A del caparazón. Deje las colas bien separadas. Unte con mantequilla derretida antes de podrían sobrevivir". (Fuente: Safe Food Book. Your Kitchen Guide. USDA Rev. Junio 1985.) - GE JKP35SMSS | Owners Manual - Page 41
las funciones automáticas cronometradas del horno funcionen apropiadamente. La hora del día no puede cambiarse durante un ciclo de horneado cronometrado o autolimpieza. ge.com Presione el botón Clock. En los modelos con botones numéricos, apriételos para seleccionar la hora del día correcta. En los - GE JKP35SMSS | Owners Manual - Page 42
Seguridad Uso de las características cronometradas de horneado y asado. (en algunos modelos) En los modelos con controles de botones para ambos hornos, puede usar el horneado cronometrado en un horno mientras usa la limpieza automática en el otro; también puede usar el horneado cronometrado en - GE JKP35SMSS | Owners Manual - Page 43
Solucionar problemas Soporte al consumidor Uso del horno de convección. ge.com Horneado por convección NOTA: El ventilador de convección puede aumentar ligeramente para algunos alimentos, pero se ahorra el tiempo general ya que muchos alimentos se cocinan al mismo tiempo. Galletas, muffins - GE JKP35SMSS | Owners Manual - Page 44
Uso del horno de convección. Seguridad Operación Soporte al consumidor Solucionar problemas Cuidado y limpieza Rejilla Bandeja para asar a la parrilla Al hornear galletas, obtendrá mejores resultados si utiliza una bandeja de horno plana en vez de una fuente con lados bajos. o Para cambiar la - GE JKP35SMSS | Owners Manual - Page 45
Seguridad Operación Uso de las características cronometradas para cocinar por convección. ge.com En modelos de horno doble, puede utilizar la función de asado u horneado cronometrado en un horno mientras utiliza la limpieza automática en el - GE JKP35SMSS | Owners Manual - Page 46
en sentido antihorario para aumentar la temperatura del horno. Para ajustar el termostato del horno (en algunos modelos) Quite la perilla OVEN del eje, mire la parte posterior de la perilla y recuerde la configuración actual antes de realizar cualquier ajuste. La perilla viene de fábrica con el - GE JKP35SMSS | Owners Manual - Page 47
horno autolimpieza. (en algunos modelos) ge.com La puerta del horno debe estar cerrada y todos los controles deben estar configurados correctamente para que el ciclo funcione apropiadamente. Antes de un ciclo de limpieza Limpie el suelo pesado sobre la parte inferior del horno. (apariencia puede - GE JKP35SMSS | Owners Manual - Page 48
Seguridad Operación Uso del horno autolimpieza. (en algunos modelos) La puerta del horno debe estar cerrada y todos los controles deben estar configurados correctamente para que el ciclo funcione apropiadamente. Cómo posponer el inicio de la limpieza o (dependiendo en modelo) o (dependiendo en - GE JKP35SMSS | Owners Manual - Page 49
Seguridad Características especiales de control de su horno. ge.com Su nuevo control con botones sensibles tiene características adicionales que puede elegir utilizar. A continuación se describen las características y cómo puede activarlas. Los - GE JKP35SMSS | Owners Manual - Page 50
3 segundos, hasta que aparezca SF en la pantalla. el nivel del volumen. Elija el nivel de sonido que desee (1 BEEP, 2 BEEP, 3 BEEP). Presione el botón Oven Light On/Off. En la pantalla aparecerá 2 BEEP. Presione el botón Start para activar el nivel deseado que se muestra. Éste es el nivel medio - GE JKP35SMSS | Owners Manual - Page 51
+ o + o (dependiendo en modelo) ge.com Cambio de la velocidad de los botones + o - (en algunos modelos) Cuando use los botones + o - al configurar un tiempo o una temperatura, es posible que advierta - GE JKP35SMSS | Owners Manual - Page 52
Seguridad Operación Soporte al consumidor Solucionar problemas Cuidado y limpieza Uso de la característica Sabbath. (Diseñada para utilizarse en el Sabbath judío y días festivos). (en algunos modelos) La característica Sabbath puede utilizarse únicamente para horneado/asado. No puede utilizarse - GE JKP35SMSS | Owners Manual - Page 53
en modelo) Cuando la pantalla muestra ⊃ el horno está configurado en Sabbath. Cuando la pantalla muestra ⊃ el horno está horneando/asando. + ge.com Cómo configurar un horneado/asado cronometrado: Inicio inmediato y Parada automática NOTA: Para entender cómo funciona el control del horno - GE JKP35SMSS | Owners Manual - Page 54
con un paño suave y moje. NOTA: Debe retirar el adhesivo de todas las partes. No puede retirarse si se quema. Panel de control Es buena idea limpiar el panel muesca en el brazo de la bisagra debe estar bien asentada en la parte inferior de la ranura. Abra la puerta por completo. Si la puerta no - GE JKP35SMSS | Owners Manual - Page 55
movido de lugar en la puerta, hágala reparar. ge.com Puerta del horno (en hornos de limpieza automática automática, no es necesario que la limpie de manera manual. s El área fuera de la junta y el y jabón para limpiar bien la parte superior, los costados y la parte delantera de la puerta del horno. - GE JKP35SMSS | Owners Manual - Page 56
reloj. NOTA: s Una lámpara para electrodomésticos de 40 vatios es más pequeña que una lámpara estándar para uso doméstico de 40 vatios. s Instale y ajuste la cubierta en el sentido de las agujas del reloj. s Vuelva a conectar la energía eléctrica al horno. s Para tener una mejor iluminación dentro - GE JKP35SMSS | Owners Manual - Page 57
Seguridad ge.com Superficies pintadas Limpie con jabón y agua o una solución de vinagre y cercano, por favor llame a nuestro número gratuito: Centro Nacional de Refacciones (National Parts Center) 1.800.626.2002 ge.com Operación Cuidado y limpieza Solucionar problemas Soporte al consumidor 25 - GE JKP35SMSS | Owners Manual - Page 58
Seguridad Operación Soporte al consumidor Solucionar problemas Cuidado y limpieza Antes de llamar para solicitar un servicio de mantenimiento... ¡Los consejos para resolución de problemas ahorran tiempo y dinero! Revise primero las gráficas en las siguientes páginas y es posible que no tenga que - GE JKP35SMSS | Owners Manual - Page 59
ge.com Seguridad Operación Cuidado y limpieza Solucionar problemas Soporte al consumidor Problema La temperatura del horno es demasiado alta o demasiado baja Causas posibles El termostato del - GE JKP35SMSS | Owners Manual - Page 60
. Suena un ventilador Un ventilador de enfriamiento • Esto es normal. El ventilador de enfriamiento puede encenderse se encenderá para refrigerar las partes internas. automáticamente. Puede funcionar durante 1-1/2 horas en modelos de 30″ et durante 2 horas en modelos de 27″ después que el - GE JKP35SMSS | Owners Manual - Page 61
costosas. Confíe en GE y llámenos en forma gratuita en los EE.UU. al 800.626.2224 para más información. *Todas las marcas están cubiertas, hasta 20 años de antigüedad, en EE.UU. continental. ✁ Corte aquí Coloque en un sobre y envíe a: General Electric Company Warranty Registration Department - GE JKP35SMSS | Owners Manual - Page 62
. Nuestro número de servicio técnico es 800.GE.CARES (800.432.2737). 3 Lea su Manual del Propietario cuidadosamente. Le ayudará a operar su uso Mes Día GE Consumer & Industrial Appliances General Electric Company Louisville, KY 40225 ge.com 30 Dirección de correo electrónico* Estado Código - GE JKP35SMSS | Owners Manual - Page 63
situado en un área que no dispone de servicio por parte de un proveedor de servicio autorizado de GE, podría tener que hacerse cargo de los costes de (Attorney General) en su localidad. Cuidado y limpieza Solucionar problemas Soporte al consumidor Garante: General Electric Company. Louisville - GE JKP35SMSS | Owners Manual - Page 64
durante horas normales de oficina. GE Consumer Home Services estará aún ahí cuando su garantía termine. Piezas y accesorios ge.com Aquellos individuos con la en este manual cubren los procedimientos a seguir por cualquier usuario. Cualquier otra reparación debería, por regla general, referirse a
-
 1
1 -
 2
2 -
 3
3 -
 4
4 -
 5
5 -
 6
6 -
 7
7 -
8
-
9
-
10
-
11
-
12
-
13
-
14
-
15
-
16
-
17
-
18
-
19
-
20
-
21
-
22
-
23
-
24
-
25
-
26
-
27
-
28
-
29
-
30
-
31
-
32
-
33
-
34
-
35
-
36
-
37
-
38
-
39
-
40
-
41
-
42
-
43
-
44
-
45
-
46
-
47
-
48
-
49
-
50
-
51
-
52
-
53
-
54
-
55
-
56
-
57
-
58
-
59
-
60
-
61
-
62
-
63
-
64
 |
 |

ge.com
49-80429
02-07 JR
JKP30–27
″
Single Wall Oven
JTP30–30
″
Single Wall Oven
JKP70–27
″
Single Convection Wall Oven
JTP70–30
″
Single Convection Wall Oven
JKP35–27
″
Double Wall Oven
JTP35–30
″
Double Wall Oven
JKP55–27
″
Double Wall Oven
JTP55–30
″
Double Wall Oven
JKP75–27
″
Double Convection Wall Oven
JTP75–30
″
Double Convection Wall Oven
Owner’s Manual
Safety Instructions
. . . . . . .2–4
Operating Instructions
Clock and Timer . . . . . . . . . . . .9
Control Lockout . . . . . . . . . . .19
Controls . . . . . . . . . . . . . . . . .5, 6
Convection . . . . . . . . . . . . .11–13
Oven
. . . . . . . . . . . . . . . . . . .7, 8
Sabbath Feature . . . . . . . . .20, 21
Self-Cleaning Oven . . . . . .15, 16
Special Features . . . . . . . . .17–19
Thermostat
. . . . . . . . . . . . . . .14
Timed Baking and Roasting . .10
Care and Cleaning
Control Panel
. . . . . . . . . . . . .22
Glass Surfaces
. . . . . . . . . . . . .25
Knob . . . . . . . . . . . . . . . . . . . .22
Lift-Off Oven Door
. . . . . .22, 23
Light Bulb . . . . . . . . . . . . . . . .24
Packaging Tape . . . . . . . . . . . .22
Painted Surfaces
. . . . . . . . . . .25
Racks . . . . . . . . . . . . . . . . . . . .23
Stainless Steel Surfaces . . . . . .25
Troubleshooting Tips
. . . .26–28
Consumer Support
Consumer Support . . . . . . . . . 32
Product Registration . . . . .29, 30
Warranty
. . . . . . . . . . . . . . . . .31
Wall Oven
Built-In Electric
Write the model and serial
numbers here:
Model #
__________________
Serial #____________________
You can find them on a label
on the side trim or on the front
of the (lower) oven behind the
oven door.