GE PFCF1PJXBB Owners Manual - Page 31
Remove The, Refrigerator Doors Cont., Remove Opposite Door, Remove Freezer Drawer, Remove Center
 |
View all GE PFCF1PJXBB manuals
Add to My Manuals
Save this manual to your list of manuals |
Page 31 highlights
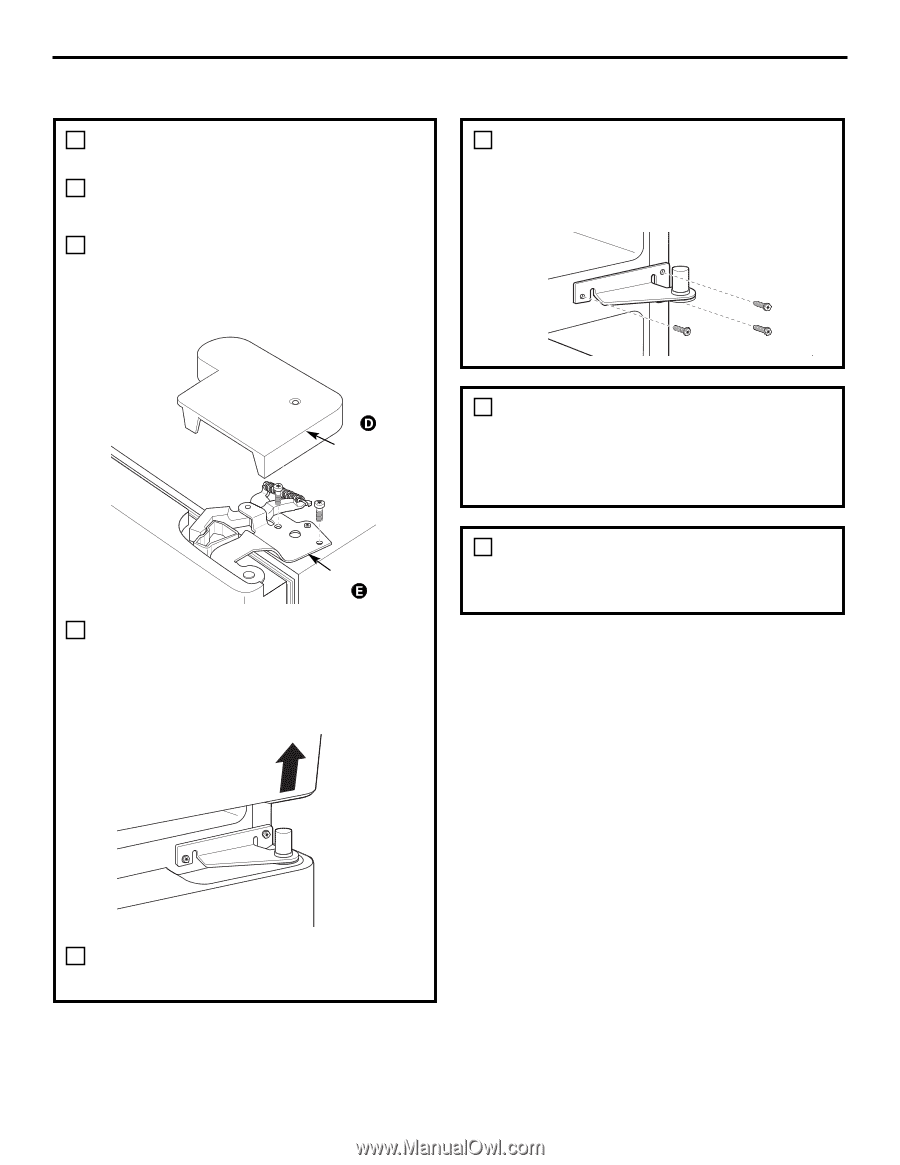
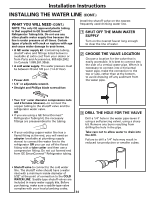
Installation Instructions 1 REMOVE THE REFRIGERATOR DOORS (cont.) D Remove the hinge cover on top of the refrigerator door by removing the Phillips head screws and pulling it up. E Using a 5/16″ socket ratchet/driver, remove the bolts securing the top hinge to the cabinet. Then lift the hinge straight up to free the hinge pin from the socket in the top of the door. 2 REMOVE CENTER HINGE Using a 5/16″ socket ratchet/driver, remove the bolts securing the center hinge to the cabinet. Set the hinge and bolts aside. Hinge Cover Top Hinge F Remove the tape and tilt the door away from the cabinet. Lift the door off the center hinge pin. Ensure that the plastic hinge pin thimble remains on the hinge pin or inside door hinge pin hole located in the bottom of the door. 3 REMOVE OPPOSITE DOOR Follow the same procedure on the opposite door. There are no wires, water lines or center hinge covers on the opposite side. 4 REMOVE FREEZER DRAWER Refer to the Removing the Freezer Drawer section for instructions. G Set the door on a non-scratching surface with the inside up. 31
-
 1
1 -
2
-
3
-
4
-
5
-
6
-
7
-
8
-
9
-
10
-
11
-
12
-
13
-
14
-
15
-
16
-
17
-
18
-
19
-
20
-
21
-
22
-
23
-
24
-
25
-
 26
26 -
 27
27 -
 28
28 -
 29
29 -
 30
30 -
 31
31 -
 32
32 -
 33
33 -
 34
34 -
 35
35 -
 36
36 -
37
-
38
-
39
-
40
-
41
-
42
-
43
-
44
-
45
-
46
-
47
-
48
-
49
-
50
-
51
-
52
-
53
-
54
-
55
-
56
-
57
-
58
-
59
-
60
-
61
-
62
-
63
-
64
-
65
-
66
-
67
-
68
-
69
-
70
-
71
-
72
-
73
-
74
-
75
-
76
-
77
-
78
-
79
-
80
-
81
-
82
-
83
-
84
-
85
-
86
-
87
-
88
-
89
-
90
-
91
-
92
-
93
-
94
-
95
-
96
-
97
-
98
-
99
-
100
-
101
-
102
-
103
-
104
-
105
-
106
-
107
-
108
-
109
-
110
-
111
-
112
-
113
-
114
-
115
-
116
-
117
-
118
-
119
-
120
-
121
-
122
-
123
-
124
-
125
-
126
-
127
-
128
-
129
-
130
-
131
-
132
-
133
-
134
-
135
-
136
-
137
-
138
-
139
-
140
 |
 |