GE PFCS1NFXSS Owners Manual - Page 24
Caution
 |
View all GE PFCS1NFXSS manuals
Add to My Manuals
Save this manual to your list of manuals |
Page 24 highlights
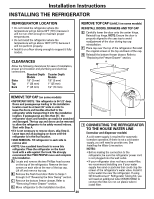
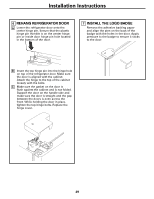
Installation Instructions INSTALLING THE REFRIGERATOR (cont.) 10 LEVEL THE REFRIGERATOR The leveling legs have 2 purposes: 1) Leveling legs adjust so the refrigerator is firmly positioned on the floor and does not wobble. 2) Leveling legs serve as a stabilizing brake to hold the refrigerator securely in position during operation and cleaning. The leveling legs also prevent the refrigerator from tipping. A Remove the grille by removing the two Phillips head screws. 11 SET THE CONTROLS Set the controls to the recommended setting. B Turn the leveling legs clockwise to raise the refrigerator, counterclockwise to lower it. CAUTION: To avoid possible personal injury or property damage, the leveling legs must be firmly touching the floor. C Replace the base grille by inserting the two Phillips head screws. 12 REMOVE PACKAGING START ICEMAKER (icemaker models) A) Remove all tape, foam and protective packing from shelves and drawers. B) Remove the tie downs from the freezer baskets. C) Place half width basket onto drawer slides. See About the freezer section for instructions. Set the icemaker power switch to the I (on) position. The icemaker will not begin to operate until it reaches its operating temperature of 15°F (-9°C) or below. It will then begin operation automatically. It will take 2-3 days to fill the ice bin. Power switch NOTE: In lower water pressure conditions, the water valve may turn on up to 3 times to deliver enough water to the icemaker. 24
-
 1
1 -
2
-
3
-
4
-
5
-
6
-
7
-
8
-
9
-
10
-
11
-
12
-
13
-
14
-
15
-
16
-
17
-
18
-
 19
19 -
 20
20 -
 21
21 -
 22
22 -
 23
23 -
 24
24 -
 25
25 -
 26
26 -
 27
27 -
 28
28 -
 29
29 -
30
-
31
-
32
-
33
-
34
-
35
-
36
-
37
-
38
-
39
-
40
-
41
-
42
-
43
-
44
-
45
-
46
-
47
-
48
-
49
-
50
-
51
-
52
-
53
-
54
-
55
-
56
-
57
-
58
-
59
-
60
-
61
-
62
-
63
-
64
-
65
-
66
-
67
-
68
-
69
-
70
-
71
-
72
-
73
-
74
-
75
-
76
-
77
-
78
-
79
-
80
-
81
-
82
-
83
-
84
-
85
-
86
-
87
-
88
-
89
-
90
-
91
-
92
-
93
-
94
-
95
-
96
-
97
-
98
-
99
-
100
-
101
-
102
-
103
-
104
-
105
-
106
-
107
-
108
-
109
-
110
-
111
-
112
-
113
-
114
-
115
-
116
-
117
-
118
-
119
-
120
-
121
-
122
-
123
-
124
-
125
-
126
-
127
-
128
-
129
-
130
-
131
-
132
-
133
-
134
-
135
-
136
-
137
-
138
-
139
-
140
 |
 |
