GE PFSF2MIYWW Use and Care Manual - Page 27
Installation Instructions, REMOVING THE DOORS, Double Door Refrigerator Models only, IMPORTANT NOTES
 |
UPC - 084691188957
View all GE PFSF2MIYWW manuals
Add to My Manuals
Save this manual to your list of manuals |
Page 27 highlights
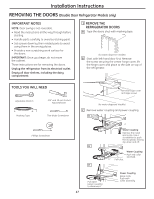
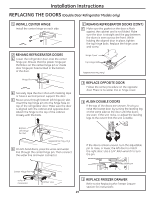
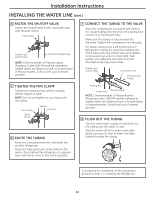
Installation Instructions REMOVING THE DOORS (Double Door Refrigerator Models only) IMPORTANT NOTES NOTE: Door swing is not reversible. • Read the instructions all the way through before starting. • Handle parts carefully to avoid scratching paint. • Set screws down by their related parts to avoid using them in the wrong places. • Provide a non-scratching work surface for the doors. IMPORTANT: Once you begin, do not move the cabinet. These instructions are for removing the doors. Unplug the refrigerator from its electrical outlet. Empty all door shelves, including the dairy compartment . 1 REMOVE THE REFRIGERATOR DOORS A Tape the doors shut with masking tape. (for water dispenser models) B Start with left-hand door first: Remove the screw securing the center hinge cover, lift the hinge cover and place to the side on top of the refrigerator. TOOLS YOU WILL NEED Adjustable Wrench 3/8″ and 10 mm Socket Ratchet/Driver Masking Tape Thin-blade Screwdriver Remove hinge cover (1 Phillips screw) (for water dispenser models) C Remove water coupling and power coupling. C1 Phillips Screwdriver C2 C3 Pull apart power coupling to disconnect 27 Water Coupling Remove the metal spring clip. Use a screwdriver to push the red plastic locking clip down and off. Pull tube. Water Coupling Push red collar and hold. Power Coupling Black mark flush with collar assembly
-
 1
1 -
2
-
3
-
4
-
5
-
6
-
7
-
8
-
9
-
10
-
11
-
12
-
13
-
14
-
15
-
16
-
17
-
18
-
19
-
20
-
21
-
 22
22 -
 23
23 -
 24
24 -
 25
25 -
 26
26 -
 27
27 -
 28
28 -
 29
29 -
 30
30 -
 31
31 -
 32
32 -
33
-
34
-
35
-
36
-
37
-
38
-
39
-
40
-
41
-
42
-
43
-
44
-
45
-
46
-
47
-
48
-
49
-
50
-
51
-
52
-
53
-
54
-
55
-
56
-
57
-
58
-
59
-
60
-
61
-
62
-
63
-
64
-
65
-
66
-
67
-
68
-
69
-
70
-
71
-
72
-
73
-
74
-
75
-
76
-
77
-
78
-
79
-
80
-
81
-
82
-
83
-
84
-
85
-
86
-
87
-
88
-
89
-
90
-
91
-
92
-
93
-
94
-
95
-
96
-
97
-
98
-
99
-
100
-
101
-
102
-
103
-
104
-
105
-
106
-
107
-
108
-
109
-
110
-
111
-
112
-
113
-
114
-
115
-
116
-
117
-
118
-
119
-
120
-
121
-
122
-
123
-
124
-
125
-
126
-
127
-
128
-
129
-
130
-
131
-
132
 |
 |
