GE WSXH208HWW Owners Manual
GE WSXH208HWW - 27" Front-Load Washer Manual
 |
UPC - 084691161158
View all GE WSXH208HWW manuals
Add to My Manuals
Save this manual to your list of manuals |
GE WSXH208HWW manual content summary:
- GE WSXH208HWW | Owners Manual - Page 1
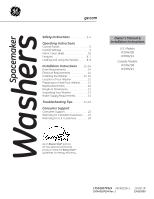
11 Replacement Parts 16 Rough-In Dimensions 12 Unpacking Your Washer 13 Water Supply Requirements 14 Troubleshooting Tips 17-19 Consumer Support Consumer Support 22 Warranty for Canadian Customers . . . .21 Warranty for U.S. Customers 20 Owner's Manual & Installation Instructions U.S. Models - GE WSXH208HWW | Owners Manual - Page 2
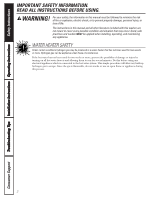
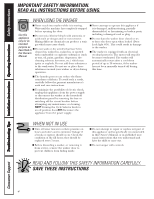
Consumer Support Troubleshooting Tips Installation Instructions Operating Instructions Safety Instructions IMPORTANT SAFETY INFORMATION. READ ALL INSTRUCTIONS BEFORE USING. WARNING! For your safety, the information in this manual must be followed to minimize the risk of fire or explosion, electric - GE WSXH208HWW | Owners Manual - Page 3
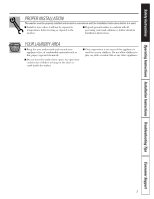
Safety Instructions Operating Instructions Installation Instructions Troubleshooting Tips Consumer Support PROPER INSTALLATION This washer must be properly installed and located in accordance with the Installation Instructions before it is used. ■ Install or store where it will not be exposed to - GE WSXH208HWW | Owners Manual - Page 4
, or removing it from service, remove the washer door to prevent children from hiding inside. ■ Do not attempt to repair or replace any part of this appliance unless specifically recommended in this Owner's Manual, or in published userrepair instructions that you understand and have the skills - GE WSXH208HWW | Owners Manual - Page 5
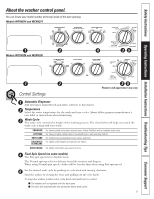
Safety Instructions Operating Instructions Installation Instructions Troubleshooting Tips Consumer Support About the washer control panel. You can locate your model number at the top inside of the door opening. Models WPXH214 and WCXH214 AUTO DISPENSER SAFETY LATCH/SLIDE TO OPEN 1 Models WCXH208 - GE WSXH208HWW | Owners Manual - Page 6
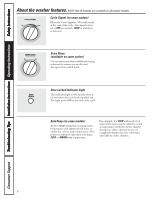
Support Troubleshooting Tips Installation Instructions Operating Instructions Safety Instructions About the washer features. NOTE: Not all features are available on all washer models. CYCLE SIGNAL OFF LOUD Cycle Signal (on some models and detergent from soiled loads. DOOR LOCKED Door Locked - GE WSXH208HWW | Owners Manual - Page 7
Instructions Operating Instructions Installation Instructions Troubleshooting Tips Consumer Support part of the normal operation of the washer. If the dispenser drawer is pulled out more than 1-1/2" when the washer is in operation, the washer the load. Avoid using too much detergent in your washer as - GE WSXH208HWW | Owners Manual - Page 8
Consumer Support Troubleshooting Tips Installation Instructions Operating Instructions Safety Instructions Loading and using the washer. Always follow fabric manufacturer's care label when laundering. Sorting Wash Loads Sort laundry into loads that can be washed together. Colors Whites Lights - GE WSXH208HWW | Owners Manual - Page 9
Instructions Operating Instructions Installation Instructions Troubleshooting Tips Consumer Support Dispenser parts of the recess. ■ Return the bleach and fabric softener inserts to the proper compartments. Replace the dispenser drawer and run the PREWASH or QUICK WASH cycle without any wash load - GE WSXH208HWW | Owners Manual - Page 10
Consumer Support Troubleshooting Tips Installation Instructions Operating Instructions Safety Instructions About the washer features. Fabric Care Labels Below are fabric care label "symbols" that affect the clothing you will be laundering. WASH LABELS Machine wash cycle Normal Permanent Press/ - GE WSXH208HWW | Owners Manual - Page 11
Installation Instructions Spacemaker Washer Models WCXH208 WCXH214 WSXH208 WPXH214 If you have any questions, call 800.GE.CARES (800.432.2737) or visit our Website at: ge.com In Canada, call 1.800.561.3344 or visit our Website at: GEAppliances.ca BEFORE YOU BEGIN Read these instructions - GE WSXH208HWW | Owners Manual - Page 12
Instructions LOCATION OF YOUR WASHER Do Not Install the Washer: 1. In an area exposed to dripping water or outside weather conditions. The ambient temperature should never be below 60°F (15.6°C) for proper washer Sides, Rear, Top = 0″ (0 cm), Front = 1″ (2.54 cm) • Closet door your GE retailer. - GE WSXH208HWW | Owners Manual - Page 13
the yellow ribbon and label from the front of the washer. 8 10 7 12 8 9 11. From the rear of the washer, carefully pull out the power supply cord through the hole in the backsheet. 12. Replace the service panel and screws. Save all bolts, washers, spacers, brackets, clamps, and blocks for future - GE WSXH208HWW | Owners Manual - Page 14
Instructions ELECTRICAL REQUIREMENTS Read these instructions replace it with a properly grounded three-prong grounding-type receptacle. BACK 24 in. (61 cm) Min. NOTE: The drain hose attached to the washer can reach a 58″ (147 cm) high standpipe. For a higher standpipe, contact an authorized parts - GE WSXH208HWW | Owners Manual - Page 15
to prevent excessive vibration. The farther out the legs are extended, the more the washer will vibrate. If the floor is not level or is damaged, you may have to extend the rear leveling legs. For undercounter installations, you can adjust the rear legs by removing the front service panel. 15 - GE WSXH208HWW | Owners Manual - Page 16
please review the Before You Call For Service section before calling for service. 14. Place these instructions in a location near the washer for future reference. REPLACEMENT PARTS If replacement parts are needed for your washer, they can be ordered in the United States by visiting our Website at ge - GE WSXH208HWW | Owners Manual - Page 17
Safety Instructions Operating Instructions Installation Instructions Troubleshooting Tips Consumer Support Before you call for service... Troubleshooting Tips Save time and money! Review the charts on the following pages first and you may not need to call for service. WATER Water leaks Too many - GE WSXH208HWW | Owners Manual - Page 18
Consumer Support Troubleshooting Tips Installation Instructions Operating Instructions Safety Instructions Before you call for service... OPERATION Washer pauses in cycle Washer won't operate Possible Causes The washer normally pauses between washing steps Washer is unplugged Water supply is - GE WSXH208HWW | Owners Manual - Page 19
Safety Instructions Operating Instructions Installation Instructions Troubleshooting Tips Consumer Support PERFORMANCE (cont.) Clothes too wet Pilling Grayed or yellowed clothes Possible Causes Load is too small Load is out of balance Result of normal wear on poly-cotton blends and fuzzy fabrics - GE WSXH208HWW | Owners Manual - Page 20
Troubleshooting Tips Installation Instructions Operating Instructions Safety Instructions GE Washer Warranty. (For customers in the United States) All warranty service provided by our Factory Service Centers, or an authorized Customer Care® technician. To schedule service, on-line, visit us at ge - GE WSXH208HWW | Owners Manual - Page 21
Operating Instructions Installation Instructions Troubleshooting Tips Consumer Support GE Washer Warranty. (For customers in Canada) All warranty service provided by our Factory Service Centers or an authorized technician. For service, call 1.800.561.3344. Please have serial number and model number - GE WSXH208HWW | Owners Manual - Page 22
day, any day of the year! For greater convenience and faster service, you can now download Owner's Manuals, order parts, or even schedule service on-line. In Canada: GEAppliances.ca Schedule Service In the U.S.: ge.com Expert GE repair service is only one step away from your door. Get on-line and - GE WSXH208HWW | Owners Manual - Page 23
l'utilisateur & Directives d'installation Modèles des États-Unis : WSXH208 WPXH214 Modèles du Canada : WCXH208 WCXH214 À titre de partenaire ENERGY STAR®, GE a déterminé que ce produit est conforme aux recommandations d'ENERGY STAR® en matière d'économie d'énergie. 175D1807P524 49-90256-1 10-08 JR - GE WSXH208HWW | Owners Manual - Page 24
les risques d'incendie, d'explosion et de chocs électriques et prévenir des dégâts matériels et des blessures graves ou mortelles. Les instructions dans ce manuel et toute autre documentation incluse avec cette laveuse n'ont pas pour but de couvrir toutes les conditions et situations possibles. Il - GE WSXH208HWW | Owners Manual - Page 25
Mesures de sécurité UNE INSTALLATION ADÉQUATE Avant d'utiliser votre laveuse, assurez-vous qu'elle a été adéquatement installée, conformément aux Directives d'installation. ■ Installez ou entreposez la laveuse à l'abri des températures inférieures au point de congélation et des intempéries. ■ - GE WSXH208HWW | Owners Manual - Page 26
Mesures de sécurité Conseils de dépannage Directives d'installation Fonctionnement MESURES DE SÉCURITÉ IMPORTANTES. LISEZ D'ABORD TOUTES LES DIRECTIVES. N'utilisez cet appareil que pour l'usage auquel il est destiné, comme expliqué dans le présent manuel. LORSQUE VOUS UTILISEZ LA LAVEUSE ■ Ne - GE WSXH208HWW | Owners Manual - Page 27
MEDIUM LIGHT WRINKLEFREE PERM PRESS EASY CARE PULL TO START / PUSH TO STOP FINAL SPIN 3 FINAL SPIN QUICK WASH 5 DELICATES KNITS FINAL SPIN WASH PREWASH COTTONS HEAVY MEDIUM LIGHT 1 2 Réglage des commandes. FINAL SPIN DOOR LOCKED PERM PRESS EASY CARE PULL TO START / PUSH TO STOP - GE WSXH208HWW | Owners Manual - Page 28
Mesures de sécurité Conseils de dépannage Directives d'installation Fonctionnement Les caractéristiques de la laveuse. REMARQUE : Toutes les caractéristiques ne sont pas disponibles sur tous les modèles. CYCLE SIGNAL OFF LOUD Cycle Signal (Indicateur de fin de programme) (sur certains modèles) - GE WSXH208HWW | Owners Manual - Page 29
Mesures de sécurité Fonctionnement Directives d'installation Conseils de dépannage Le tiroir-distributeur Ouvrez lentement le tiroir-distributeur en retirant jusqu'à ce qu'il arrête. Après avoir ajouté les produits de lessive, refermez lentement le tiroir-distributeur. Si vous le refermez trop - GE WSXH208HWW | Owners Manual - Page 30
dans ce manuel. Si les pièces nécessaires ne sont pas disponibles, vous pouvez les ordre aux États-Unis en visitant notre site Web ge.com ou appelez au 800.GE.CARES. Au Canada, écrivez au : Directeur, Relations avec les consommateurs, Mabe Canada Inc., 1 Factory Lane, Bureau 310, Moncton, NB E1C 9M3 - GE WSXH208HWW | Owners Manual - Page 31
et d'assouplissant. Remettez le tiroir-distributeur en place et, alors que le panier de lavage est vide, actionnez le programme PREWASH (prélavage) ou QUICK WASH (lavage rapide). 9 Soutien au consommateur - GE WSXH208HWW | Owners Manual - Page 32
Mesures de sécurité Conseils de dépannage Directives d'installation Fonctionnement Chargement et utilisation de la laveuse. Étiquettes d'entretien des tissus Les symboles ci-dessous se trouvent sur les étiquettes d'entretien et ont un effet sur le lavage de vos vêtements. ÉTIQUETTES POUR LE - GE WSXH208HWW | Owners Manual - Page 33
Laveuse Spacemaker Models WCXH208 WCXH214 WSXH208 WPXH214 Si vous avez des questions, appelez le 1.800.561.3344 ou visitez notre site Web à : electromenagersge.ca AVANT DE COMMENCER : Lire attentivement la totalité de ces instructions. • IMPORTANT - Sauvegardez ces instructions pour utilisation - GE WSXH208HWW | Owners Manual - Page 34
de travail Lors de l'installation de la laveuse sous un plan de travail,* on DOIT installer l'ensemble 14-A037 (disponible chez votre détaillant GE). *Plan de travail de taille spéciale nécessaire. Installation dans une maison mobile L'installation doit satisfaire les prescriptions de la norme ANSI - GE WSXH208HWW | Owners Manual - Page 35
de la tôle arrière. 12. Réinstaller le panneau de l'ouverture de service et les vis. Gardez les boulons, les rondelles, les cales d'espacement, les tard nécessaire de déménager la laveuse, il faudra réinstaller les articles de support placés avant l'expédition, pour que la laveuse ne subisse pas de - GE WSXH208HWW | Owners Manual - Page 36
les raccords électriques Lire attentivement la totalité de ces instructions. CIRCUIT - Circuit indépendant de 15 A avec po2 (différence maximale de 10 lb/po2 entre eau chaude et eau froide). Le service local de distribution d'eau peut communiquer la pression de distribution. Régler le chauffe-eau pour - GE WSXH208HWW | Owners Manual - Page 37
Directives d'installation Installation de la laveuse 1. Ouvrir les robinets et laisser l'eau couler, pour qu'elle entraîne tous les débris éventuellement présents qui pourraient obstruer les tamis des raccords d'alimentation de la laveuse. 2. Enlevez du sac en plastique les tuyaux d'arrivée et les - GE WSXH208HWW | Owners Manual - Page 38
. ❏ La machine à laver est branchée. ❏ Les robinets d'eau sont ouverts. ❏ La machine à laver est réparateur. 14. Conserver ce manuel d'instructions en lieu sûr pour consultation ultérieure. aux États-Unis, visitez notre site Web ge.com ou appelez au no 800.GE.CARES. Au Canada, écrivez au Directeur - GE WSXH208HWW | Owners Manual - Page 39
Mesures de sécurité Fonctionnement Directives d'installation Conseils de dépannage Avant d'appeler un réparateur... Conseils de dépannage Économisez du temps et de l'argent! Consultez d'abord les tableaux qui suivent et vous pourrez peut-être éviter de faire appel à un réparateur. EAU Fuites d' - GE WSXH208HWW | Owners Manual - Page 40
par des corps étrangers. Retournez les articles pourvus étrangers dans la cuve ou d'attaches métalliques à l'envers. Appelez le la pompe, ou des attaches service à la clientèle pour faire inspecter la pompe. métalliques frappant la cuve RENDEMENT Charpie ou résidus sur les vêtements 18 Causes - GE WSXH208HWW | Owners Manual - Page 41
Mesures de sécurité Fonctionnement Directives d'installation Conseils de dépannage RENDEMENT (suite) Vêtements trop mouillés Boulochage Vêtements grisâtres ou jaunis Taches de couleur Faux-plis Fils tirés, trous, déchirures, usure excessive Causes possibles Correctifs Brassée trop petite Brass - GE WSXH208HWW | Owners Manual - Page 42
Notes. 20 Soutien au consommateur Conseils de dépannage Directives d'installation Fonctionnement Mesures de sécurité - GE WSXH208HWW | Owners Manual - Page 43
en raison d'un vice de matériaux ou de fabrication. Pendant cette garantie limitée d'un an, GE fournira également, gratuitement, tous les frais de main-d'œuvre et les frais connexes de service pour remplacer la pièce défectueuse. Ce qui n'est pas couvert (au Canada) : ■ Toute visite à votre - GE WSXH208HWW | Owners Manual - Page 44
-nous par Internet au site electromenagersge.ca 24 heures par jour, tous les jours de l'année. Service de réparations Service de réparations GE est tout près de vous. Pour faire réparer votre électroménager GE, il suffit de nous téléphoner. 1.800.561.3344 Studio de conception réaliste Sur demande
-
 1
1 -
 2
2 -
 3
3 -
 4
4 -
 5
5 -
 6
6 -
 7
7 -
8
-
9
-
10
-
11
-
12
-
13
-
14
-
15
-
16
-
17
-
18
-
19
-
20
-
21
-
22
-
23
-
24
-
25
-
26
-
27
-
28
-
29
-
30
-
31
-
32
-
33
-
34
-
35
-
36
-
37
-
38
-
39
-
40
-
41
-
42
-
43
-
44
 |
 |
ge.com
175D1807P524
49-90256-1
10-08 JR
350A4502P294 Rev. 1
134203500
Washers
Safety Instructions
. . . . . . . . . . . . . 2–4
Operating Instructions
Control Panels . . . . . . . . . . . . . . . . . . . . . . . .5
Control Settings
. . . . . . . . . . . . . . . . . . . . . . .5
Fabric Care Labels . . . . . . . . . . . . . . . . . . . .10
Features . . . . . . . . . . . . . . . . . . . . . . . . . . . .6, 7
Loading and Using the Washer . . . . . .8, 9
Installation Instructions
. . . . .11–16
Drain Requirements . . . . . . . . . . . . . . . . . .14
Electrical Requirements . . . . . . . . . . . . . . .14
Installing the Washer
. . . . . . . . . . . . .15, 16
Location of Your Washer
. . . . . . . . . . . . .12
Preparing to Install Your Washer . . . . . .11
Replacement Parts . . . . . . . . . . . . . . . . . . .16
Rough-In Dimensions . . . . . . . . . . . . . . . . .12
Unpacking Your Washer . . . . . . . . . . . . . .13
Water Supply Requirements . . . . . . . . . .14
Troubleshooting Tips
. . . . . . . . .17–19
Consumer Support
Consumer Support . . . . . . . . . . . . . . . . . . . 22
Warranty for Canadian Customers . . . .21
Warranty for U.S. Customers . . . . . . . . . 20
Spacemaker
U.S. Models:
WSXH208
WPXH214
Canada Models:
WCXH208
WCXH214
Owner’s Manual &
Installation Instructions
As an
E
NERGY
S
TAR
®
partner,
GE has determined that this
product meets the
E
NERGY
S
TAR
®
guidelines for energy efficiency.