Gigabyte GA-8I865GVMK Manual - Page 75
Exploring the Q-Flash, utility screen
 |
View all Gigabyte GA-8I865GVMK manuals
Add to My Manuals
Save this manual to your list of manuals |
Page 75 highlights
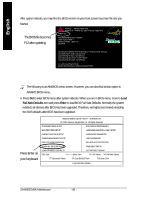
English Exploring the Q-Flash™ utility screen The Q-Flash™ BIOS utility screen consists of the following key components. Task menu for the Q-flash utility Q-Flash Utility V1.30 Flash Type/Size SST 49LF002A Keep DMI DataEnable Update BIOS from Floppy Save BIOS to Floppy The Qflash utility 256K title bar Enter: Run h/i: Move ESC: Reset F10:Power Off Action bar Task menu for the Q-Flash™ utility: Contains the names of three tasks. Blocking a task and pressing Enter key on your keyboard to enable execution of the task. Action bar: Contains the names of four actions needed to operate the Q-Flash™ utility. Pressing the buttons mentioned on your keyboard to perform these actions. Using the Q-Flash™ utility: This section tells you how to update BIOS using the Q-Flash™ utility. As described in the "Before you begin" section above, you must prepare a floppy disk having the BIOS file for your motherboard and insert it to your computer. If you have already put the floppy disk into your system and have enter the Q-Flash™ utility, please follow the steps below to flash BIOS. Steps: 1. Press arrow buttons on your keyboard to move the light bar to "Load Main BIOS from Floppy" item in the Q-Flash™ menu and press Enter button. If you want to save the current BIOS for backup purpose, you can begin Step 1 with Save Main BIOS to Floppy item. Q-Flash Utility V1.30 Flash Type/Size SST 49LF002A 256K Keep DMI DataEnable Update BIOS from Floppy Save BIOS to Floppy Enter: Run h/i: Move ESC: Reset F10:Power Off - 71 - Technical Reference
-
 1
1 -
2
-
3
-
4
-
5
-
6
-
7
-
8
-
9
-
10
-
11
-
12
-
13
-
14
-
15
-
16
-
17
-
18
-
19
-
20
-
21
-
22
-
23
-
24
-
25
-
26
-
27
-
28
-
29
-
30
-
31
-
32
-
33
-
34
-
35
-
36
-
37
-
38
-
39
-
40
-
41
-
42
-
43
-
44
-
45
-
46
-
47
-
48
-
49
-
50
-
51
-
52
-
53
-
54
-
55
-
56
-
57
-
58
-
59
-
60
-
61
-
62
-
63
-
64
-
65
-
66
-
67
-
68
-
69
-
 70
70 -
 71
71 -
 72
72 -
 73
73 -
 74
74 -
 75
75 -
 76
76 -
 77
77 -
 78
78 -
 79
79 -
 80
80 -
81
-
82
-
83
-
84
-
85
-
86
-
87
-
88
-
89
-
90
-
91
-
92
-
93
-
94
-
95
-
96
-
97
-
98
-
99
-
100
-
101
-
102
-
103
-
104
-
105
-
106
-
107
-
108
-
109
-
110
-
111
-
112
 |
 |
