Gigabyte GA-945P-S3 Manual - Page 57
Load Optimized Defaults, Save & Exit Setup - update
 |
View all Gigabyte GA-945P-S3 manuals
Add to My Manuals
Save this manual to your list of manuals |
Page 57 highlights
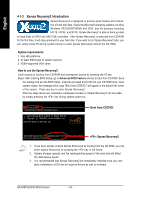
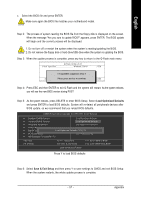
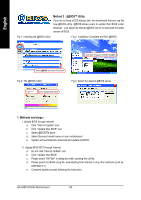
English c. Select the BIOS file and press ENTER. Make sure again the BIOS file matches your motherboard model. Step 2: The process of system reading the BIOS file from the floppy disk is displayed on the screen. When the message "Are you sure to update BIOS?" appears, press ENTER. The BIOS update will begin and the current process will be displayed. 1. Do not turn off or restart the system when the system is reading/updating the BIOS. 2. Do not remove the floppy disk or hard drive/USB drive when the system is updating the BIOS. Step 3: When the update process is complete, press any key to return to the Q-Flash main menu. Q-Flash Utility v2.02 Flash Type/Size Winbond 25X40 512K Enter : Run Keep DMI Data Enable !! CopUypBdaItOeSBcIoOmSpflreotemd D- Priavses !! Save BIOS to Drive Please:Mproevses any kEeySCto:Rceosnettinue F10:Power Off Step 4: Press ESC and then ENTER to exit Q-Flash and the system will restart. As the system reboots, you will see the new BIOS version during POST. Step 5: As the system reboots, press DELETE to enter BIOS Setup. Select Load Optimized Defaults and press ENTER to load BIOS defaults. System will re-detect all peripherals devices after BIOS update, so we recommend that you reload BIOS defaults. CMOS Setup Utility-Copyright (C) 1984-2007 Award Software Standard CMOS Features Load Fail-Safe Defaults Advanced BIOS Features Load Optimized Defaults Integrated Peripherals Set Supervisor Password Power Management Setup Set User Password PnP/PCI Configurations Load Optimized DefaultSs a(vYe/N&)?ENxit Setup PC Health Status Exit Without Saving MB Intelligent Tweaker(M.I.T.) ESC: Quit F8: Q-Flash : Select Item F10: Save & Exit Setup F11: Save CMOS to BIOS F12: Load CMOS from BIOS Load Optimized Defaults Press Y to load BIOS defaults Step 6: Select Save & Exit Setup and then press Y to save settings to CMOS and exit BIOS Setup. When the system restarts, the whole update process is complete. - 57 - Appendix
-
 1
1 -
2
-
3
-
4
-
5
-
6
-
7
-
8
-
9
-
10
-
11
-
12
-
13
-
14
-
15
-
16
-
17
-
18
-
19
-
20
-
21
-
22
-
23
-
24
-
25
-
26
-
27
-
28
-
29
-
30
-
31
-
32
-
33
-
34
-
35
-
36
-
37
-
38
-
39
-
40
-
41
-
42
-
43
-
44
-
45
-
46
-
47
-
48
-
49
-
50
-
51
-
 52
52 -
 53
53 -
 54
54 -
 55
55 -
 56
56 -
 57
57 -
 58
58 -
 59
59 -
 60
60 -
 61
61 -
 62
62 -
63
-
64
-
65
-
66
-
67
-
68
-
69
-
70
-
71
-
72
 |
 |