Gigabyte GA-K8N51GMF User Manual - Page 66
Hard Disk Boot Priority, Advanced BIOS Features, Hard Disk Boot, Priority - 9 rh windows 7
 |
View all Gigabyte GA-K8N51GMF manuals
Add to My Manuals
Save this manual to your list of manuals |
Page 66 highlights
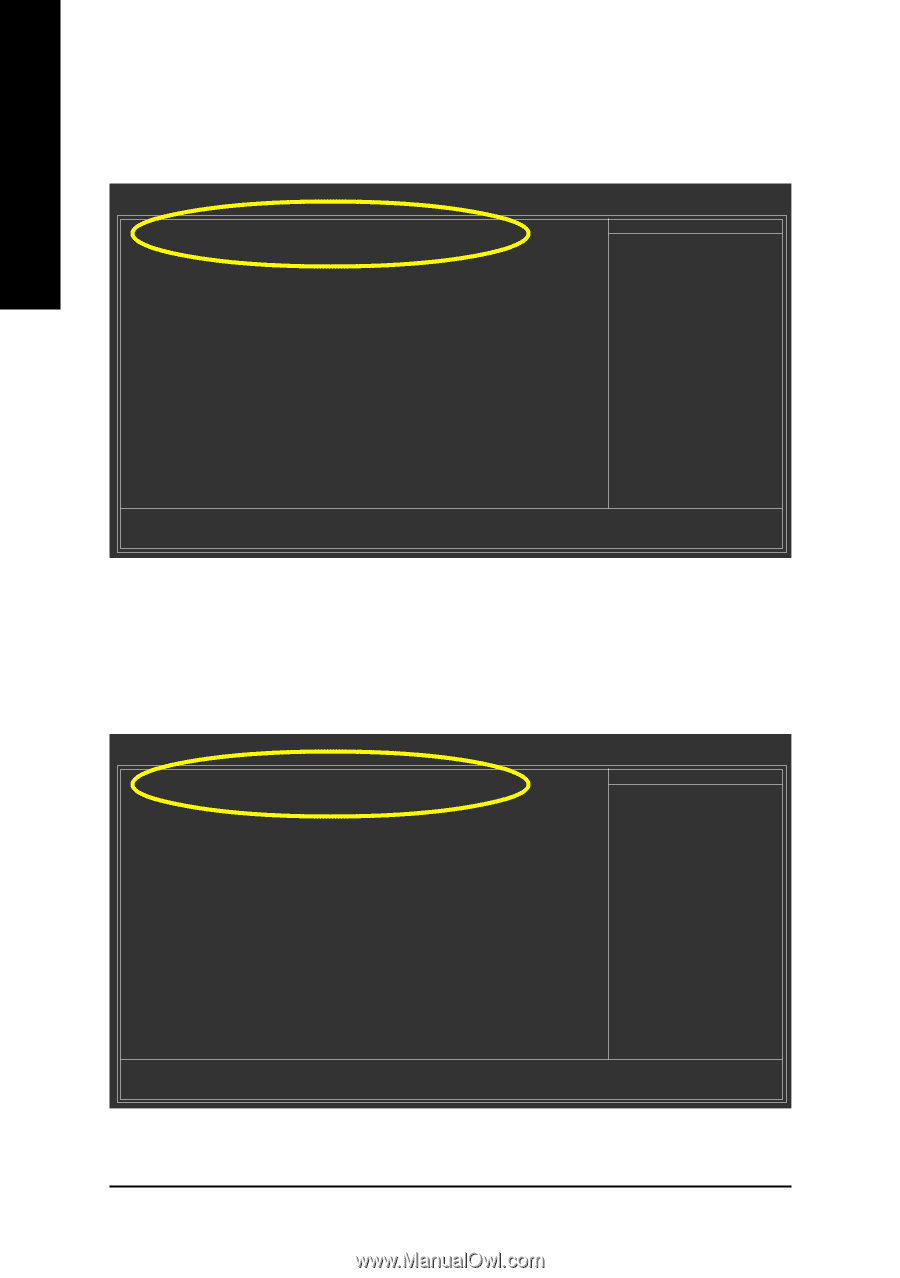
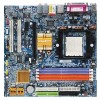
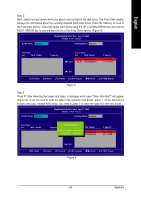
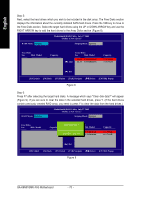
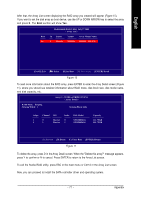
English Step 2: If you do not create RAID, select Hard Disk Boot Priority under the Advanced BIOS Features menu. In the Hard Disk Boot Priority submenu, select the model of the SATA hard drive onto which you wish to install Microsoft Windows 2000/XP. You should see a screen similar to Figure 3 below. CMOS Setup Utility-Copyright (C) 1984-2006 Award Software Hard Disk Boot Priority 1. CH2 M. : 2. CH3 M. : 3. Bootable Add-in Cards ST3120026AS ST3120026AS Item Help Menu Level Use < > or < > to select a device, then press to move it up, or to move it down the list. Press to exit this menu. : Move PU/PD/+/-: Change Priority F10: Save Figure 3 ESC: Exit After configuring the SATA controller mode in system BIOS, if you wish to create RAID, save the settings and exit. Then go to RAID BIOS (refer to page 68) to configure the RAID array. After finished, re-enter the system BIOS Setup to set hard disk boot priority before OS installation. Select Hard Disk Boot Priority under the Advanced BIOS Features menu. In the Hard Disk Boot Priority submenu, select the RAID array onto which you wish to install Microsoft Windows 2000/XP (Figure 4). CMOS Setup Utility-Copyright (C) 1984-2006 Award Software Hard Disk Boot Priority 1. SCSI-0: NVIDIA MIRROR 111.7 2. Bootable Add-in Cards Item Help Menu Level Use < > or < > to select a device, then press to move it up, or to move it down the list. Press to exit this menu. : Move PU/PD/+/-: Change Priority F10: Save Figure 4 GA-K8N51GMF(-RH) Motherboard - 66 - ESC: Exit
-
 1
1 -
2
-
3
-
4
-
5
-
6
-
7
-
8
-
9
-
10
-
11
-
12
-
13
-
14
-
15
-
16
-
17
-
18
-
19
-
20
-
21
-
22
-
23
-
24
-
25
-
26
-
27
-
28
-
29
-
30
-
31
-
32
-
33
-
34
-
35
-
36
-
37
-
38
-
39
-
40
-
41
-
42
-
43
-
44
-
45
-
46
-
47
-
48
-
49
-
50
-
51
-
52
-
53
-
54
-
55
-
56
-
57
-
58
-
59
-
60
-
 61
61 -
 62
62 -
 63
63 -
 64
64 -
 65
65 -
 66
66 -
 67
67 -
 68
68 -
 69
69 -
 70
70 -
 71
71 -
72
-
73
-
74
-
75
-
76
-
77
-
78
-
79
-
80
-
81
-
82
-
83
-
84
-
85
-
86
-
87
-
88
 |
 |