Gigabyte GV-R485OC-1GH Manual
Gigabyte GV-R485OC-1GH Manual
 |
UPC - 818313006301
View all Gigabyte GV-R485OC-1GH manuals
Add to My Manuals
Save this manual to your list of manuals |
Gigabyte GV-R485OC-1GH manual content summary:
- Gigabyte GV-R485OC-1GH | Manual - Page 1
GV-R485ZL-512H/ GV-R485MC-1GH/ GV-R485OC-1GH/ GV-R485SO-1GH ATI RadeonTM HD 4850 Graphics Accelerator User's Manual Rev. 102 12MM-R4850S-102R Copyright © 2009 GIGABYTE TECHNOLOGY CO., LTD Copyright by GIGA-BYTE TECHNOLOGY CO., LTD. ("GBT"). No part of this manual may be reproduced or transmitted in - Gigabyte GV-R485OC-1GH | Manual - Page 2
VGA Card GV-R485ZL-512H/GV-R485MC-1GH/GV-R485OC-1GH Aug. 12, 2008 VGA Card GV-R485ZL-512H/GV-R485MC-1GH/ GV-R485OC-1GH Aug. 12, 2008 - Gigabyte GV-R485OC-1GH | Manual - Page 3
VGA Card GV-R485SO-1GH Aug. 30, 2009 VGA Card GV-R485SO-1GH Aug. 30, 2009 - Gigabyte GV-R485OC-1GH | Manual - Page 4
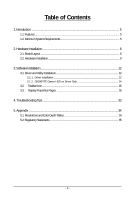
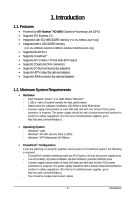
Hardware Installation ...9 3. Software Installation 12 3.1. Driver and Utility Installation 12 3.1.1. Driver Installation ...12 3.1.2. GIGABYTE Gamer HUD on Driver Disk 14 3.2. Taskbar Icon ...16 3.3. Display Properties Pages 18 4. Troubleshooting Tips 33 5. Appendix ...34 5.1. Resolutions and - Gigabyte GV-R485OC-1GH | Manual - Page 5
with two PCI Express x16 slots and correct chipset driver - Two GV-R485ZL-512H/GV-R485MC-1GH/GV-R485OC-1GH/GV-R485SO-1GH - A power supply that provides at least 550-watt and with two 2x3-pin PCIe power connectors is required. The power supply should be with a known brand and certified to conform - Gigabyte GV-R485OC-1GH | Manual - Page 6
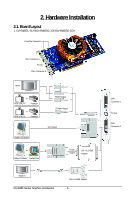
2. Hardware Installation 2.1. Board Layout 1. GV-R485ZL-512H/GV-R485OC-1GH/GV-R485SO-1GH CrossFire Connector DVI-I Connector 1 TV-Out DVI-I Connector 2 HDTV or NTSC / PAL TV Projector or NTSC / PAL TV Projector Digital LCD Monitor Y Pr Pb/AV Output S- - Gigabyte GV-R485OC-1GH | Manual - Page 7
2. GV-R485MC-1GH CrossFire Connector DVI-I Connector 1 TV-Out DVI-I Connector 2 HDTV or NTSC / PAL TV Projector or NTSC / PAL TV Projector Digital LCD Monitor Y Pr Pb/AV Output S- - Gigabyte GV-R485OC-1GH | Manual - Page 8
Radeon HD 4800 series support such as the power supply case. 3. POWER TO YOUR SYSTEM IF THE GRAPHICS CARD IS DAMAGED. In order to ensure that your graphics card can work correctly, please use official GIGABYTE BIOS only. Using non-official GIGABYTE BIOS might cause problem(s) on the graphics card. GV - Gigabyte GV-R485OC-1GH | Manual - Page 9
cover. After installation, remember to connect the power cable to your graphics card, or the system DVI-I digital connectors. You can connect a monitor that supports DVI-I function or use the DVI-I to D-Sub driver. Please refer to next chapter for detailed instructions. - 9 - Hardware Installation - Gigabyte GV-R485OC-1GH | Manual - Page 10
GIGABYTE Video Adapter (Optional) AV Out S-Video Out Connect to the TV-Out port on the graphics card. HDTV Component (Y+Pr+Pb) (1) has a Composite video connection, you can connect the RCA cable from your TV to the AV Out port on the adapter. GV-R485 Series Graphics Accelerator - 10 - - Gigabyte GV-R485OC-1GH | Manual - Page 11
-supported motherboard and connect the graphics cards via two CrossFire bridge interconnect cables (Figure 1). Then users can enable the CrossFireX technology through the graphics card driver. Two CrossFire bridge interconnect cables. Two CrossFire graphics cards of the same type. (Example: GV - Gigabyte GV-R485OC-1GH | Manual - Page 12
.exe program.) Step 1: Click the Install Display Driver item. Step 3: Click the Install button. Step 2: Select the displayed language and then click Next. For software MPEG support in Windows XP, you must install DirectX first. Users who run Windows XP with Service Pack 2 or above do not need to - Gigabyte GV-R485OC-1GH | Manual - Page 13
Setp 4: Click the Express or Custom icon and then click Next. Step 5: Click the Accept button. The system is installing the components. Step 6: Click the Finish button to restart the computer. Then the driver installation is completed. - 13 - Software Installation - Gigabyte GV-R485OC-1GH | Manual - Page 14
Gamer HUD on Driver Disk Step 1: Click the GIGABYTE Gamer HUD item. Step 2: Choose the language for the installation and click the installing the components. Step 5: Click the Finish button. Then the installation of the GIGABYTE Gamer HUD is completed. GV-R485 Series Graphics Accelerator - 14 - - Gigabyte GV-R485OC-1GH | Manual - Page 15
Gamer HUD The GIGABYTE Gamer HUD allows you to adjust the voltage of your graphics card and the current operating frequency Automatically optimizes the voltage/frequency Adjusts Power PWM working frequency Enables manual adjustment of the voltage/frequency Clock adjustment (Note) Hardware - Gigabyte GV-R485OC-1GH | Manual - Page 16
3.2. Taskbar Icon After installation of the display driver, you will find an ATI icon in the notification area. Right-click the icon to enter the ATI Catalyst Control Center. Or you can right-click on the desktop and select Catalyst(TM) Control Center. GV-R485 Series Graphics Accelerator - 16 - - Gigabyte GV-R485OC-1GH | Manual - Page 17
Configuring Audio Output Configure the default audio output device based upon your needs. Step 1: Go to Start > Control Panel > Hardware and Sound > Manage audio devices. Figure 1 Figure 2 Figure 3 Step 2: In the Manage audio devices dialog box, click the Playback tab. Using the picture to the - Gigabyte GV-R485OC-1GH | Manual - Page 18
change the resolution. You can click the item to change the color quality. Click the Advanced button for advanced settings. Display Model GV-R485ZL-512H GV-R485MC-1GH GV-R485OC-1GH GV-R485SO-1GH Matrix CRT+TV (Note 1) Yes Yes Yes Yes CRT+DVI Yes Yes Yes Yes CRT+CRT Yes Yes Yes Yes - Gigabyte GV-R485OC-1GH | Manual - Page 19
ATI Catalyst® Control Center Basic View : The Basic View is the default view when ATI Catalyst Control Center is launched for the first time. This interface provides access to the basic settings and advanced features of your ATI graphics products. You can switch between Basic View and Advanced View - Gigabyte GV-R485OC-1GH | Manual - Page 20
configure display setting for desktop viewing. „ HydraVision Configuration Settings This wizard will take you to set up the HydraVision Configuration based on your own preference. GV-R485 Series Graphics Accelerator - 20 - - Gigabyte GV-R485OC-1GH | Manual - Page 21
and Advanced View provides hardware and software information about the installed graphics card. „ Graphics Software Provides software information including driver version, CATALYST version, Direct 3D version and so on. „ Graphics Hardware Provides hardware information including graphics chipset - Gigabyte GV-R485OC-1GH | Manual - Page 22
many available settings of your ATI graphics card. View Properties: The CATALYST Control Center dashboard supports three types of views: Basic View/ Advanced View/ Custom View. „ Basic View The Ctrl, Alt, or Shift, and any letter from the alphabet. GV-R485 Series Graphics Accelerator - 22 - - Gigabyte GV-R485OC-1GH | Manual - Page 23
create customized environments for your desktop, video, and 3D applications. Define and save your own personal video settings that can be quickly activated manually, through a Hotkey, or by file association. Note: A profile applies to a specific graphics card. If there is more than one graphics card - Gigabyte GV-R485OC-1GH | Manual - Page 24
Catalyst Control Center Help feature allows you to access the comprehensive online help, register your product, or generate a problem report should you require technical support. The Catalyst Control Center Help feature offers the following options: „ Help for this Page „ Help Contents ... „ Go to - Gigabyte GV-R485OC-1GH | Manual - Page 25
setup, arrange your desktop in a multi-monitor environment, and enable TV Out. Note: The stretch vertically and horizontally options are not supported on systems running Windows Vista. Display Options: The Display Options aspect gives you additional control to optimize performance of OpenGL and - Gigabyte GV-R485OC-1GH | Manual - Page 26
's display screen. You can also adjust the horizontal and vertical sync or enable composite sync. „ AvivoTM Color Use AvivoTM Color for ATI graphics cards that support per-display color settings. Independently set the hue, saturation, and temperature for each attached and enabled display - Gigabyte GV-R485OC-1GH | Manual - Page 27
that rapidly configures your application. „ Anti-Aliasing Anti-Aliasing (AA) is a rendering technique designed to remove jagged edges, shimmering, and pixelation problems that are common in rendered 3D images. Rather than determining the color to display for each pixel by sampling a single location - Gigabyte GV-R485OC-1GH | Manual - Page 28
or even improving image quality. It analyzes individual textures as they are loaded to determine the best and fastest way to display them. GV-R485 Series Graphics Accelerator „ Mipmap Detail Level Mipmapping is a texturing technique that preserves the detail on a 3D object's surface as it moves - Gigabyte GV-R485OC-1GH | Manual - Page 29
, consult the documentation of your 3D application. Note: The Alternate Pixel center Direct 3D setting is not supported on systems running Windows Vista. This setting corrected a corruption problem that occurred with some older games that should not occur with modern games. Color: Adjust the overall - Gigabyte GV-R485OC-1GH | Manual - Page 30
video settings choose one of the video presets. Note: These settings will only affect applications with video overlay support. „ Basic Color Use the Avivo Color: Basic option to manually set Gamma, Brightness, Contrast, Saturation, and Tint for video playback. Note: Certain video formats do not - Gigabyte GV-R485OC-1GH | Manual - Page 31
Use Theater Mode to change the way you view streaming video. Note: • These settings will only affect applications with video overlay support. Extended Desktop Mode is not supported on systems running Windows Vista. • This item will be available when you connect two monitors. „ All Settings The All - Gigabyte GV-R485OC-1GH | Manual - Page 32
memory clock. Alternatively, manually set these speeds to meet power of two or more Graphics Processing Units (GPUs). „ Configure When an ATI CrossFireX configuration is detected for the first time by the ATI Catalyst display driver, ATI CrossFireX support GV-R485 Series Graphics Accelerator - 32 - - Gigabyte GV-R485OC-1GH | Manual - Page 33
receiving power. „ If necessary, disable any built-in graphics capabilities on your motherboard. For more information, consult your computer's manual or Manager check whether the driver for the graphics card is correct. „ For more assistance, use the Troubleshooting Guide located in the Windows - Gigabyte GV-R485OC-1GH | Manual - Page 34
x 1080 1920 x 1200 1920 x 1400 2048 x 1536 RadeonTM HD 4800 Series 2D Single Display Modes Refresh Color Depth (bpp) Rate 3 3 3 3 3 3 3 3 3 3 3 3 * The tables are for reference only. The actual resolutions supported depend on the monitor you use. GV-R485 Series Graphics Accelerator - 34 - - Gigabyte GV-R485OC-1GH | Manual - Page 35
" product. Restriction of Hazardous Substances (RoHS) Directive Statement GIGABYTE products have not intended to add and safe from hazardous government office, your household waste disposal service or where you purchased the product manual and we will be glad to help you with your effort. - Gigabyte GV-R485OC-1GH | Manual - Page 36
that potentially hazardous substances are not released into the environment and are disposed of properly. China Restriction of Hazardous Substances Table The following table is supplied in compliance with China's Restriction of Hazardous Substances (China RoHS) requirements
-
 1
1 -
 2
2 -
 3
3 -
 4
4 -
 5
5 -
 6
6 -
 7
7 -
8
-
9
-
10
-
11
-
12
-
13
-
14
-
15
-
16
-
17
-
18
-
19
-
20
-
21
-
22
-
23
-
24
-
25
-
26
-
27
-
28
-
29
-
30
-
31
-
32
-
33
-
34
-
35
-
36
 |
 |

GV-R485ZL-512H/
GV-R485MC-1GH/
GV-R485OC-1GH/
GV-R485SO-1GH
ATI Radeon
TM
HD 4850 Graphics Accelerator
User's Manual
Rev. 102
12MM-R4850S-102R
Copyright
© 2009 GIGABYTE TECHNOLOGY CO., LTD
Copyright by
GIGA-BYTE TECHNOLOGY CO., LTD. ("GBT")
. No part of this manual may
be reproduced or transmitted
in any form without the expressed, written permission of
GBT
.
Trademarks
Third-party brands and names are the properties of their respective owners.
Notice
Please do not remove any labels on this graphics card. Doing so may void the warranty of this card.
Due to rapid change in technology, some of the specifications might be out of date before publication of this this manual.
The author assumes no responsibility for any errors or omissions that may appear in this document nor does the author
make a commitment to update the information contained herein.
Macrovision corporation product notice:
This product incorporates copyright protection technology that is protected by U.S. patents and other intellectual property rights.
Use of this copyright protection technology must be authorized by Rovi Corporation, and is intended for home and other limited
viewing uses only unless otherwise authorized by Rovi Corporation.
Reverse engineering or disassembly is prohibited.