Gigabyte GV-R485OC-1GH Manual - Page 9
Hardware Installation - graphic card
 |
UPC - 818313006301
View all Gigabyte GV-R485OC-1GH manuals
Add to My Manuals
Save this manual to your list of manuals |
Page 9 highlights
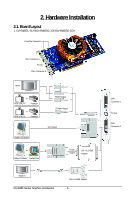
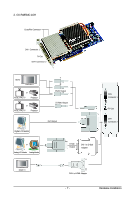
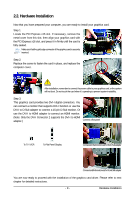
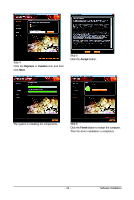
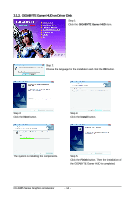
2.2. Hardware Installation Now that you have prepared your computer, you are ready to install your graphics card. Step 1. Locate the PCI Express x16 slot. If necessary, remove the metal cover from this slot; then align your graphics card with the PCI Express x16 slot, and press it in firmly until the card is fully seated. Make sure that the gold edge connector of the graphics card is securely inserted. Step 2. Replace the screw to fasten the card in place, and replace the computer cover. After installation, remember to connect the power cable to your graphics card, or the system will not boot. Do not touch the card when it's operating to prevent system instability. Step 3. This graphics card provides two DVI-I digital connectors. You can connect a monitor that supports DVI-I function or use the DVI-I to D-Sub adapter to connect a 15-pin D-Sub monitor. Or use the DVI-I to HDMI adapter to connect an HDMI monitor. (Note: Only the DVI-I Connector 2 supports the DVI-I to HDMI adapter.) Connect a flat panel To TV / VCR To Flat Panel Display Connect a D-Sub monitor via DVI-I to D-Sub adapter Connect a HDMI monitor via DVI-I to HDMI adapter You are now ready to proceed with the installation of the graphics card driver. Please refer to next chapter for detailed instructions. - 9 - Hardware Installation
-
 1
1 -
2
-
3
-
 4
4 -
 5
5 -
 6
6 -
 7
7 -
 8
8 -
 9
9 -
 10
10 -
 11
11 -
 12
12 -
 13
13 -
 14
14 -
15
-
16
-
17
-
18
-
19
-
20
-
21
-
22
-
23
-
24
-
25
-
26
-
27
-
28
-
29
-
30
-
31
-
32
-
33
-
34
-
35
-
36
 |
 |
