Gigabyte Z390 AORUS MASTER G2 Edition Audio Setup Guide
Gigabyte Z390 AORUS MASTER G2 Edition Manual
 |
View all Gigabyte Z390 AORUS MASTER G2 Edition manuals
Add to My Manuals
Save this manual to your list of manuals |
Gigabyte Z390 AORUS MASTER G2 Edition manual content summary:
- Gigabyte Z390 AORUS MASTER G2 Edition | Audio Setup Guide - Page 1
Table of Contents Configuring Audio Input and Output 2 1-1 Configuring 2/4/5.1/7.1-Channel Audio 2 1-2 Configuring S/PDIF Out 4 1-3 Stereo Mix...5 1-4 Using the Voice Recorder 6 - 1 - - Gigabyte Z390 AORUS MASTER G2 Edition | Audio Setup Guide - Page 2
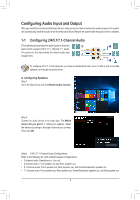
from Microsoft Store. Restart the system after the audio driver is installed. 1-1 Configuring 2/4/5.1/7.1-Channel Audio The motherboard provides five audio jacks on the back panel which support 2/4/5.1/7.1-channel (Note) audio. The picture to the right shows the default audio jack assignments - Gigabyte Z390 AORUS MASTER G2 Edition | Audio Setup Guide - Page 3
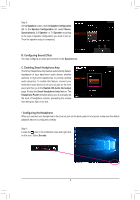
and then go to the Realtek HD Audio 2nd output page. Enable the Smart Headphone Amp feature. The Headphone Power list below allows you to manually set the level of headphone volume, preventing the volume from being too high or too low. * Configuring the Headphone When you connect your headphone to - Gigabyte Z390 AORUS MASTER G2 Edition | Audio Setup Guide - Page 4
Step 2: On the Playback tab, make sure your headphone is set as the default playback device. For the device connected to the Line out jack on the back panel, right-click on Speakers and select Set as Default Device; for the device connected to the Line out jack on the front panel, right-click on - Gigabyte Z390 AORUS MASTER G2 Edition | Audio Setup Guide - Page 5
1-3 Stereo Mix The following steps explain how to enable Stereo Mix (which may be needed when you want to record sound from your computer). Step 1: Locate the icon in the notification area and right-click on this icon. Select Sounds. Step 2: On the Recording tab, right-click on Stereo Mix item and - Gigabyte Z390 AORUS MASTER G2 Edition | Audio Setup Guide - Page 6
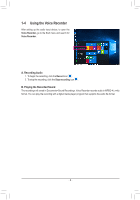
will saved in Documents>Sound Recordings. Voice Recorder records audio in MPEG-4 (.m4a) format. You can play the recording with a digital media player program that supports the audio file format. - 6 -
-
 1
1 -
 2
2 -
 3
3 -
 4
4 -
 5
5 -
 6
6
 |
 |

- 1 -
Table of Contents
Configuring Audio Input and Output
................................................................................
2
1-1
Configuring 2/4/5.1/7.1-Channel Audio
...............................................................
2
1-2
Configuring S/PDIF Out
......................................................................................
4
1-3
Stereo Mix
...........................................................................................................
5
1-4
Using the Voice Recorder
...................................................................................
6