Graco 3G00TAN Owners Manual
Graco 3G00TAN - Easy Chair High Tango Manual
 |
UPC - 047406090792
View all Graco 3G00TAN manuals
Add to My Manuals
Save this manual to your list of manuals |
Graco 3G00TAN manual content summary:
- Graco 3G00TAN | Owners Manual - Page 1
OWNER'S MANUAL MANUEL D'UTILISATEUR MANUAL DEL PROPIETARIO ©2003 Graco ISPH001AC 05/03 - Graco 3G00TAN | Owners Manual - Page 2
follow these warnings and the assembly instructions could result in serious injury or death. • PLEASE SAVE OWNER'S MANUAL FOR FUTURE USE. • ADULT ASSEMBLY . • FOLLOW ASSEMBLY INSTRUCTIONS CAREFULLY. If you experience any difficulties, please contact the Customer Service Department. • DISCONTINUE - Graco 3G00TAN | Owners Manual - Page 3
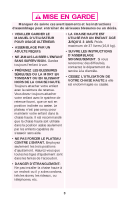
maximum de 37 livres (16,8 kg). ADULTE REQUIS. • SUIVRE LES INSTRUCTIONS • NE JAMAIS LAISSER L'ENFANT SANS SUPERVISION. Gardez toujours l'enfant à vue rencontrez des difficultés, contactez le département du • PRÉVENEZ LES BLESSURES service à la clientèle. SÉRIEUSES OU LA MORT EN TOMBANT OU EN - Graco 3G00TAN | Owners Manual - Page 4
Si no se obedecen estas advertencias y se siguen las instrucciones de montaje, podría resultar en lesiones graves o la muerte. • POR FAVOR, CONSERVELO EL MANUEL DEL PROPIETARIO PARA UTILIZARLO EN EL FUTURO. • SE REQUIERE MONTAJE POR UN ADULTO. • NUNCA DEJE A SU NIÑO DESATENDIDO. Siempre tenga su ni - Graco 3G00TAN | Owners Manual - Page 5
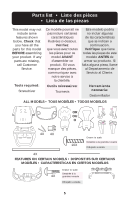
certaines caractéristiques illustrées ci-dessous. Vérifiez que vous avez toutes les pièces pour ce model AVANT d'assembler ce produit. S'il vous manque des pièces, communiquez avec notre service à la clientèle. Este modelo podría no incluir algunas de las características que se indican a continuaci - Graco 3G00TAN | Owners Manual - Page 6
Assembly • Assemblage • Montaje 1 2 Once connected, flip two pieces over, and insert rod through seat hinge. 2 1 4 3 Une fois connecté, tournez les deux pièces l'autre côté, et insérrez la tige à travers la charnière du siège. Una vez conectado, de vuelta las dos piezas y pase la varilla por - Graco 3G00TAN | Owners Manual - Page 7
Front Leg Connectors • Connecteurs de tube avant • Conectadores de la patas delanteras Front leg connector Connecteurs de tube avant Conectadores de la patas delanteras 6X 2 3 Track Trace Riel With number showing on top of front leg connector, insert connector into track. Secure with screws. Repeat - Graco 3G00TAN | Owners Manual - Page 8
Rear Leg Connectors • Connecteurs de tube arrière • Conectadores de las patas traseras 4X 4 5 1 Attach rear leg connectors into the appropriately numbered slots on the seat bottom. Secure with screws. Attachez les connecteurs de tube arrière dans la fente numéroté approprié sur le bas du siège. - Graco 3G00TAN | Owners Manual - Page 9
To Attach Legs • Fixer les pieds • Colocación de las patas 4X 4X 4X 6 The button MUST pop out of the hole in the leg tube as shown. Le bouton DOIT ressortir du trou dans le tube du pied de base tel qu'illustré. El botón DEBE saltar del agujero en el tubo de la pata como se indica. SNAP! - Graco 3G00TAN | Owners Manual - Page 10
8 SNAP! ENCLENCHEZ! ¡CHASQUIDO! Align button on leg with notch in leg connector. CHECK that the legs are properly attached by twisting them in the housings. Alignez le bouton sur le tube avec l'encoche dans le connecteur de tube. VÉRIFIEZ que les pieds sont fixés correctement en les faisant pivoter - Graco 3G00TAN | Owners Manual - Page 11
Attaching Seat Pad • Fixer le coussin du siège • Conexión de la almohadilla del asiento Styles may vary. Modèles peuvent varier. Los estilos pueden variar. 9 10 Pull harness buckle and harness straps through the slots in the seat pad. Tirez la boucle à harnais et les courroies d'harnais aux travers - Graco 3G00TAN | Owners Manual - Page 12
11 Insert seat pad tabs through the slots in seat, and secure on hooks on back of foot rest. Insérrez les pattes de la housse du siège à travers les fentes du siège, et attachez les crochets à l'endos du 12 repose-pied. Pase las lengüetas del almohadón del asiento a través de las ranuras del - Graco 3G00TAN | Owners Manual - Page 13
14 Pull harness buckle and harness straps through the slots in the seat pad. Tirez la boucle à harnais et les courroies d'harnais aux travers des fentes dans la housse du siège. Tire el bucle del arnés y las correas del arnés a través de las ranuras en el almohadón del asiento. 15 Insert seat - Graco 3G00TAN | Owners Manual - Page 14
To Assemble Accessory Tray • Assemblage le plateau accessoire • Para montaje la bandeja de accesorios Flip tray over and screw in four shoulder screws. Tighten screws until 4X only the smooth portion of thread is showing. Align the accessory tray as shown, and slide back. 17 Tournez le - Graco 3G00TAN | Owners Manual - Page 15
To Use Tray • Utiliser le plateau • Para usar la bandeja 20 Squeeze release levers on each side of tray, place tray on seat, and snap into side tray locks. Pincez les leviers de relâchement sur chaque côté du plateau, placez le plateau sur le siège, et enclenchez dans les loquets à plateau sur - Graco 3G00TAN | Owners Manual - Page 16
To Secure Child • Pour attacher l'enfant • Para asegurar el niño 22 23 24 To remove the seat belt, follow steps 24 and 25. To rethread buckle, reverse steps. CHECK by pulling on seat belt. Belt should not slip. Pour enlever la ceinture de retenue, suivre les étapes 24 et 25. 25 Pour enfiler - Graco 3G00TAN | Owners Manual - Page 17
Assembling Toy Bar (certain models) • Assemblage du barre de jouets (certains modèles) • Armado de la barra de juegos (ciertos modelos) 26 27 28 29 30 17 - Graco 3G00TAN | Owners Manual - Page 18
Maintenance • FROM TIME TO TIME CHECK YOUR HIGHCHAIR for worn parts, torn vinyl or stitching. Replace or repair the parts as needed. Use only Graco replacement parts. • TO CLEAN HIGHCHAIR FRAME, use only household soap and warm water. NO BLEACH or detergent. • TO CLEAN REMOVABLE SEAT COVER use only - Graco 3G00TAN | Owners Manual - Page 19
Graco, we make innovative, high quality products for babies the product has been assembled and maintained per the instructions. This warranty does not cover abuse, accident, Services, Graco Children's Products, 150 Oaklands Boulevard, Exton, PA 19341. Canada: Please e-mail us at: service@graco - Graco 3G00TAN | Owners Manual - Page 20
que si le produit a été assemblé et entretenu d'après les instructions. Cette garantie ne couvre pas l'abus, accident,ou des problèmes écrivez au Service à la Clientèle, Produits pour Enfants Graco, 150 Boulevard Oaklands, Exton, PA 19341. Canada : Par courriel électronique: [email protected], par - Graco 3G00TAN | Owners Manual - Page 21
material o mano de obra. Para obtener servicio bajo la garantía oinformación para pedir repuestos: EE.UU. : Por favor, llame al 1-800-345-4109, o escriba a Consumer Services, Graco Children's Products,150 Oaklands Boulevard, Exton, PA 19341. Canadá: Por favor, envíenos un mensaje electrónico - Graco 3G00TAN | Owners Manual - Page 22
form to ensure proper modelo DEBE incluirse en este replacement parts. Your model formulario para asegurar las piezas number can be found on the de Customer Service Department Devuélvase con pago a: 150 Oaklands Blvd. GRACO Children's Products Inc. Exton, PA 19341 Customer Service Department - Graco 3G00TAN | Owners Manual - Page 23
plástico recubierto $12.00 $12.00 $12.00 12 13 14 $2.50 (1) / $5.00 (4) no charge sin costo no charge sin costo Features on certain models • Características en ciertos modelos 15 $7.00 23 - Graco 3G00TAN | Owners Manual - Page 24
Must be filled in: Debe completarse: Model No. N° de modelo Serial No. N° de serie Total • 5.75%, PA 6%, SC 5% Check or money order enclosed (payable to Graco Children's Products Inc.) Cheque o giro adjunto (a nombre de Graco Children's Products Inc.) Charge to credit card • Cargar a la tarjeta de
-
 1
1 -
 2
2 -
 3
3 -
 4
4 -
 5
5 -
 6
6 -
 7
7 -
8
-
9
-
10
-
11
-
12
-
13
-
14
-
15
-
16
-
17
-
18
-
19
-
20
-
21
-
22
-
23
-
24
 |
 |

OWNER'S MANUAL
MANUEL D'UTILISATEUR
MANUAL DEL PROPIETARIO
©2003 Graco
ISPH001AC
05/03