Haier AB142FCBIA User Manual - Page 9
Maintenance, Installation Procedures - washer
 |
View all Haier AB142FCBIA manuals
Add to My Manuals
Save this manual to your list of manuals |
Page 9 highlights
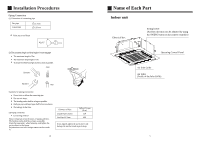
Maintenance Clean the unit Turn off the power supply switch Do not touch with wet hand. Do not use hot water or volatile liquid ON OFF Button the 2 fixing fastener as shown in the figure by arrow , till the air inlet grille be pulled off. Button fixing fastener lock parts portal lock parts Outward drawable filter take down the air inlet grille lockhole lug two corners of the filter Lug two corners of the filter at the same time,pull off the filter. fixing fastener Filter rim Clean the air filter Clean the air filter with water or vacuum cleaner. Use the detergent or neutral soapy water if the air filter is too dirty. Then rinse the air filter with water,and reinstall after drying. Caution: Do not clean the air filter with hot water over 40 C, otherwise may damage the filter. Sweep the filter carefully. Clean indoor unit Clean with hot wet cloth and neutral detergent, then wipe with dry cloth.Do not use too hot water (over 40 C) which may result in fading and deforming. Do not use insecticide and chemical washing agent. 8 Installation Procedures (3) Install a suspending bolt To support the unit weight ,anchor bolt should be used in the case of already exists ceiling. Fow new ceiling, use flush-in type bolt, built-in type bolt or parts pretared in the field. Before going on installing, adjust space to ceiling. Roof Anchor bolt Long nut or thread Suspending bilt M10 50 ~150mm Ceiling Note: All the above mentioned parts shall be prepared in feild, the diameter of suspending bolt is M10 3. Installation of indoor unit In case of no ceiling Install unit temporally Put suspending bracket on the suspending bolt to hang the unit up. Be sure to use nut and washer at both end of the breaket to secure firmly. After installation on the ceiling (1) Adjust unit to its right position (Refer to preparation for installation-(1)) (2)Check that unit is horzontal. Water pump and floating switch is installed inside indoor unit,check four corners of the unit for its lever using horizontal comparator or PVC tube with water.(If unit is tilting against the direction of water drainage,problem may occur on floating water leakage.) Nut (Prepare in feild) In the case of ceiling already exists Washer (Prepared in feild) (1)Install unit temporally Put suspending bracket on the suspending bolt to hang the unit up.Be sure to use nut and washer at both end of the bracket to secure it firmly. (2)Adjust the height and position of the unit. (3)Proceed with procedure (4) of " In the case of no ceiling " Suspending bolts Fasten (double nuts) leveler Polythene pipe 13 Insert Washer fixing pad (prepared in feild) [ secure the washer firmly]
-
 1
1 -
2
-
3
-
 4
4 -
 5
5 -
 6
6 -
 7
7 -
 8
8 -
 9
9 -
 10
10 -
 11
11
 |
 |
