Haier BS1008A User Manual - Page 6
Instal, lation, Maintenance
 |
View all Haier BS1008A manuals
Add to My Manuals
Save this manual to your list of manuals |
Page 6 highlights
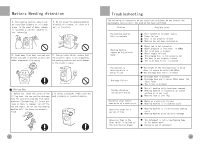
Instal lation •Remove al l the packing materials to prevent vibration during use. Upon opening of the package, water drops may be seen on the plastic bag and the porthole. This is normal phenomenon resulting from water test in the factory. *Check attachments and materials with reference to the fol lowing, as shown in Fig 1. Qty Name Service manual Mode Qual ity certificate Inlet hose assembly Drainage hose holder Anti-splash plug BS808A 1 1 1 1 3 4 1141 n : ;ut7icate Drainage hoee hold., -. *.. Arrti-aplash s.... Inlet noolsm: aesenbly Fig. 1 *Dismantle the packing bolts as shown in Fig. 2. The packing bolts are designed for clamping antivibration components inside of the washing machine during the transportation process. Before use: 1. Remove the back plate; 2. Remove the three packing bolts on the back plate and take out the rubber hose; 3. Replace the back plate; 4. Fi l l the holes left by the packing bolts with plastic plugs. : -i. r= 5ii, i ' \NI I sii ., l:2i...t.-4 Q4 (Attention: The packing bolts and rubber hose should be kept in a safe place for later use) Fig. 2 • Adjusting the washing machine There are adjustable feet under the bottom of the washing machine. Before use, the washing machine should be adjusted, as shown in Fig. 3, so that it is level. 44 ' ' 0 , Fig. 3 4 Maintenance 1. Turn off the water tap and pul l out electricity plug after each wash. Open the porthole to prevent formation of moisture and odors. If the washing machine is left idle for a long period, drain the water in the machine and replace the drainage hose. e g C li 2. Unplug the machine during cleaning and maintenance. Use a soft cloth dampened with soap l iquid to clean the machine case and rubber components. Do not use organic chemicals or corrosive solvents. A8 • . () = III 3. Clean the detergent distribution drawer regularly. Swing out the drawer, flush it clean with water and then replace it. ,," V 4. Clean the fi lter (once a month) 1) Pul l out the bottom cover with both hands (as shown in Fig.2); 2) Remove the fi lter by turning counterclockwise (as shown in Fig.3); 3) Flush clean with running water; 4) Replace the fi lter by turning clockwise and remount the cover. Note: To ensure the bottom cover in place during transportation, it fits tightly with the body. Use a flat screwdriver to l ightly loosen the cover first for the first removals (as shown in Fig.4) and then remove it with the hands (as shown in Fig.5). -- N L' l -----.15--: gn, Fig. 1 Fig. 2 Fig. 3 1NS /P L4Lj Fig. 4 Fig. 5 13
-
 1
1 -
 2
2 -
 3
3 -
 4
4 -
 5
5 -
 6
6 -
 7
7 -
 8
8 -
 9
9 -
 10
10
 |
 |
