Haier HPU-24C03 User Manual - Page 8
Reset
 |
View all Haier HPU-24C03 manuals
Add to My Manuals
Save this manual to your list of manuals |
Page 8 highlights
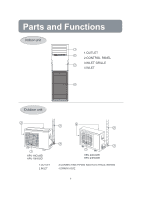
Parts and Functions 16 19 14 15 BA 19 26 9. ON/OFF button Used for unit start and stop. 10. TIMER ON display 11. FAN SPEED display Remote controller LOW MED HI Control panel: See p17 12. LOCK display 13. SWING UP/DOWN display 14. SLEEP display 15. HEALTH display 16. Operation mode display Operation mode AUTO COOL DRY AUTO FAN Remote controller Display board 1. RESET When the remote controller appears abnormal, use a sharp pointed article to press this button to reset the remote controller normal. 2. LIGHT button Control the lightening and extinguishing of the indoor LED display board. 3. TIMER button Used to select TIMER ON, TIMER OFF, TIMER ON-OFF. 4. CLOCK button Used to set correct time. 5. HEALTH button Used to set healthy operation. 6. MODE button 17.Singal sending display 18. Left/right air flow display 19. TEMP display Remote controller: to display the TEMP. setting. 20. TIMER OFF display 21. TIMER display 22. TEMP button Used to select your desired temperature. 23. FAN button Used to select fan speed: LOW,MED, HI, AUTO. 24. S. LEEP button Used to select sleep mode. 25. SET button Used to confirm timer and clock settings. 26. LOCK Used to lock buttons and LED display. If pressed, the other buttons will be disabled and the lock condition display appears. Press it once again, lock will be canceled and lock condition display disappears. AUTO COOL DRY FAN 7. HOUR button Used to set clock and timer setting. 8. SWING UP/DOWN button Used to select up or down air sending direction. NOTE:(1) The following functions and related displays are not available: 5 (2) Cooling only unit do not have functions and displays related with heating. 7
-
 1
1 -
2
-
 3
3 -
 4
4 -
 5
5 -
 6
6 -
 7
7 -
 8
8 -
 9
9 -
 10
10 -
 11
11 -
 12
12 -
 13
13 -
14
-
15
-
16
-
17
-
18
-
19
-
20
-
21
-
22
-
23
-
24
-
25
-
26
-
27
-
28
 |
 |
