Haier HSU-12RK03 User Manual - Page 1
Haier HSU-12RK03 Manual
 |
View all Haier HSU-12RK03 manuals
Add to My Manuals
Save this manual to your list of manuals |
Page 1 highlights
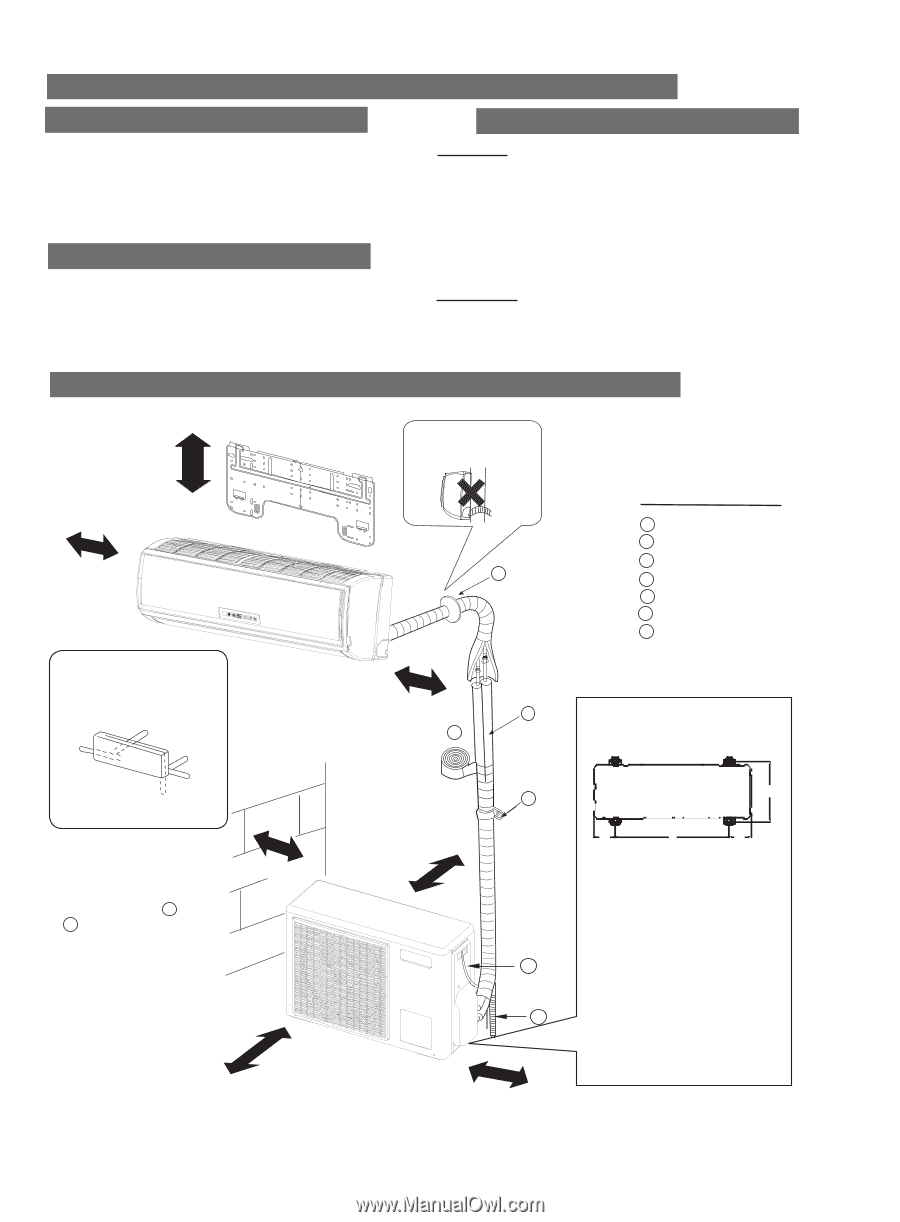
Installation Manual of Room Air Conditioner Preparation Necessary Tools for Installation Selection of Installation Place ● Driver ● Nipper ● Hacksaw ● Hole core drill ● Spanner(17,19 and 26mm) ● Gas leakage detector or soap-and-water solution ● Torque wrench (17mm,22mm,26mm) ● Pipe cutter ● Flaring tool ● Knife ● Measuring tape ● Reamer Power Source ● Before inserting power plug into receptacle, check the voltage without fail. The power source is the same as the corresponding name plate. ● Install an exclusive branch circuit of the power. ● A receptacle shall be set up in a distance where the power cable can be reached.Do not extend the cable by cutting it. Indoor Unit ● Place, robust not causing vibration, where the body can be supported sufficiently. ● Place, not affected by heat or steam generated in the vicinity, where inlet and outlet of the unit are not disturbed. ● Place, possible to drain easily, where piping can be connected with the outdoor unit. ● Place, where cold air can be spread in a room entirely. ● Place, nearby a power receptacle, with enough space around. (Refer to drawings). ● Place where the distance of more than lm from televisions, radios, wireless apparatuses and fluorescent lamps can be left. ● In the case of fixing the remote controller on a wall, place where the indoor unit can receive signals when the fluorescent lamps in the room are lightened. Outdoor Unit ● Place, which is less affected by rain or direct sunlight and is sufficiently ventilated. ● Place, possible to bear the unit, where vibration and noise are not increased. ● Place, where discharged wind and noise do not cause a nuisance to the neighbors. ● Place, where a distance marked is available as illustrated in the above figure. Drawing for the installation of indoor and outdoor units The models adopt HFC free refrigerant R410A more than 5cm Attention must be paid to the rising up of drain hose more than 10cm Optional parts for piping A Non-adhesive tape B Adhesive tape C Saddle (L.S) with screws G D Connecting electric cable for indoor and outdoor E Drain hose F Heating insulating material G Piping hole cover Arrangement of piping directions Rear left Left Rear right more than 10cm F Floor fixing dimensions of the A outdoor unit (Unit:mm) 317 Right Below more than 10cm ● The marks from A to G in the figure are the parts numbers. ● The distance between the indoor unit and the floor should be more than 2m. more than 60cm more than 10cm C 106.5 566 106.5 Fixing of outdoor unit ● Fix the unit to concrete or block with bolts (10mm) and nuts firmly and horizontally. ● When fitting the unit to wall surface, roof or rooftop, fix D a supporter surely with nails or wires in consideration of earthquake and strong wind. ● If vibration may affect the E house, fix the unit by attaching a vibration-proof mat. more than15cm Please be subject to the actual product purchased , the above picture is just for your reference. Read this manual before installation Explain sufficiently the operating means to the user according to this manual. NO.0010519573
-
 1
1 -
 2
2 -
 3
3 -
 4
4
 |
 |