Haier LE40T3 User Manual - Page 21
Haier LE40T3 Manual
 |
View all Haier LE40T3 manuals
Add to My Manuals
Save this manual to your list of manuals |
Page 21 highlights
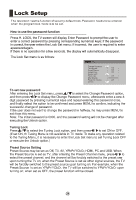
How to use the password function Press H. LOCK, the TV screen will display Enter Password to prompt the user to enter a correct password by pressing corresponding numerical keys; if the password is correct, the user enters the Lock Set menu; if incorrect, the user is required to enter apasswordagain. If there is no operation for a few seconds, the display will automatically disappear. The Lock Set menu is as follows: menu To set new password After entering the Lock Set menu, press / to select the Change Password option, and then press / to display the Change Password menu, afterwards enter a new 4digit password by pressing numerical keys and repeat entering this password once, and finally select the option to be confirmed and press MENU to confirm, indicating the successful change of password. If the user does not want to change the password in halfway, he may press MENU to exit from this menu. Note: The initial password is 0000, and the password setting will not be changed after executing the Unlock option. Tuning Lock Press / to select the Tuning Lock option, and then press / to set ON or OFF. (If set ON, th Tuning Menu is not available in TV mode. T make any operation related o to the Tuning Menu, it is necessary to enter the Lock Set menu to set Tuning Lock OFF or execute the Unlock option.) Preset Source Setting Preset Source may be set as Off, TV, AV, YPbPr/YCbCr, HDMI, PC and USB. When the Preset Source is set as TV, after entering the Preset Channel menu, press / to select the preset channel, and the channel will be forcibly switched to the preset one upon turning the TV on; when the Preset Source is set as other signal sources, the TV will be forcibly switched to the preset source upon turning on. For example, when the Preset Source is set as YPbPr/YCbCr, the TV will be switched to YPbPr/YCbCr upon turning on; when set as OFF, the preset function will be closed.
-
 1
1 -
2
-
3
-
4
-
5
-
6
-
7
-
8
-
9
-
10
-
11
-
12
-
13
-
14
-
15
-
 16
16 -
 17
17 -
 18
18 -
 19
19 -
 20
20 -
 21
21 -
 22
22 -
 23
23 -
 24
24 -
 25
25 -
 26
26 -
27
-
28
-
29
-
30
-
31
-
32
 |
 |